Make sense of the news and how it affects the blockchain space as a whole. Crypto trends is a collection of relevant news and insights to help you make an informed decision.
Avail ($AVAIL) is a new technology that allows developers to create their own blockchains with more speed, security, and flexibility. Avail will be launching their mainnet very soon, which means their Goldberg Incentivized Testnet will be ending soon, so do not miss out! Here’s our Avail ($AVAIL) token airdrop guide.
Check out our step by step guide:
https://youtube.com/live/Lo3_zJHuFvk
Avial incentivized testnet airdrop guide
What is Avail ($AVAIL)?
Here is a summary of what Avail is and their main features based on the information on this page:
Avail: A fast and secure data and consensus layer that provides a foundation for building next-generation, trust-minimized applications.
Modularity: Avail supports any blockchain execution environment, allowing developers to customize, scale, and adapt their blockchains to any modular stack.
Sovereignty: Avail enables chains to become sovereign, meaning they have full control over their state and logic, and can update them without redeploying a smart contract.
Shared Security: Avail inherits the security of its base layer validator set, which uses cutting-edge math to ensure data availability and correctness.
Will there be an Avail ($AVAIL) token airdrop?
The Avail Goldberg Incentivized Testnet (also known as the Clash of Nodes) campaign has been live since November 2023. Avail will be launching its mainnet sometime this quarter. So it is likely Avail will do an airdrop soon!
How to get the Avail ($AVAIL) token airdrop?
Here’s how to get the Avail ($AVAIL) token airdrop
Connect to the Avail Goldberg testnet
Connect to https://goldberg.avail.tools/#/accounts using your Polkadot wallet such as SubWallet. If you do not have a Polkadot wallet, the page will give you a public address and a mnemonic seed phrase to create one right on the page!
Access testnet faucet
Join the Avail Discord and head to the #faucet-access channel. Note you will need a Gitcoin Passport with over 20 points. Then, go to https://passport-verifier.avail.tools/, connect your Discord and submit your Gitcoin Passport. Then click “Give role”.
Return to Goldberg and copy the address of the account that you created. Return to Discord, go to #goldberg-faucet and type “/deposit”. Then paste your address and you will get 5 $AVAIL for doing this. You can use the faucet every 3 hours and we suggest to return to get more testnet $AVAIL testnet tokens often because you will need a lot of them to complete tasks.
Set up on-chain identity
Go to the Goldberg testnet website and click on the ‘Set On-Chain Identity’ option. Enter your information, such as email, Twitter, Discord, etc. Note that this action requires 10 $AVAIL tokens.
Stake $AVAIL tokens
To stake your AVAIL tokens on the network, go to the ‘Network’ section on the Goldberg testnet website, select ‘Staking’, and join a pool with fewer than 100 participants.
Stake at least 10 AVAIL tokens in the pool. Remember you can claim more testnet tokens from the faucet every 3 hours to have enough for staking.
Complete Avail’s Light Client Lift-Off challenge and claim the participation NFT
To complete Avail’s Light Client Lift-Off challenge, connect your wallet to https://lightclient.availproject.org/ and complete the social tasks. Afterwards, mint the participation NFT.
Venom Foundation have launched a $1 billion fund to invest in Web3 and blokchain firms. And is launching a layer-0 blockchain that will function as the main infrastructure for a global ecosystem of Web3 applications. According to their whitepaper, 22% of the initial token supply will be allocated to the community. This is very likely to be an airdrop to early users. Venom has launched their mainnet on 18th March 2024 and their $VENOM token will be listed on 25th March 2024! Here is our Venom token airdrop guide.
Check out our video on the latest news and predictions for the upcoming potential Venom token airdrop!
https://www.youtube.com/watch?v=fl_Sz53_038
What is happening to Venom?
On 16th December 2023, Venom Foundation announced on Twitter as of 14th December 2023, they will no longer continue operating in ADGM (Abu Dhabi Global Market). Therefore, Venom Foundation will begin the dissolution process. They have however, mentioned that they are open to exploring future opportunities within ADGM. However, it does mean that it is unlikely there will be a Venom airdrop in the foreseeable future.
Step-by-Step Venom Testnet Guide
What is Venom Foundation?
Venom Foundation is a new layer-0 blockchain that envisions a global economy built on decentralized, blockchain-based, financial systems. They are a new player in the financial application-specific blockchain (appchain) space, offering real-world assets (RWA) with the transparency of a blockchain. They are fully regulated by financial authorities in Abu Dhabi.
The architecture of Venom Foundation is essentially a modular blockchain that is built on its own Threaded Virtual Machine (TVM). This allows for the efficient execution of smart contracts through an asynchronous communication model as well as dynamic sharding.
In theory, the Venom blockchain can handle interactions between accounts more effectively than EVM-based networks, allowing for greater parallelism and reduced delays. As the network experiences heavy loads, validators divide into parallel groups and handle transactions through “split events.” As such, their mission is to be the infrastructure for the next generation of digital services and products.
Does Venom Foundation have a Token?
$VENOM, the native currency of the Venom blockchain, serves multiple purposes. It is used to pay transaction fees, which helps maintain the network and compensate validators. Additionally, it secures the network through a proof-of-stake mechanism and allows network participants to support validators via DePools staking.
According to their whitepaper, the $VENOM token has no fixed maximum supply. It has an inflationary model, with a projected annual inflation rate of 1%. However, the Venom Foundation is exploring ways to transition to a deflationary model. It is worth noting that 22.0% of the tokens will be allocated towards the community, and 10% will be unlocked at TGE.
Venom have confirmed their $VENOM token will be listed on 25th March 2024 on Bybit, OKX, MEXC, gate.io, Poloniex and Web3.world.
The best way to get the $VENOM airdrop is to interact with the Venom Network Testnet. Here’s a step-by-step guide:
Create a Venom Wallet
Go to the Venom Network Testnet, and install a Venom Wallet (Chrome users can download here). Pin the wallet to your Google Chrome Extension at the top right.
Connect your Twitter account to your Venom wallet to claim 50 testnet $VENOM tokens.
Claim Testnet $VENOM Tokens
Go to the Task page and log in with your Venom Wallet. Connect your wallet, Twitter account and follow Venom Foundation to claim 50 testnet $VENOM.
You can also claim additional testnet tokens by completing other tasks on the Faucet page. You will be required to complete various tasks to claim additional testnet Venom.
Complete Venom Foundation tasks
On the task page, follow Venom Foundation on Telegram and subscribe to their YouTube Channel. Once that’s done, you can claim your NFT by clicking “Mint NFT”.
Complete Venom Wallet tasks
Go to the task page. Send at least 1 VENOM token to 0:077873f1453fa67b0f1ce77f1e806675acd19c4694b9738be61fd406618f2f7a. Then, click “Mint NFT”.
Complete Web3.World tasks
On the task page, join the Web3.World Telegram Channel and swap any token available on testnet.web3.world to any other tokens. Then mint the NFT.
Use Venom Bridge
Go to the task page. Join the Venom Bridge Telegram channel. Then, transfer tokens from Venom to EVM chains. First, go to https://testnet.venombridge.com/bridge and connect your Venom and EVM (e.g. Metamask) wallets. In the “From” and “To” fields, select “Venom Testnet” and “Binance Smart Chain” respectively. Select the amount of Venom tokens you want to transfer and turn off the “Swap TVENOM to pay BSC gas” option. Click “Continue”, then approve the transaction. Then, go to the “History” tab, click “Only My” and find that transaction. Click on the transaction and “confirm” to release transfer in Binance Smart Chain. Afterwards, do the transaction in reverse, i.e. swap from Binance Smart Chan to Venom Testnet.
Claim Snipa Finance NFT
Go to the task page and complete the tasks to claim your free Snipa Finance NFT! Full guide here.
Stake Venom
Go to the task page. Connect your Venom wallet to https://testnet.venomstake.com/. Then choose the amount you wish to stake and click “Stake”. You can also unstake your Venom at any time by going to the “Unstake” tab, choosing the amount you wish to unstake and clicking “Unstake”. On the task page, click “check”, you may need to wait a few minutes after the task has been completed before the checking will be sucessful. Finally, mint the NFT.
Trade NFTs on Oasis Gallery
Find the instructions on the task page. Oasis Gallery is a NFT marketplace on Venom. Buy any NFT on Oasis Gallery here. Click on the NFT you wish to buy, connect your Venom wallet, click “Buy now” and confirm the transaction. Then go back onto the task page and click “Check”. Now, list your NFT for sale on Oasis Gallery by going to their website and going to the “My NFTs” tab. Click on your NFT and “Put for sale”. Choose your sale price and confirm the transaction. Return to the task page and click “Check” and finally, mint your NFT.
Complete VenomPad tasks
Go to the task page. Follow and Tweet about VenomPad. Click “Check” once each of the the tasks have been completed. Mint the NFT.
Buy NFT on Nümi
Go to the task page. Watch the video, tweet about Nümi and buy any NFT on Nümi.
If you made a Venom Wallet before June 2023, you should receive Nümi token airdrops. Click the refresh button at the bottom part of your wallet to see it. If you don’t have any Nümi tokens, you can swap them at Web3.World with VENOM tokens. Once you have some Nümi tokens, you can buy an NFT on the Nümi Marketplace after signing up for an account. Finally, mint the NFT.
Go to the task page. Follow Gravix on Twitter. Then, connect your Venom wallet to https://app.gravix.io/ and open a long/short position. However, you will need USDT to open a position. If you do not have any USDT in your Venom wallet, go to https://testnet.web3.world/swap and swap some $VENOM for $USDT first. Lastly, mint your NFT.
Go to the Venom Burn task page. Follow Venom Burn on Twitter. Then, go to https://testnet.venomburn.com/ and burn any amount of VENOM for any project. Mint your NFT.
Complete OneArt tasks
Go to the OneArt task page. Follow OneArt on Twitter. Then, download the OneArt mobile app here and import your Venom Wallet using your seed phrase. If you have at least 3 VENOM, a window will pop up asking you to Mint your NFT, click “Mint”. Once you have minted your OneArt Welcome NFT, go back to the task page and mint your other NFT.
Complete Valicit tasks
Go to the Valicit task page, follow Valicit on Twitter, buy a ticket and mint their NFT.
Wrap $VENOM tokens
Visit the Swap page. Choose VENOM and WVENOM tokens, and the amount. Then click “Wrap VENOM” and approve your transaction.
Provide liquidity
Go to “Liquidity Providing” and click “Add Liquidity”. Then, connect pool and approve the transaction, set the amount you wish to add and continue. Next, deposit your tokens and confirm the transaction in the wallet. Then, click “Supply tokens” and approve the transaction.
Deposit into farming pools
Go to the “Farming” tab, choose the USDT/WVENOM pool. Then, enter the amount you want to deposit and select the lock-up period. Click the deposit button and approve the transaction in your Venom Wallet when prompted.
Complete Everplay tasks
Go to the Everplay task page. Follow @everplaygg on Twitter. Then, buy a Venom Pass for 0.05 $VENOM (note this is testnet Venom and won’t require you to use real funds). Finally, mint your NFT.
Complete Chainspot tasks
Connect your wallet to the Chainspot task page. Follow @chainspotIO on Twitter. Then, connect your Metamask wallet to Chainspot (make sure you are connected to BSC Chain) and click “Claim” in order to Claim 10 $CST tokens. Transfer any amount of CST tokens from BSC Chain to Venom Testnet. Finally, mint your NFT.
Complete Segmint tasks
Go to the Segmint task page. Follow @segmintapp on Twitter. Next, mint any segment on segmint.app by finding an empty seat and clicking “Mint segment”. This will cost 0.49 testnet $VENOM. Finally, mint your NFT.
Post screenshot and wallet address on Venom Discord
Post a screenshot of your NFT achievements together with your wallet address on the Completed-tasks channel on Venom’s Discord.
Connect your wallet regularly to https://venom.network/tasks. Complete any new tasks, there will be more coming soon! Since the tasks are relatively easy to complete, we believe that users may have to collect all 24 NFTs in order to qualify for the Venom token airdrop.
Where can I trade $VENOM tokens?
$VENOM tokens can be traded on Bybit, OKX, MEXC, gate.io, Poloniex and Web3.world.
You can mint Venom NFTs as rewards for using the Venom testnet and represent your engagement with the ecosystem. They could be the key to getting airdrop rewards in the future! Here’s a step-by-step guide:
Go to https://venom.network/tasks, and click “Complete tasks”. Follow Venom Network on Twitter and tweet about the Venom Testnet. Then click “Mint” to mint your Venom NFT.
You will then need to send any amount of Venom tokens to their address. Once you have done so, click “Check” and you can now mint your NFT.
Airdrop Review
When reviewing an airdrop, there are several factors to consider. First, the likelihood the project will even do an airdrop in the first place. Then, to look at how many tokens the project intends to allocate towards airdrop campaigns, as well as the difficulty in participating in their airdrop. It is also important to look at the utility of the token so that there will be an actual use and purpose in participating in the airdrop in the first place. Finally, a factor to consider when reviewing an airdrop is whether the airdropped tokens are subject to any lockup period.
Likelihood of Airdrop: Based on recent events, Venom Foundation is unlikely to do an airdrop.
Airdropped Token Allocation: 22% of the initial token supply will be allocated to the community. However, it is unlikely that Venom would do an airdrop.
Airdrop Difficulty: The Venom Testnet page is very UI-friendly. It shows you the tasks you can complete for each DApp!
Token Utility: $VENOM will be used to pay for transaction fees to maintain the network by validators, secure the network through proof-of-stake mechanisms, and support validators by network participants through DePools staking.
Token Lockup: Of the initial supply of 7.2 billion $VENOM, 15.5% will be available to use, while 84.5% will remained locked. The locked tokens include 10% of the initial supply as a stake of early validators. However, it is unlikely that Venom would do an airdrop.
Dymension ($DYM) comprises a network of swiftly deployable and high-speed modular blockchains known as RollApps. The projects have just finished their airdrop, and those who had just staked 1 Celestia ($TIA) tokens were able to get thousands of Dymension ($DYM) tokens! However, even if you did not manage to get the Dymension ($DYM) token airdrop, it is still worth getting some tokens so you can stake it. This is to position yourself for more airdrops in the future just like Celestia! Here is our Dymension ($DYM) token staking guide for MORE airdrops!
Check out our Dymension ($DYM) Token Staking Guide!
https://youtube.com/live/VXYrqBwUk1A
And check out our other video on other airdrop rewards offered to Dymension ($DYM) stakers HERE.
What is Dymension ($DYM)?
Dymension is a groundbreaking blockchain network characterized by its modular blockchains known as RollApps. These RollApps serve as the front-end, offering users a platform for diverse applications such as games, decentralized finance (DeFi), and NFTs. Central to its operation is the Dymension Hub, akin to a back-end server, which orchestrates network activities, manages requests from RollApps, and ensures cohesive functionality within the ecosystem. In its architecture, Dymension incorporates Data Availability Networks via Celestia, paralleling the role of databases in traditional web setups. These networks provide temporary data storage, enhancing efficiency and adaptability. Complementing this structure is the Dymension RollApp Development Kit (RDK), based on the Cosmos SDK. This kit facilitates the creation of RollApps, offering essential tools and pre-built modules for developers to efficiently build and deploy their applications, each with distinct client and server components. Dymension distinguishes itself through its innovative consensus mechanism and interoperability features. RollApps delegate the consensus process to the Dymension Hub, which maintains network integrity and manages state root updates. This delegation enables rapid transaction processing and high transaction throughput. Furthermore, the network’s design promotes smooth interoperability within the Cosmos ecosystem through the Inter-Blockchain Communication (IBC) protocol, fostering a connected and collaborative ecosystem.
How to stake Dymension ($DYM) tokens for more airdrops
Time needed: 15 minutes.
Here’s our guide on how to stake Dymension ($DYM) tokens for more airdrops.
Get Dymension ($DYM) tokens
Claim your Dymension ($DYM) tokens. If you missed the airdrop, you can still buy Dymension ($DYM) tokens on exchanges such as Bybit.
Connect your wallet (either MetaMask, Leap, Trust or Keplr wallets) to the Dymension portal at https://portal.dymension.xyz/dymension/staking. Also follow the steps to add the Dymension network to your wallet.
Choose a validator to delegate your Dymension ($DYM) tokens
Choose a validator to delegate your Dymension tokens to. Avoid picking validators associated with centralised exchanges, those will have the exchange in its name. We suggest delegating your Dymension ($DYM) tokens to the ValiDAO validator because they announced a ValiDAO ($VDO) token airdrop to all address who delegate their $DYM with their validator!
We also suggest delegating your Dymension ($DYM) tokens to the Enigma and Frens validators. Essentially, it is a good idea to delegate your Dymension ($DYM) tokens to validators with their own DAO because they are likely to make their own DAO token and airdrop it to you as a reward.
Delegate your Dymension ($DYM) tokens
Once you have chosen your validator, click “Stake”, select the amount of $DYM you wish to stake and click “Stake”. Note that staking will lock up your tokens for 21 days. To access your staked tokens again, you will need to go through the un-staking process.
Keep track of your validators
Keep track of any announcements from the validators you have delegated your $DYM with. Follow their Twitter, Discord and Telegram pages for any announcements regarding additional airdrops.
Check if you qualify for NIM Network airdrops
NIM Network have announced that all $DYM token stakers will be eligible to claim The Nim Genesis Drop, and can claim up to 50 million $NIM (i.e. 5% of the total supply). You can check if you qualified for the $NIM airdrop by going to https://claim.nim.network/ and entering your Dymension wallet address. If you do qualify, the $NIM tokens will automatically be airdropped to your Dymension wallet at TGE.
Stay up to date on the potential Aigisos ($AIG) airdrop
Aigisos ($AIG) is a RollApp focusing on security, and have been selected by Microsoft for Startups. The team have confirmed that 12% of the $AIG supply will be airdropped to $DYM token stakers as Genesis RollDrop. The $AIG tokens will be distributed during the mining of the Aigisos genesis block, which is expected to be in H1 of 2024. No further details have been released yet. So, follow Aigisos on Twitter to make sure you have the latest airdrop news.
Complete Rivals Network ($RIZ) Galxe tasks
Rivals Network ($RIZ) is an AI-driven Data Provenance DePIN RollApp built on Dymension and powered by Celestia. The team have already confirmed they will have a $RIZ token and are likely to do a token airdrop. This is because Rivals Network ($RIZ) has a Galxe page where you can complete various social tasks to mint an OAT.
Check eligibility for Dogmond ($DGM) airdrop
Dogmond ($DGM) is a memecoin similar to ChihuahuaChain ($HUAHUA). However, instead of being built on a blockchain, Dogmond will be built on a RollApp powered by Dymension. Dogmond have confirmed that 40% of their token supply will be allocated to $DYM stakers as a reward for their contribution towards network security and engagement. You can check your eligibility by pasting your wallet address HERE.
Frequently asked questions (FAQs)
Which Dymension Validator to pick for MORE AIRDROPS?
We suggest the ValiDAO validator because they announced a ValiDAO ($VDO) token airdrop to all address who delegate their $DYM with their validator.
How to find the best Dymension Validator to get more airdrops?
The best Dymension validators are those with their own DAO. This is because they are likely to make their own DAO token and airdrop it to you as a reward. We suggest you follow their social media channels closely to get the latest news on any airdrop announcements.
How many Dymension ($DYM) tokens do you need to stake for airdrops?
The amount of Dymension ($DYM) tokens to stake for airdrops depends on the validator. Each validator will have their own airdrop eligibility criteria.
Eigenlayer is a protocol built on Ethereum that helps people who own Ethereum to keep their money safe and earn more rewards. With EigenLayer, people can use their Ethereum to help many different services stay safe at the same time. EigenLayer have already taken the airdrop snapshot, announced the eligibility criteria and claim details. Here’s our guide explaining the eligibility criteria and how you can claim the EigenLayer token airdrop.
Eigenlayer Airdrop: Most Disappointing Airdrop SO FAR?!
EigenLayer is a protocol that introduces a new primitive in cryptoeconomic security called restaking. This primitive enables users to reuse their ETH on the consensus layer and extend cryptoeconomic security to additional applications on the network. Users who stake ETH natively or with a Liquid Staking Token (LST) can opt-in to EigenLayer smart contracts to restake their ETH or LST and earn additional rewards.
What is interesting about EigenLayer is that they have raised $50 million in Series A funding led by Blockchain Capital. Other notable investors include Finality Capital, Electric Capital, Polychain Capital, Hack VC and Coinbase Ventures. With Coinbase Ventures backing EigenLayer, there is strong speculation that their token will be listed on either Coinbase or Binance.
How to get a potential EigenLayer token airdrop if deposits are paused
To get the potential EigenLayer token airdrop, simply connect to https://app.eigenlayer.xyz/ and connect your wallet. Then, click into your preferred pool, enter the amount of tokens you wish to deposit and click “Deposit”.
However, Liquid Restaking deposits are currently paused on EigenLayer because it is full. They sometimes reopen, but when it does, it is only for a few hours at a time. So it is importantly to SUBSCRIBE to Boxmining+ because we will be the first to let you know when it does!
There is an alternative solution to getting the potential EigenLayer token airdrop if liquid restaking deposits are full. However, there is a risk of using Ether.fi as a backdoor to getting into the EigenLayer token airdrop. This is because EigenLayer has not officially supported this as an alternative to getting the EigenLayer token airdrop.
Here’s how to get a potential EigenLayer token airdrop if EigenLayer deposits are paused:
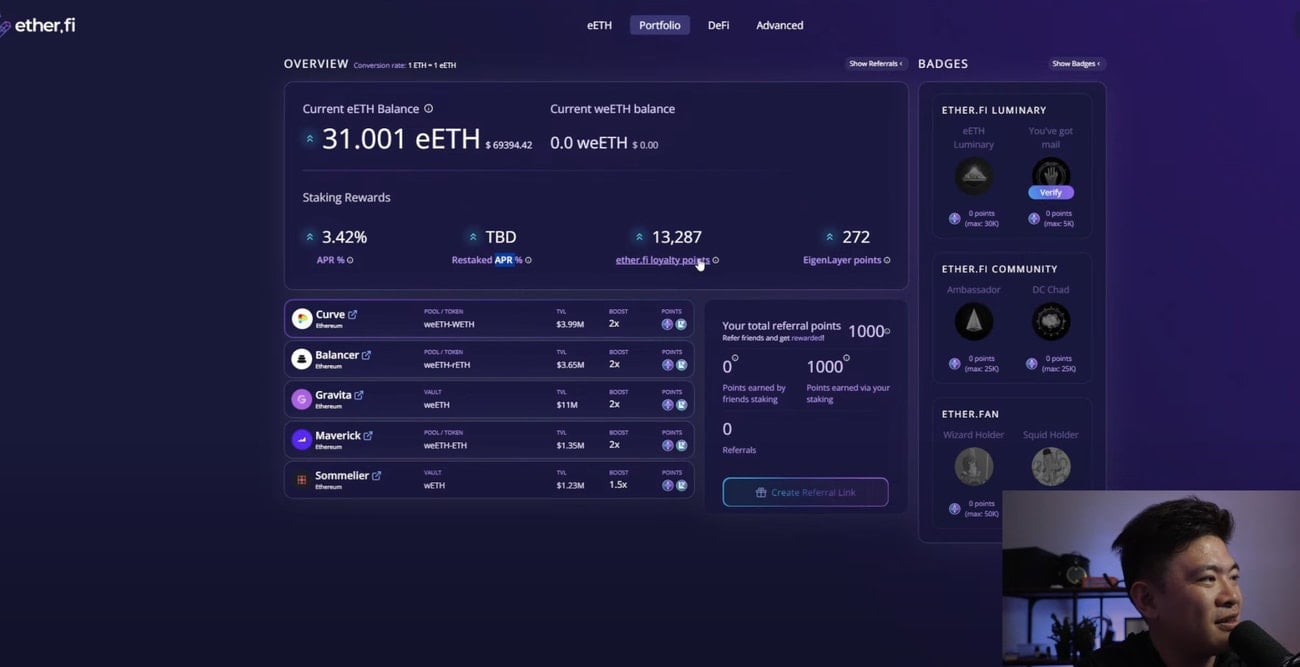
Stake ETH: Choose the amount of ETH you wish to deposit and click “Stake”. But make sure the transaction fees are not expensive when staking. This is because they could be more than what you may potentially get from this airdrop. You will get eETH when you stake ETH on Ether.fi.
Earn rewards: You will earn the following rewards for staking on Ether.fi: APR, restaked APR, ether.fi loyalty points and Eigenlayer points.
Withdraw staked ETH: Withdraw your eETH on the “Stake” tab. Note it takes around 7 to 14 days. Or if you don’t want to wait 7 to 14 days, you can immediately swap your eETH for an alternative cryptoasset using any DEX. However, you will need to pay exchange fees for this.
How to qualify for potential Eigenlayer airdrop: Cheapest method, no Ethereum
Time needed: 1 hour
Here’s how to get a potential EigenLayer token airdrop if EigenLayer deposits are paused:
Withdraw Ethereum to Manta
Withdraw Ethereum on your centralized exchange account (e.g. Binance) to MetaMask using the Manta network. This is because it is extremely cheap to do this. For instance, Binance charged us 0.0001 ETH (around US$0.35) for this transaction, versus 0.003 ETH (around $10.48) for doing the same transaction using the Ethereum network. Note we chose the Manta network so we can get extra rewards on the Manta Renew Paradigm campaign. However, you can also use other networks such as Arbitrum, Base and Optimism.
Learn more about the Manta Renew Paradigm and our step by step guide HERE.
Join Manta’s New Paradigm
You need an invite to join Manta’s Renew Paradigm. Use the invite code HERE.
Swap ETH for STONE
You will need STONE in order to stake on Manta. To get STONE tokens, connect your wallet to https://app.aperture.finance/swap?chainId=169 and swap your ETH to STONE. Note, do not swap all your ETH as you will need some ETH to pay for upcoming transaction costs.
Stake STONE on protocols
On the staking dashboard, select your validator and stake your ETH. Make sure that you select a validator that offers Eigen Layer Points. For example Shoebill, LayerBank and ZeroLend offer LayerBank/ Shoebill/ ZeroLend rewards, Manta rewards, Stone Stake ETH rewards and Eigen Layer Points. You can choose to stake all your ETH on one or split your ETH between several protocols. We chose which protocol to supply and stake our STONE depending on the Supply APY offered. You can check the Supply APY on the protocol’s page. As at the time of writing, Shoebill offers 4.53% and ZeroLend offers 0.012% Supply APY. Whilst LayerBank offers 3.46% Supply APR.
See steps 5-6 for supplying and staking STONE on Shoebill. See steps 7-8 for supplying and staking STONE on ZeroLend. See steps 9-10 for supplying and staking STONE on LayerBank.
Note that token unstaking on Manta New Paradigm will only be enabled in May 2024.
Supply STONE on Shoebill
Connect your wallet to https://manta-stone.shoebill.finance/#/ and click on the “STONE” market. Uder the “Supply” tab, choose the amount of STONE you wish to supply and confirm the transaction. This will give you sbSTONE.
Stake sbSTONE on Manta
Go to the Manta Renew Paradigm staking dashboard and click on the down arrow under Shoebill. Stake your sbSTONE to get Shoebill rewards, Manta rewards, Stone Stake ETH rewards and Eigen Layer Points. Note that token unstaking on Manta New Paradigm will only be enabled in May 2024.
Supply STONE on ZeroLend
Connect your wallet to https://app.zerolend.xyz/. Click the down arrow to change to the Manta market. Click on “StakeStone Ether”. Choose the amount of STONE you wish to supply and click “Approve STONE to continue”. This will give you z0STONE.
Stake z0STONE on Manta
Go to the Manta Renew Paradigm staking dashboard and click on the down arrow under ZeroLend. Stake your z0STONE to get Zerolend rewards, Manta rewards, Stone Stake ETH rewards and Eigen Layer Points. Note that token unstaking on Manta New Paradigm will only be enabled in May 2024.
Supply STONE on LayerBank
Connect your wallet to https://manta.layerbank.finance/bank. Click “STONE” under Markets. Choose the amount of STONE you wish to supply and click “Supply”. This will give you lSTONE.
Stake lSTONE on Manta
Go to the Manta Renew Paradigm staking dashboard and click on the down arrow under LayerBank. Stake your lSTONE to get LayerBank rewards, Manta rewards, Stone Stake ETH rewards and Eigen Layer Points.
AltLayer airdrop for EigenLayer restakers and ecosystem partners: How to claim?
AltLayerannounced details of their Airdrop Season 1. A total of 300 million $ALT tokens (i.e. 3% of the total supply) will be airdropped. They have taken a snapshot at 12:00:11 on 17th January 2024 (UTC), and the AltLayer airdrop will be available to claim from 25th January to 25th February 2024. Of the $ALT tokens to be airdropped, 13.05% (i.e. 39.15 million) $ALT will be airdropped to EigenLayer Restakers. And 4.49% (i.e. 13.47 million) $ALT will be distributed to EigenLayer Ecosystem Partners.
For EigenLayer Restakers, you must have at least 720 Restaked Points to be eligible for the AltLayer airdrop.
AltLayer $ALT token claims are now open and can be claimedHERE. To claim your airdrop, enter your Ethereum address and click “Check”.
EigenLayer airdrop eligibility criteria
The EigenLayer token airdrop snapshot was taken at Block #19437000, on 15th March 2024, at 01:11:35 UTC.
EigenLayer has announced there are 2 airdrop seasons. In particular, Season 1 will be split into 2 phases. In Phase 1, 90% of Season 1 tokens will go to those who staked directly in EigenLayer or via Liquid Restaking Tokens (LRTs). For Phase 2, the remaining 10% of Season 1 tokens may go to those who engaged with EigenLayer in more intricate ways, where identifying the appropriate EigenLayer end user was either impossible or necessitated a subjective judgment.
EigenLayer have confirmed there will be they will give an additional 100 $EIGEN to all users who have interacted with EigenLayer before 29th April 2024 and passed the Sybil filtering. Therefore, Season 1 airdrop participants will receive a minimum of 110 $EIGEN (i.e. a floor amount of 10 $EIGEN plus the additional 100 $EIGEN). Meanwhile, Season 2 participants who started staking between 15th March and 29th April 2024 will also receive a minimum of 100 $EIGEN.
How to claim your EigenLayer airdrop?
To check your eligibility for the EigenLayer token airdrop, click HERE and enter your EVM wallet address. You can then claim your EigenLayer token airdrop on 10th May 2024. HOWEVER, airdropped $EIGEN will be unlockable (i.e. non-transferrable) until new features are live and further decentralization is achieved. This is targeted to be on 30th September 2024.
EigenLayer airdrop review
When reviewing an airdrop, there are several factors to consider. First, the likelihood the project will even do an airdrop in the first place. Then, to look at how many tokens the project intends to allocate towards airdrop campaigns, as well as the difficulty in participating in their airdrop. It is also important to look at the utility of the token so that there will be an actual use and purpose in participating in the airdrop in the first place. Finally, a factor to consider when reviewing an airdrop is whether the airdropped tokens are subject to any lockup period.
Likelihood of airdrop: The EigenLayer airdrop is now live. Participants are already doing tasks and getting points!
Airdropped token allocation: The EigenLayer airdrop allocation is unknown.
Airdrop difficulty: The EigenLayer airdrop requires users to deposit ETH onto their platform. But deposits are currently closed. We have an alternative which is to deposit on Ether.fi instead, but EigenLayer have not confirmed this is an official method to getting their token airdrops.
Token utility: The EigenLayer token utility is unknown.
Token lockup: There is no information on the EigenLayer token lockup yet.
DOT is $DED is a memecoin on Polkadot ($DOT) and is very popular amongst the Polkadot community. The team have confirmed that 100% of the token supply will be airdropped starting on 23rd March 2024! Here’s our DOT is $DED token airdrop guide.
DOT is $DED is a memecoin in the Polkadot ecosystem. According to the team, the goal of the project is to drive growth in the Polkadot ecosystem through onboarding new users, bringing in new liquidity and attracting new attention from the crypto community.
DOT is $DED is created by a team of Polkadot natives and $DOT token holders.
How to get the DOT is $DED token airdrop
Time needed: 1 hour
Here’s how to get the DOT is $DED token airdrop.
Get a Polkadot wallet
To get the airdrop, you will need a Polkadot wallet such as Subwallet, Talisman, Enkrypt or Polkadot.js. We use Subwallet which is a Chrome extension that can be downloaded here.
Subwallet is also a good choice because we can use it to stake Manta tokens for ecosystem airdrops. Check out our Manta token staking guide here.
Fund your wallet with Polkadot ($DOT) tokens
DOT is $DED will airdrop $DED tokens to any Polkadot $DOT token holders, including $DOT held on centralized exchanges. HOWEVER, the team have warned that it does not mean that the centralized exchanges would give $DED to their users.
Therefore, you should move your Polkadot into your SubWallet to get the airdrop or buy Polkadot ($DOT) tokens from centralized exchanges such as Bybit, Binance or KuCoin exchange.
Staking $DOT tokens on Polkadot means you will be nominating a validator. However, there are requirements for becoming a nominator on Polkadot. To become a nominator on Polkadot, you will need 250 $DOT to run a nomination pool and maintain a 100% uptime.
Join a nomination pool
Alternatively, you can join a nomination pool with only 1 $DOT! To join a nomination pool, connect your wallet to https://staking.polkadot.network/?utm_source=polkadot.network#/pools, go to “All Pools” and choose a nomination pool to stake your Polkadot. However, you can only bond your $DOT tokens to one pool at a time, and it will take 28 days to unbond your tokens from the pool.
To decide which Polkadot pool to stake your $DOT, we looked at https://polkadot.subscan.io/nomination_pool. In particular, we look at the “Reward Pool” and “Members” columns. We would look for pools that have higher Reward Pool but fewer Members. However, avoid the pools with “Destroying” or “Destroyed” as its status.
Stake $DOT on Bifrost
Go to https://bifrost.app/vstaking/vDOT and stake your $DOT to earn $vDOT. Bifrost is doing a campaign right now to further incentivize $vDOT holders until 10th March 2024! Note you will need to cross in (bridge) your $DOT to the Bifrost Polkadot network.
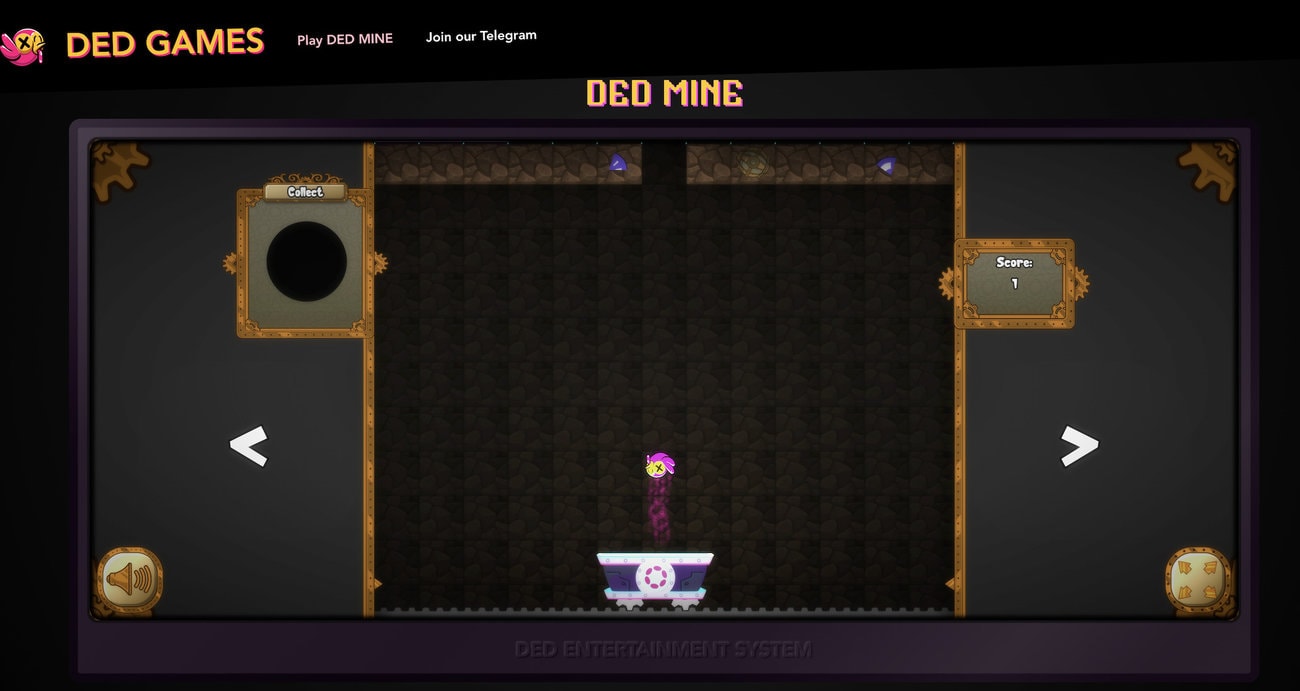
To mint the Deadmine NFT badge, go to https://ded.games/play/dedmine and play the Deadmine game. The goal of the game is to collect all 45 badges. No gas fees are required for this, and you may get a reward if you are able to collect all the badges.
Complete Zealy quests
Go to the DOT is DED Zealy questpage and complete the tasks. Tasks include reading articles, completing social tasks and creating content. They have a reward pool of 400 $DOT up for grabs!
Claim Zealy quest rewards
The first Zealy sprint has just concluded and the DOT is DED team have announced that rewards will be distributed in the next 7 days i.e. 12th March 2024. The team have also hinted that a new Zealy quest sprint will be coming soon.
Dot is $DED snapshot taken!
Dot is $DED has taken its snapshot at block height of 19,952,000.
Dot is $DED airdrop started! Eligibility and distribution details
On 23rd March 2024, Dot is $DED have confirmed that their airdrop has started! Those who are eligible with get 36 $DED for every DOT held at the time of the snapshot. $DED tokens will automatically be distributed to users, but will initially be frozen until exchange listings are confirmed. Users however can follow the token distribution and airdrop as it occurs live HERE.
Check out our video with the latest news on the DOT is $DED airdrop distribution HERE!
Dot is $DED trading?
Airdropped $DED can be traded on HydraDX on its Isolated Pool. All $DED tokens will be thawed after 29th March 2024.
Frequently Asked Questions (FAQs)
Has the DOT is DED airdrop snapshot been taken yet?
The DOT is DED airdrop snapshot has been taken at a block height of 19,952,000.
Am I eligible for the DOT is DED airdrop?
All DOT that is natively on Polkadot qualifies for the DOT is DED airdrop. However, if your DOT is stored on a centralized exchange, there is a possibility that the exchange will claim and keep your airdrop. So move your DOT off centralized exchanges!
Will I still be eligible for the DOT is DED airdrop if my DOT is stored on a Ledger or Trezor hardware wallet?
Yes, you will still be eligible for the DOT is DED airdrop, BUT you will not be able to transfer or swap the $DED tokens with a Ledger account until the new app is released.
Is it too late to buy $DOT?
Many see $DOT as having huge potential with the upcoming release of Polkadot 2.0. This will allow a lot of smaller projects to join the Polkadot ecosystem because the barrier to entry is much lower if they want to auction for a slot on Polkadot. The recent Polkadot event held in Hong Kong also attracted a lot of participants.
Will there be more Polkadot airdrops in the future?
We spoke to many project founders that attended the Polkadot event, many of them said they would do a token airdrop!
Which is the best wallet for Polkadot?
We like to use Subwallet for Polkadot as it allows us to also stake Manta tokens for ecosystem airdrops. Check out our Manta token staking guide here!
Will I still be eligible for the DOT is DED airdrop if my DOT is staked on a Ledger?
Yes, you will still be eligible for the DOT is DED airdrop, BUT you will not be able to transfer or swap the $DED tokens with a Ledger account until the new app is released.
Will I still be eligible for the DOT is DED airdrop if my DOT is in liquid staking?
You will be eligible for the DOT is DED airdrop if your $DOT is staked on Bifrost Finance, Acacia Network, or StellaSwap.
Will I still be eligible for the DOT is DED airdrop if my DOT is held in a self-custody wallet?
You will be eligible for the DOT is DED airdrop if your $DOT is held in a self-custody wallet such as Nova Wallet (mobile wallet ONLY), Talisman (desktop wallet ONLY), Subwallet and Fearless wallets.
Will I still be eligible for the DOT is DED airdrop if my DOT is locked in a crowdloan?
Yes! Your $DOT will still be eligible for the DOT is DED airdrop even if it is locked in a crowdloan. The team confirmed they are able to extra the amount of $DOT you have locked in crowdloan(s) and airdrop your $DED tokens to the wallet you lent your $DOT from.
Will I still be eligible for the DOT is DED airdrop if I am liquidity providing my DOT?
You will still be eligible for the DOT is DED airdrop if you are liquidity providing your DOT tokens. The $DED tokens will be airdropped to the parachain or dApp’s treasury. The protocol then has the responsibility to forward the $DED tokens to you.
When is the $DED airdrop?
The $DED airdrop started on 23rd March 2024 and is ongoing.
How many $DED tokens will I receive in the airdrop?
Those who are eligible will receive 36 $DED for every DOT held at the time of the snapshot.
Why haven’t I received my $DED airdrop yet?
The $DED airdrop distribution is ongoing, so some users may not have received their airdrop yet. You can follow the distribution in real time HERE.
Where can I trade my $DED?
Airdropped $DED can be traded on HydraDX.
Are my $DED tokens thawed?
All $DED tokens were thawed between 28th to 29th March 2024.
io.net ($IO) is a decentralized computing network that allows AI engineers to access scalable distributed computing power. Massive Web3 investors are backing this huge Decentralized Physical Infrastructure Network (DePIN) project. And they have officially announced the launch of its $IO token on 28th April 2024. This may be accompanied by an airdrop for participants in both the network and Galxe. Here is our io.net ($IO) token airdrop guide.
io.net, an enterprise-grade decentralized computing network, aggregates underutilized GPUs into a Decentralized Physical Infrastructure Network (DePIN) for AI/ML workloads. Its primary goal is to offer accessible compute resources at a reduced cost. Here are some main features of io.net.
Decentralized Computing: io.net is building an enterprise-grade decentralized computing network to provide machine learning engineers with distributed cloud clusters at a lower cost.
Mission and Vision: Their mission is to create the world’s largest AI compute network, with IO as the currency of compute, powering an ecosystem for accessible compute resources.
Challenges and Solutions: They address challenges like limited availability, poor choice, and high costs in traditional cloud services by aggregating underutilized GPUs into a Decentralized Physical Infrastructure Network (DePIN).
Core Functions: io.net supports batch inference, parallel training, hyperparameter tuning, and reinforcement learning, optimizing performance across a network of GPUs for AI/ML workloads.
io.net is backed by HackVC, Multicoin Capital, Sandbox, Delphi Digital and Aptos, among others.
How to get the io.net ($IO) token airdrop?
If you have limited GP resources, one simpler way of getting the potential io.net ($IO) token airdrop is to create a worker node and complete the Galxe tasks. However, we predict that you are likely to receive more airdropped io.net ($IO) tokens if you set up the worker node. Therefore, here’s our guide on how to obtain the io.net ($IO) token airdrop, specifically focusing on setting up the worker node for MacOS.
Complete Galxe tasks
Go to io.net’s Galxe page and complete the tasks. These tasks not only involve following their social media pages but also getting Discord roles, as well as participating in their AMAs, completing daily tasks, and actively engaging on Discord for a specified number of days. Please note that you have until 30th April 2024 to complete these tasks2.
Sign up on io.net
Go to. https://cloud.io.net/login and create an account. Then, on the homepage, hover over the “io/cloud” logo on the top left hand corner and click “Worker”.
Set up worker
Firstly, on the homepage, hover over the “io/cloud” logo at the top left-hand corner and click “Worker”. Afterwards, click “Connect New Worker” at the top of the screen. Then, proceed by selecting your Operating System (for instance, Mac OS), Supplier, and finally, give your device a unique name and choose the device type.
Download and set up Docker Desktop
Download Docker Desktop for MAC OS HERE. Afterwards, choose the recommended settings when prompted.
Download and launch binary
On the Docker, click on “Containers” on the left hand side. Then, press the Command and Space keys on your keyboard to open the Terminal on your Mac. Paste each of the 3 commands on the webpage in step 3 above onto the Terminal and click “enter” after each one.
Wait for setup
After copying and pasting the commands onto Terminal in step 5 above you will need to wait for the setup to complete. Click “refresh” periodically whilst you are waiting. It could take up for 48 hours for the set up to be completed.
Check that your setup is complete.
To check that your setup is complete, type “docker ps” into your Terminal. If setup is completed the “CPU(%)” column will show a number. This number represents your CPU power.
The snapshot for Season 1 of the airdrop was taken on 25th April 2024.
Frequently Asked Questions (FAQs)
What are the recommended specifications for setting up a Worker Node
Here are the recommended specifications for setting up a Worker Node: Windows OS, Computer GPU (Graphics Card)- RTX 3050 or higher.
Why does the status not say “Running”/ Why don’t I have the green icon?
If your status does not say “Running” or the green icon is not showing up, go to the “Control Panel” and then “Programs”. Then turn the Windows features on or off (as the case may be). Afterwards, go to “Enable” and you will see several files, tick the following: (1) Windows Subsystem for Linux; (2) Virtual Machine Platform; and (3) Windows Hypervisor Platform. This is so that your computer can talk to io.net.
Is KYC required for participating in the potential io.net airdrop?
No, you do not need to complete KYC for participating in the potential io.net airdrop.
What to do if you are still not connected to io.net or set up is not complete
The process may take up to 48 hours. If set up does not work, you may need to clear the cache, delete all containers and images, and set it up again. To stop and remove containers, type “sudo docker stop $(sudo docker ps -a -q); sudo docker rm $(sudo docker ps -q)” into Terminal. Then, follow the steps in this io.net ($IO) token airdrop guide to repeat the setup process again.
Note we’ve heard of people repeating this process about 8 times before they were finally connected to io.net.
How to clear the cache, delete all containers and images on io.net using a MAC device.
To clear the cache, delete all containers and images on io.net using MAC, type in “sudo docker stop $(sudo docker ps -a -q); sudo docker rm $(sudo docker ps -q)” on Terminal.
Injective ($INJ) is a blockchain platform that aims to create a decentralized, scalable, and interoperable financial system using the fastest blockchain and Web3 modules. Injective has been going through a huge surge of attention recently and more protocols are building on Injective. And many of these protocols are doing token airdrops to reward its users. And there is Here is our ultimate guide to the best Injective $INJ ecosystem token airdrops.
Check out our guide on how to earn insane passive income by doing token airdrops on the Injective ecosystem!
Injective is a blockchain platform that aims to create a decentralized, scalable, and interoperable financial system using the fastest blockchain and Web3 modules. Injective’s ecosystem is reshaping a broken financial system with dApps that are highly interoperable, scalable, and truly decentralized, and aims to create a financial system that is truly free and inclusive through decentralization.
Here are the best Injective ($INJ) ecosystem projects that are doing token airdrops.
Black Panther Finance ($BLACK)
Black Panther Finance is a protocol on Injective that helps users earn more from their digital assets by using smart vaults that trade for them with one click. The team have confirmed they will do an airdrop by distributing POINT tokens on the Injective mainnet. These POINT tokens will then be used to unlock rewards when their $BLACK token is launched.
Get the Black Panther Finance airdrop by delegating your $INJ tokens to the Black Panther Validator. To do this, go to the Injective Hub and connect your wallet. Locate the validator named “Black Panther | Delegate for Claimdrop”. Click on “Delegate Now” and then “Continue to Delegate”. Finally, enter around 3 INJ as the amount to stake and confirm the transaction. Note however that it does take 21 days to unstake your $INJ on Black Panther Finance.
Talis Protocol functions as an NFT marketplace for Injective NFTs. This platform allows users to buy or sell various digital collectibles.
There are 2 main strategies to potentially receive the Talis Protocol airdrop. First, stake $INJ on the Talis Protocol validator. This shows you’re actively supporting the network. Second, trade Injective NFTs on the platform. By actively using the platform, buying or selling NFTs, you demonstrate your involvement and could potentially be rewarded with an airdrop.
DojoSwap ($DOJO)
DojoSwap is a decentralized finance platform on Injective that allows users to provide liquidity, stake INJ tokens, and farm rewards. The $DOJO token is the native token of DojoSwap, which gives users governance power, rewards, staking opportunities, and fee reduction benefits.
To get the DojoSwap airdrop, users need to set up a web3 wallet, buy INJ tokens, transfer them to the wallet, connect it to DojoSwap, stake INJ tokens, and farm rewards by staking the liquidity pool tokens on DojoSwap. This will generate $POINTs that can be redeemed for $DOJO tokens, as well as trading fees from the liquidity pool pair.
Hydro Protocol ($HDRO) is the first and only native liquid staking protocol on the Injective Network. The $HDRO token airdrop has three phases, and the last one is currently live until 31st January 2024. To get the airdrop, users need to stake their testnet $INJ tokens with Hydro Protocol and receive hINJ tokens, which can be used across other DeFi protocols and earn staking rewards. Users also need to participate in various features of the platform, such as yield farming, auto-compounding, liquidity pools, governance, and swapping. The airdrop amount will depend on the timing and amount of staking.
How to get a potential Injective ($INJ) ecosystem token airdrop
There are 3 main ways to get a potential Injective ($INJ) ecosystem token airdrop: Staking on validators, mainnet interactions and testnet interactions. Of these 3 methods, staking on validators will form the bulk of the airdrop tasks.
Note you will need Injective $INJ tokens for staking on validators or for mainnet interactions. You can buy Injective $INJ tokens on centralized exchanges such as Bybit. Sign up for a Bybit account here!
Staking on validators
Time needed: 44 minutes
Here’s how stake on validators on the Injective Ecosystem
Set up Chrome profiles
Open Google Chrome and click on your profile picture icon on the top right of the window. Then, Click on the cog icon next to Other profiles. Click on the plus sign in the Add box and name this profile. Repeat the previous steps for each profile you want to create.
Install Keplr wallet onto Chrome profiles
Install Keplr into each of the 10 Chrome profiles by going to the Keplr Chrome extension page and clicking “Add to Chrome” to install the Keplr Browser Extension.
Create and manage a spreadsheet
To manage your Chrome profiles and ensure you don’t lose your funds, create a spreadsheet and back up your private keys for each wallet. Then, add the TIA, INJ, OSMO and ATOM token addresses from each wallet into the spreadsheet.
Deposit tokens into main Keplr wallet
Deposit $INJ tokens into your main Keplr wallet.
Distribute $INJ to each wallet
Distribute around 6 $INJ into each of these wallets.
Organise your Chrome profiles and Keplr dashboards
Open each of your Chrome profiles with the Keplr dashboard open on each window.
Stake $INJ on Black Panther Finance
Connect your wallet to the Injective Hub and find the “Black Panther | Delegate for Claimdrop” validator. Click “Delegate Now” and “Continue to Delegate”. Stake around 3 $INJ to the Black Panther validator. Repeat this step for each of your Chrome profiles.
Stake $INJ to Talis Protocol
Search for Talis Protocol on the Injective Hub. Click “Delegate Now” and stake around 2.95 $INJ to the Talis Protocol validator. Repeat this step for each of your Chrome profiles.
Mainnet interactions
Here’s how to do mainnet interactions to get a potential Injective ecosystem token airdrop:
Deposit on Black Panther valuts
Trade NFTs on Talis Protocol
Deposit on Helix markets
Farm on DojoSwap
To deposit on Black Panther vaults, connect your wallet to https://trade.blackpanther.fi/vault. Choose a vault and deposit your $INJ. Then, stake your resulting LP tokens. By doing this you will accumulate Points. Afterwards, navigate to your staked Vault and select “Stake > Claim Rewards” to claim your rewards. Your Points will be used to unlock Black Panther’s $BLACK token when it is launched.
To trade NFTs on Talis Protocol, go to https://talis.art/ and select Injective as your preferred chain. Then, bid on and flip some NFTs.
Helix is a decentralized exchange and they are doing a continuous airdrop! Connect your wallet to https://helixapp.com/. Go to the “Rewards->LP rewards” tab. Select the TIA/USDT market and deposit some funds there. This will allow you to earn $TIA and $INJ rewards. Helix has just received 2 million $PYTH which will be distributed to early users! You can check your availability HERE
DojoSwap is a decentralized finance platform on Injective. To participate in the DojoSwap airdrop, users need to set up a web3 wallet. Then, buy INJ tokens, transfer them to your wallet, connect it to DojoSwap. There, stake your INJ tokens, and farm rewards by staking the liquidity pool tokens on DojoSwap. This will generate $POINTs that can be redeemed for $DOJO tokens, as well as trading fees.
Testnet interactions
Testnet interactions are a good way to participate in the Injective ecosystem airdrop if you do not have any $INJ tokens or do not want to spend any money. So this will be a literal free airdrop! Here are some of the best protocols on the injective ecosystem that have incentivized testnet campaigns:
Ninja Blaze
Aeroscraper
Hydro Protocol
Before doing any testnet interactions however, you will need to get some testnet $INJ tokens. To get testnet $INJ tokens, connect your wallet to https://inj-testnet.nept.finance/ and go to the “Faucet” tab. Enter your Injective address and click “Submit”. You will receive your testnet $INJ after a few minutes.
Ninja Blaze is a game in the Injective ecosystem. To participate, connect your wallet to https://testnet.blaze.ninja/ and create a free account. Then, go to the Ninja Blaze Galxe page and complete the missions to claim their $SHU tokens. Afterwards, you can play the games on Ninja Blaze. Currently they have 2 games available: Jackpot and Roshambo. Mint the Ninja Blaze NFTs or buy them at Talis Protocol.
Aeroscraper is a decentralized lending and borrowing protocol. To interact with Aeroscraper, go to https://www.aeroscrapertest.tech and click “Launch app”. Select Injective as your chain and connect your wallet. On the “Trove” tab, deposit some testnet $INJ as collateral to borrow $AUSD. Then, deposit the $AUSD into the Stability Pool to earn rewards.
Hydro Protocol ($HDRO) is the first and only native liquid staking protocol on the Injective Network. To receive the airdrop, users must stake their testnet $INJ tokens with Hydro Protocol and try the platform’s various features.
Injective ecosystem airdrop review
When reviewing an airdrop, there are several factors to consider. First, the likelihood the project will even do an airdrop in the first place. Then, to look at how many tokens the project intends to allocate towards airdrop campaigns, as well as the difficulty in participating in their airdrop. It is also important to look at the utility of the token so that there will be an actual use and purpose in participating in the airdrop in the first place. Finally, a factor to consider when reviewing an airdrop is whether the airdropped tokens are subject to any lockup period.
Likelihood of airdrop: There are numerous protocols in the Injective ecosystem with new ones being added all the time. So there is always an ongoing airdrop!
Airdropped token allocation: The Injective ecosystem airdrop allocation depends on the protocol.
Airdrop difficulty: As there are multiple Injective ecosystem projects doing airdrops, the difficulty can vary. The most difficult would be staking on validators, but it could be as easy as playing games on the testnet.
Token utility: The Injective $INJ token is used to govern key components of the Injective Chain including the futures protocol (such as new listings), exchange parameters, and protocol upgrades. The INJ token is used for governance and also distributed as rewards for those who build and help develop dapps in the Injective ecosystem.
Token lockup: The Injective ecosystem airdropped token lockup depends on the protocol.
Elys Network is a blockchain platform that supports a decentralized suite of financial applications using nuclear fusion technology and Cosmos ecosystem. The project is at a VERY EARLY stage such that their testnet is still not even out yet. The Elys Network incentivized testnet, known as the Elys Network Odyssey is now LIVE, which means they WILL do a token airdrop! This is our Elys Network ($ELYS, $EDEN) token airdrop guide!
Check out our Elys Network airdrop guide!
https://youtube.com/live/NzyFhcyAJAU
Elys Network Airdrop: Incentivized Testnet is LIVE!! (HUGE Rewards)
What is Elys Network?
Elys Network is a distributed ledger system that enables a variety of decentralized finance solutions powered by nuclear fusion and Cosmos network. Here are some of the main features of Elys Network
NextGen oracle-based Decentralized Perpetual Trading and Leverage Lending platform: Elys Network is a platform that allows users to trade and lend various assets with leverage, using oracles to provide reliable data feeds for the market prices and other parameters.
ETF style multi-asset Index Pools: Elys Network offers a feature that enables users to create and invest in diversified portfolios of assets, similar to exchange-traded funds (ETFs), which are designed to track the performance of a specific index or sector.
Highly Scalable, Interoperable and Secure with premier UX, high TPS and low Transaction Fees: Elys Network claims to have a high-performance, user-friendly, and secure blockchain network that can handle a large number of transactions per second (TPS) and interoperate with other blockchains, while charging low fees for the users.
Built in the Cosmos ecosystem: Elys Network is a part of the Cosmos network, which is a decentralized network of independent blockchains that can communicate with each other using a standard protocol called Inter-Blockchain Communication (IBC).
What is the Elys Network ($ELYS, $EDEN) tokens?
Elys Network will have 4 tokens in its ecosystem, ELYS, ELYS-LP, EDEN and EDEN-Boost. Here are some of the features of the Elys Network tokens:
Here is a summary of the tokens and their uses based on the information on this page:
ELYS: The staking & governance token of ELYS Network. It has a low supply and rewards users who deploy it with inflationary and non-inflationary rewards. It may become deflationary over time as the ecosystem grows and burns ELYS.
ELYS-LP: The liquidity provider tokens that can be either Pool Tokens or Molecule Tokens. Pool Tokens are assigned to a specific AMM pool, while Molecule Tokens are assigned to a multi-asset index within a sector. Both types of tokens allow users to provide liquidity and earn rewards.
EDEN: The vesting ‘inflationary reward’ token that is earned by both stakers & liquidity providers. EDEN can be ‘committed’ to earn extra rewards and participate in governance.
EDEN-Boost: The multiplier token that is earned while ELYS is ‘staked’ or EDEN is ‘committed’. Its purpose is to reward long-term users and increase their rewards.
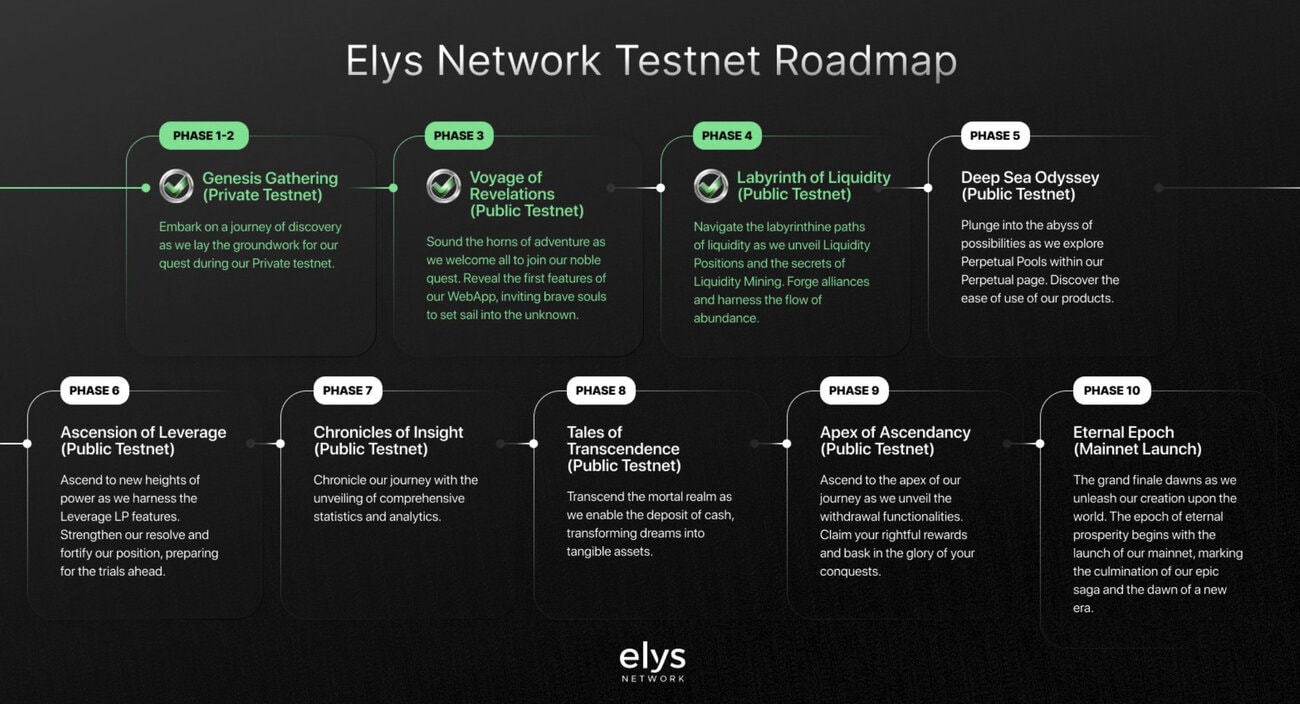
What is the Elys Network Odyssey incentivized testnet?
The Elys Network Odyssey incentivized testnet is a public testnet by Elys Network that is currently live. It is structured into 9 phases. We are currently in phase 3 and phase 4 is set to start in the week of 31st March 2024. This incentivized testnet aims to engage participants to complete various tasks such as swapping tokens, staking, and delegating to validators on the Elys Network platform. Participants will have the opportunity to earn testnet tokens and potentially collect NFT rewards for completing tasks in each phase. Once you have collected at least 5 NFTs, you can combine them into a gold NFT. This may be key to a potential airdrop at the end of the Elys Network Odyssey.
Here are the answers to the Elys Network Zealy quizzes: A (Yes), B (proof of stake), A (validators), B (Voting), C (none of the above), C (Osmosis), A (Neutron), C (Stride), B (Stargaze), C (Akash), B (Mars), C (Elys Network), A (Yes), A (Inter-Blockchain Communication), B (February 18, 2021), B (Bridge assets), A (Using a smart-contract), A (Using a smart-contract), A (Yes), A (ELYS), B (EDEN), C (Reward and vesting token), B (No), B (A basket of assets), A (65% of non-inflationary revenue from the assets in the specific Molecule, paid in USDC + EDEN), A (Perpdex), A (LP leveraging), A (Yes), A (Yes).
Fill in some information about yourself and your motivations to become a Cadet. Then, in a few sentences explain: (1) What type of project Elys Network is? (Blockchain? Application? Both?); (2) What is the native token and its role?; (3) What is the purpose of IBC?
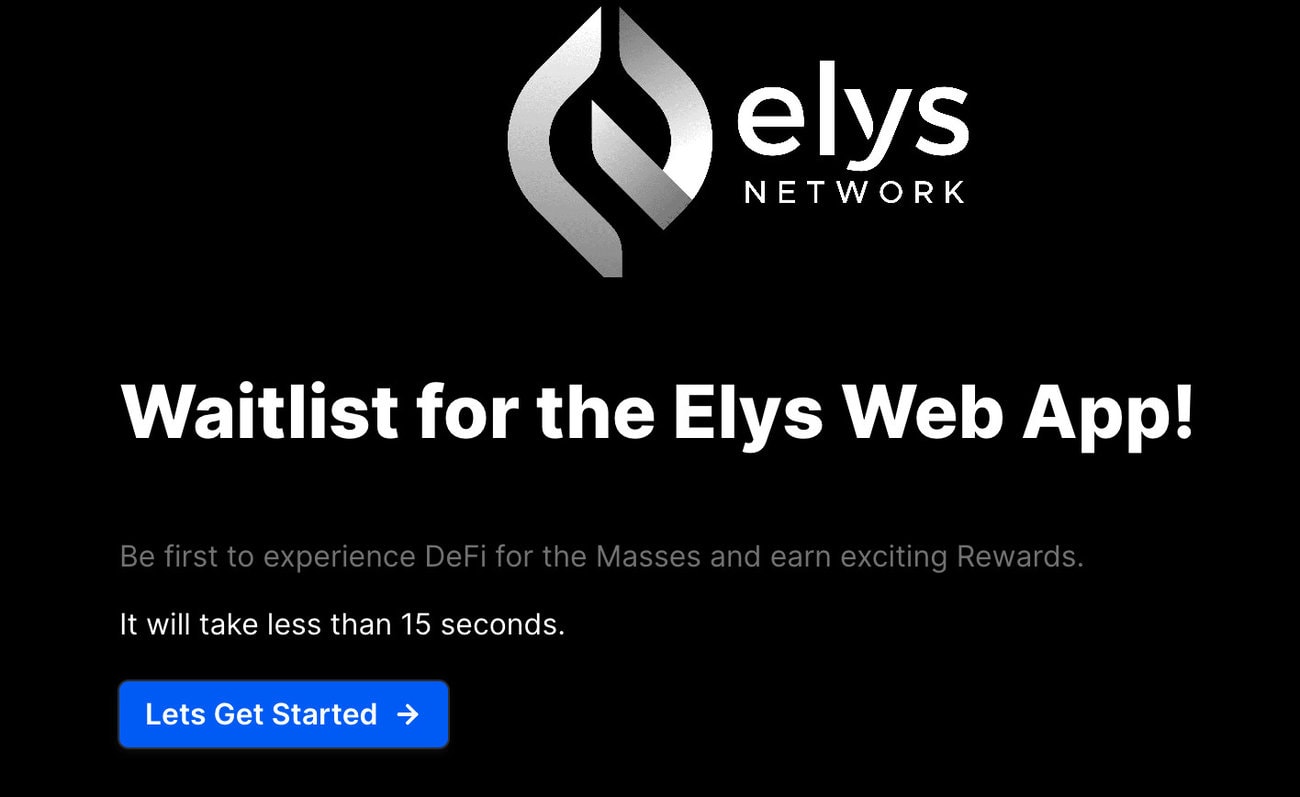
Sign up at Elys Network testnet and claim tokens.
Sign up for the Elys Network testnet with your email or wallet at https://testnet.elys.network/. Click “Deposit” and “Claim testnet tokens” to claim 1 testnet $ELYS and 2 testnet $USDC tokens. You can repeat this claim every 24 hours.
Swap $ELYS for $USDC or $ATOM
Go to the “Swap” tab and swap $ELYS for $USDC or $ATOM. Make sure to save some $ELYS for gas fees. Note if it still does not work even after a few hours you can let the team know on their Discord channel. Do one of these transactions every day to maintain your streak.
Stake $ELYS on ELYS Staking
Go to the “Earn” tab and click “Simple staking”. Go for the ELYS Staking option by clicking “Manage”. Choose a validator you want to delegate your $ELYS tokens to. We chose the High Stakes validator because to our understanding, they have an incentive program where if you delegate any Cosmos IBC tokens to them they would give you extra yields. Note it may take 30 minutes for the transaction to be processed. Staking $ELYS on ELYS Staking gives you $EDEN and EDEN BOOST rewards.
Stake USDC on USDC earn
On the staking page, click “Manage” under the USDC Earn pool. Select the amount of USDC you wish to stake and click “Stake USDC”. You will earn rewards in $EDEN for this.
Stake $EDEN on Commitment
On the staking page, click “Manage” under the Commitment staking pool. Stake your $EDEN and multiply with EDEN BOOST for even more rewards.
Check your progress on Elys Bonusblock
Connect your wallet to https://elys.bonusblock.io?r=G9quTM2k and check your task progress. Note that some tasks may take a while to process so you may not see the check mark immediately.
Elys Network airdrop review
When reviewing an airdrop, there are several factors to consider. First, the likelihood the project will even do an airdrop in the first place. Then, to look at how many tokens the project intends to allocate towards airdrop campaigns, as well as the difficulty in participating in their airdrop. It is also important to look at the utility of the token so that there will be an actual use and purpose in participating in the airdrop in the first place. Finally, a factor to consider when reviewing an airdrop is whether the airdropped tokens are subject to any lockup period.
Likelihood of airdrop: Elys Network have confirmed they will an incentivized testnet.
Airdropped token allocation: The Elys Network airdrop allocation is unknown.
Airdrop difficulty: The Elys Network incentivized testnet has not even been launched yet, so all you need to do is to sign up for the waitlist. However, they have Zealy quests to complete, and their quizzes require you to wait 1 hour to try again if you get the answer wrong. This makes Elys Network one of the most time-consuming and hardest airdrop tasks we have done.
Token utility: The $ELYS and $EDEN token utility is unknown.
Token lockup: There is no information on the $ELYS and $EDEN token lockup yet.
Axelar ($AXL) is a network on Cosmos that allows different blockchain systems to communicate with each other by sending messages and transferring assets securely through its validators and smart contracts. Being on the Cosmos ecosystem, there could be a potential for a Axelar ($AXL) token airdrop! Here is our Axelar ($AXL) token airdrop guide.
Check out our step by step guide!
https://www.youtube.com/watch?v=f5DmaWRPQxQ
IG Airdrop Potential for Axelar ($AXL) Stakers 2024?!
What is Axelar ($AXL)?
Axelar is a blockchain network designed to facilitate cross-chain communication and transactions. Here are the main features of Axelar ($AXL):
Gateway Smart Contracts: Enable message passing across connected chains, controlled by a key shared among Axelar validators through multi-party cryptography.
Validators’ Roles: Validators not only produce blocks and validate transactions but also verify cross-chain activities by running nodes for supported chains and observing external chain activities.
Relayer Services: Optional services that anyone can perform without trust, crucial for initiating cross-chain communication like starting deposit confirmation votes.
Gas Receiver: A smart contract that accepts tokens to cover gas fees for executing cross-chain smart contract calls, part of Axelar’s relayer services.
Axelar is gaining a lot of attention right now because it is attracting a lot of institutional attention. For example, Ripple is teaming up with Axelar for cross chain communication. They are also collaborating with Onyx by JP Morgan for cross-chain portfolio management.
How to get the Axelar ($AXL) token airdrop?
Time needed: 10 minutes
Here’s a guide on how to get the potential Axelar ($AXL) token airdrop
Buy Axelar ($AXL)
Buy Axelar ($AXL) tokens – Start by purchasing Axelar tokens from a cryptocurrency exchange such as Bybit, BingX, Coinbase or Binance. Ensure you have the required number of tokens for staking and participation in the airdrop.
Set up a Keplr wallet or any other secure and compatible wallet that supports Axelar tokens. The Keplr wallet can be downloaded as a Chrome browser extension.
Stake Axelar ($AXL) Tokens
Connect to the Axelar chain on Keplr dashboard at https://wallet.keplr.app/chains/axelar to find a list of Axelar validators. Choose a validator to stake your Axelar ($AXL) tokens in order to participate in the Axelar network and qualify for potential airdrops. Note, do not stake your tokens with centralized exchanges. We staked our $AXL tokens with Cosmos Station and some other validators.
Monitor Airdrop Announcements
Monitor Airdrop Announcements – Stay updated on official announcements from Axelar regarding upcoming potential airdrops. Follow Axelar’s social media channels and website for the latest information.
Self Chain is a blockchain designed to securely store encrypted backups and a master decryption key, aiming to improve crypto wallet security and user experience by replacing traditional private keys with distributed mathematical shares. They launched their incentivized testnet recently on 29th February 2024, and it will end on 15th March 2024. So, you need to hurry and complete the tasks if you want to qualify for any potential airdrop! Here is our Self Chain token airdrop guide.
Check out our step-by-step Self Chain ($SELF) token airdrop guide
Self Chain pioneers as the initial modular, intent-centric Layer 1 blockchain, offering a keyless wallet infrastructure service powered by MPC-TSS/AA for multi-chain Web3 access. Here are its main features:
Modular Design: Self Chain is built with a modular intent-centric approach, allowing for flexible and customizable blockchain solutions.
Access Layer 1 Blockchain: It operates as a foundational blockchain layer, providing key infrastructure for multi-chain WEB3 access.
Keyless Wallet Service: The infrastructure includes a keyless wallet service, enhancing security and user convenience.
MPC-TSS/AA Technology: Utilizes Multi-Party Computation Threshold Signature Scheme/Algorithmic Autonomy (MPC-TSS/AA) for secure and decentralized operations.
What is the Self Chain ($SELF) token?
The $SELF token is the native token of Self Chain, and has the following uses:
Transaction Submission: Users and dApps use $SELF tokens to submit transactions for creating, mutating, and transferring digital assets or interacting with applications.
Staking & Governance: $SELF token holders can stake their tokens to validators and participate in Self Chain’s proof-of-stake mechanism and governance.
Validator Incentives: Validators manage transaction processing and are incentivized through the proof-of-stake mechanism, which rewards honest behavior.
Network Fees: Gas fees, paid in $SELF tokens, are charged for network operations to reward participants and protect against spam and attacks.
According to Self Chain’s tokenomics, 19% of its total token supply are allocated towards ecosystem initiatives via grants and incentives. This could mean a token airdrop for supporters.
How to get the Self Chain ($SELF) token airdrop
Time needed: 10 minutes
Here’s a guide on how to get the potential Self Chain ($SELF) token airdrop.
Connect to Self Chain testnet
Connect your Keplr or Leap wallet to the Self Chain incentivized testnet website HERE. Click “Complete the quest” and “Connect to Self Chain devnet”. Follow the remaining prompts on the bottom right hand corner to claim your testnet $SELF tokens.
Claim testnet $SELF tokens
Click “Complete the quest” and “Connect to Self Chain devnet”. Follow the remaining prompts on the bottom right hand corner to claim your testnet $SELF tokens. Note you can only claim testnet $SELF tokens once.
Stake $SELF token
Click “start” on the bottom right hand corner. Then, you will be taken to a separate page with a list of validators. Connect your Keplr or Leap wallet to the page. We suggest you stake on one Bonded, and one Unbonded validator, and in particular, choose the ones that offer APR. Select the validator, then scroll down and select the number of $SELF tokens you wish to stake and click “Delegate”. Approve the transaction in your wallet.
Follow Self Chain on social media
Next, you will be prompted to follow Self Chain on Twitter and Discord. Follow the steps to do this and verify once you have completed the task.
Claim rewards
Once you have finished the task you will be prompted to claim your 100 $SUPR as a reward. You will also be asked to mint the Uni Zorb NFT. Note this will be on the Arbitrum network and you will need to pay gas fees for the transaction.
Follow Self Chain on social media
Check the launch date of the testnet to ensure you’re within the airdrop timeframe. 3. Look for the criteria set by the validators for eligibility. 4. Ensure you have an active wallet with enough funds to qualify. 5. Participate in the staking task on the Self Chain testnet. 6. Verify your staking amount and delegate your tokens to a validator. 7. Check for any additional tasks or quests on the testnet platform. 8. Stay updated on announcements for airdrop allocation. 9. Complete any social media-related tasks for potential additional rewards. 10. Monitor your wallet balance and transaction history for a successful airdrop. Remember, participation and following the guidelines accurately are key to qualifying for the Self Chain token airdrop.