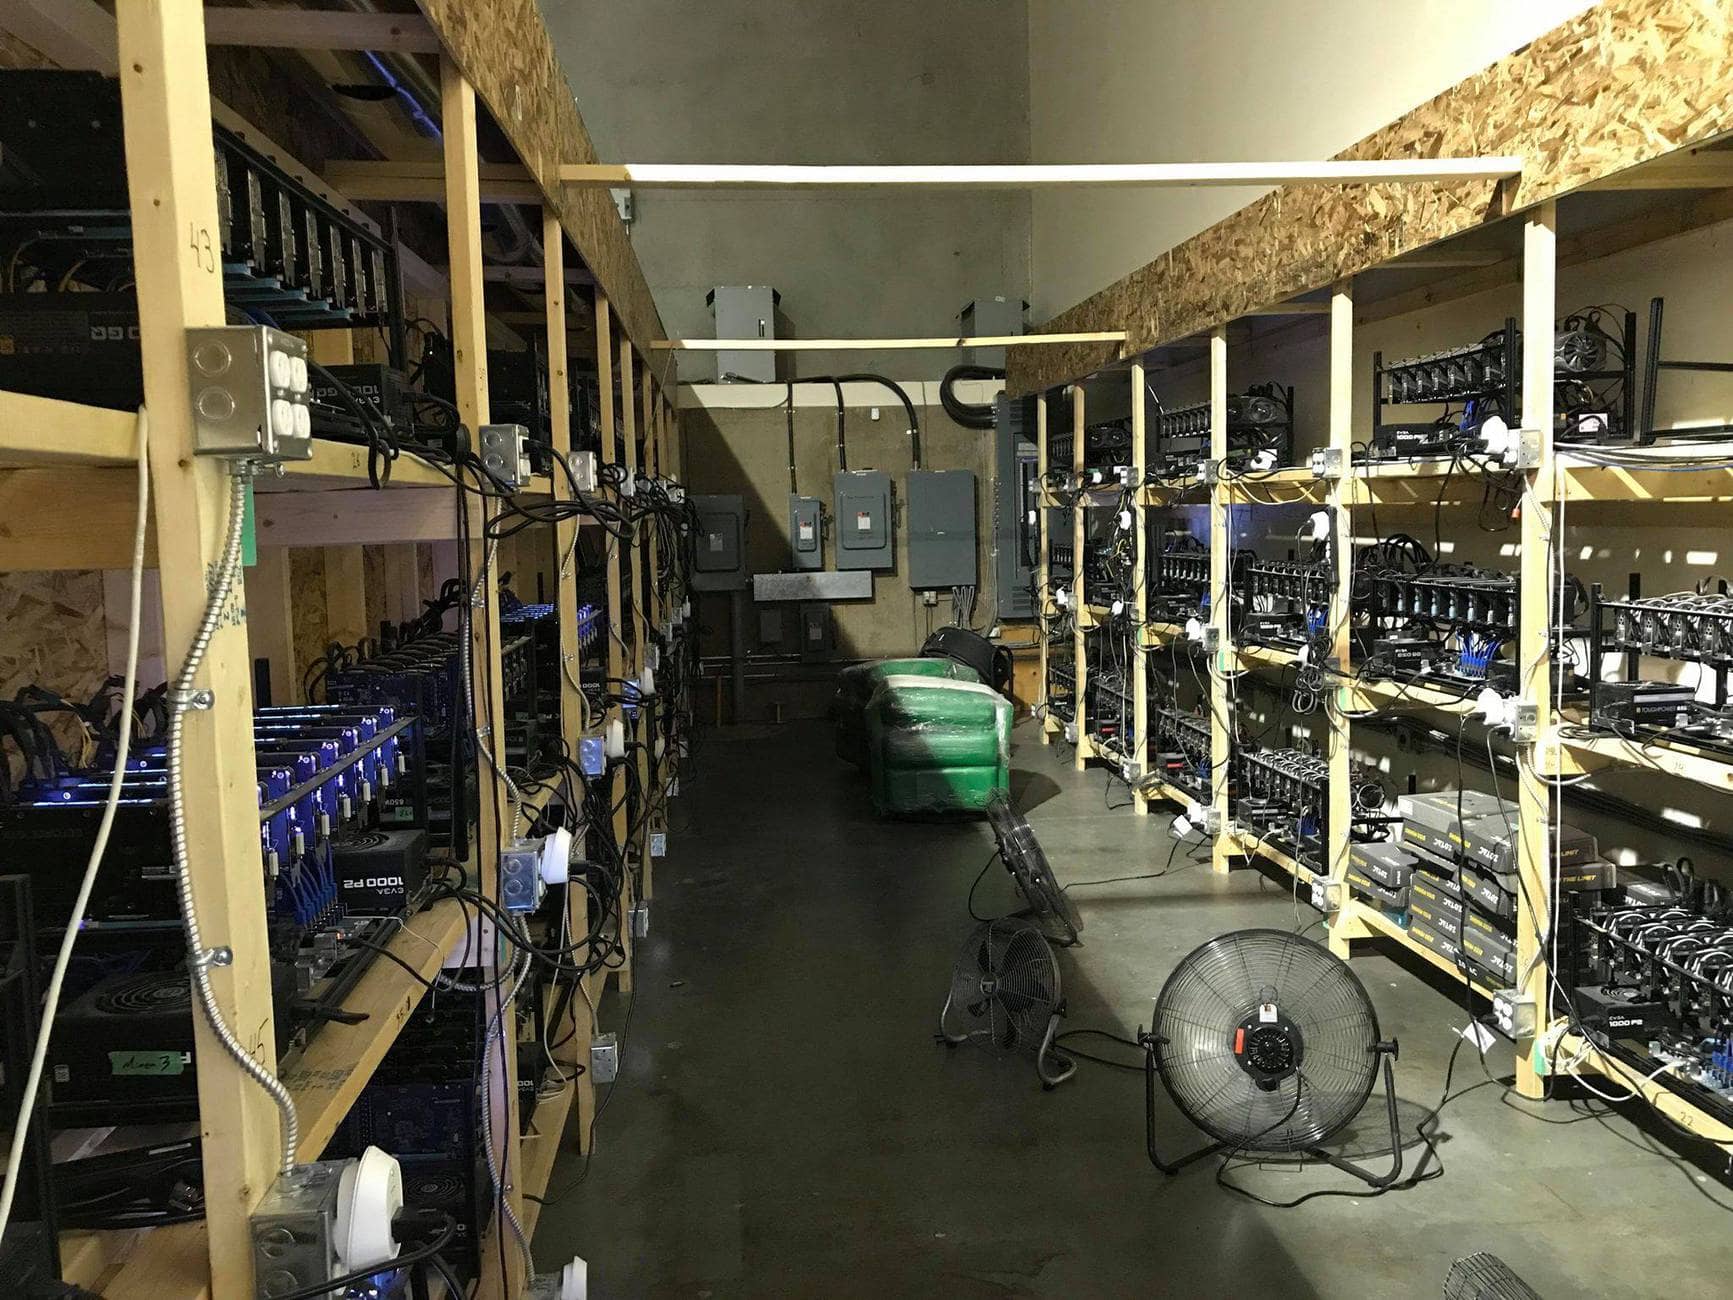
Cryptocurrency Mining can be tough to get started with – but there are always mining expert’s who are willing to lend a hand and share their wealth of experience. One such person is Alex Hillman, he runs cryptocurrency mining farm with over 300 GPUs. We asked detailed questions about how he got started, his mining setup and what advice he would give to beginners getting started with mining.
Miner Bio: Alex Hillman
Alex Hillman (@SpillyGuy) comes from a computer and programming background. He currently mines at 3 different locations, including dedicated warehouses and research labs. He mines with more than 300 GPUs, often times on multiple cryptocurrencies at the same time.
Can you tell us about your mining operation (Where/ How many people are involved / Power usage)
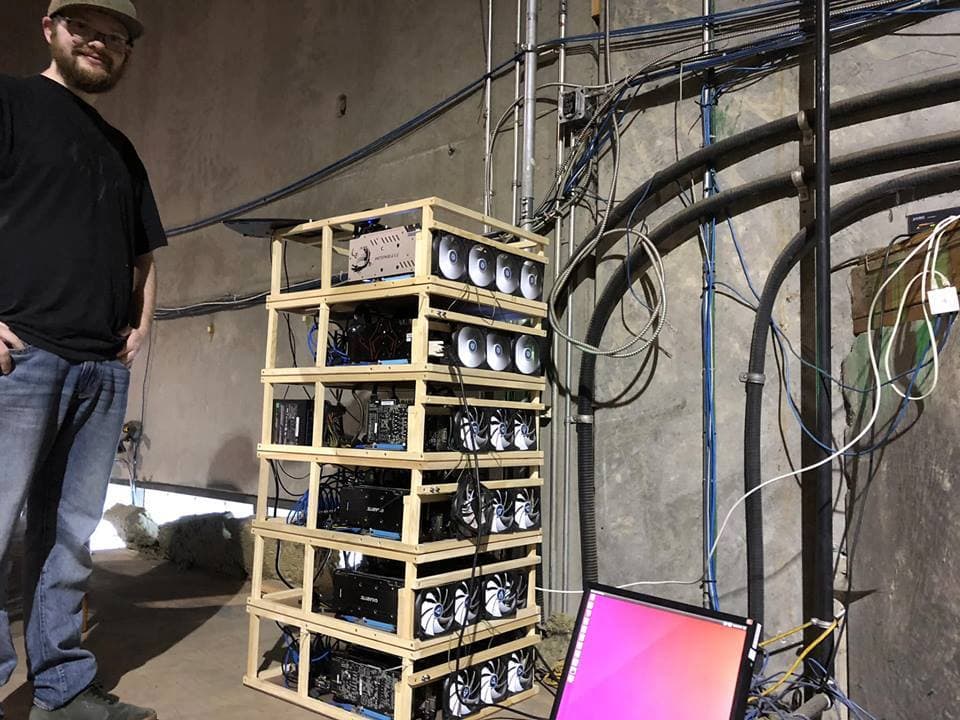
When the technology started taking off I knew it was something I wanted to be involved in with my computer and programming back ground. We currently run well over 300 gpus at 3 locations including dedicated warehouses and research labs.
What type of setup – solo or pool mining do you use
We tri or quad mine all of our gpu miners. Often we mine coins like Ethereum or Raven while dual mining something like LBRY or DECRED on the GPU extra memory. We accomplish this most cases with Claymore Miner. On the CPU we use a xmr-stak style miner to mine coins like Loki, Monero or Sumocoin. Last you can mine on pools that create extra tokens and with the fpga cards we do this as well.
We mine on large pools like ethermine with a private
workgroup of about 50 clients and friends to increase profits and luck factor.
Do you use ASICs ?
No we strongly disagree with the logistical cycle and ethics of building single use products like this that have such a short life span.
Mining is Loud and Hot – have you ever been driven crazy by the noise or Danced around naked when setting up gear?
I often jam while building but we try to do all of our
thoughtful work away from the computers. But yes I have danced naked in the
mines many times.
What do you think is the biggest challenge when it comes to mining
Having enough power to grow
Do you ever dabble in speculative mining – if so what new coins are you into
Yes spec mining can be wildy profitable. At the start we
mined sumocoin about several hundred a week at 0.07 cents. We sold those coins
at 14.00usd so it paid for our first dedicated miners.
What happens when hardware breaks ? who repairs them?
Spencer my business partner is the expert on trouble shooting most often its a software driver issue or a hardware issue like usb or risers going bad.
What is the most controversial thing to happen to you?
We helped attack the EOS and ADA blockchain with our GPU network in a effort to prove their lacking security.
What advice would you give to a someone who wants to start out mining
Start simple with a single computer at home. Use a gaming or work computer toss a good video card like a Nvidia 1070Ti or Nvidia 1080ti in it and start speculative mining first.
Nvidia or AMD – which team are you on?
Nvidia produces coins at a more efficent power rate and with
far less loss and heat. Its really not a question amd is cheap and quick while
Nvidia is the better option over time
Cloud Mining – in your opinion are they legit or scam
All a scam…. why would I rent you my money tree for any
money less than it makes me. The business model is flawed from the start.
Remote hosting is a thing but in most cases if someone is trying to rent you
cloud mining they are hedging out their own risk by making you take it all.
Epic Cash is a privacy focused cryptocurrency designed function like cash in the digital age. It’s got in-built privacy features using Mimblewimble technology (Epic Cash is a fork of GRIN – no traceable addresses, CoinJoin and IP-shielding). What makes Epic Cash different is that it can be mined using any of the 3 of the hottest mining algorithms – RandomX, ProgPoW and Cuckoo. This means both CPU and GPU miners can mine Epic Cash. In this tutorial we’ll cover the basics to get started and tips on solo-mining (if that’s you’re thing)
In order to mine Epic cash, you’ll need a modern Graphics Processor (GPU) or CPU that is fast enough to mine at a profitable rate. Generally speaking, hardware that is manufactured after 2018 is usually efficient enough to EPIC at a reasonable rate. Here is a list of the latest GPUs and their hashrate.
[wp-compear id=”5165″]
Epic Cash Mining Guide (Easy)
The easiest way to mine Epic Cash is via a mining-pool (easy to set-up, predictable payments)
For this setup, I’ll be using the Icemining Pool. To get started,
Download the Epic Cash mining client on either Windows or Linux: https://epic.tech/mining/ (download epic-miner).
Unzip the contents of the file
Edit the file epic-miner.toml (Linux – /etc/epic-miner.toml, Windows (same folder as epic-miner.exe)
Add the following information to connect to the mining pool (replace USERNAME and PASSWORD with you’re desired information, keep this information safe as it’ll be required for withdrawal)
# listening epic stratum server url
stratum_server_addr = "epic.icemining.ca:4000"

# login for the stratum server (if required)
stratum_server_login = "USERNAME"

# password for the stratum server (if required)
stratum_server_password = "PASSWORD"
Now you’re good to start mining by running epic-miner (epic-miner.exe on windows, epic-miner on linux)
At this point you can log onto the mining dashboard at https://icemining.ca/?address= to check if your miner is successfully connected and mining. You can optimise your mining efficiency by following this guide.
Payouts
To receive payouts from the pool, you’ll need to have a working epic-wallet. This is because unlike traditional cryptocurrencies, epic doesn’t have an “receive address”. Follow the setup guide to start your epic-wallet. To get the payouts, select “other listener” and enter your ip followed by the mining password.
Unlike Bitcoin transactions where there are cryptocurrency addresses, Epic Cash withdraw requires that your epic-node is online and accessible. This is a major advantage of MimbleWimble transactions where there are no addresses, and hence less methods to invade a user’s privacy.
How do you view balance on epic cash?
You can view your epic cash wallet balance by typing the command “epic-wallet info” (Linux) or on Windows, open epic-wallet folder and run epic-wallet-info. Make sure Epic-wallet and Epic server are both running to view the balance.
RandomX CPU mining
RandomX is a new cryptocurrency mining algorithm designed improve the distribution of mined cryptocurrencies more evenly to a broader base of users. The idea is that everyone with a computer has a CPU, and hence an algorithm that favors the CPU will be more inclusive. Random is is designed to only function on CPUs, with strong resistance to both GPU and ASIC mining. This is achieved by making use of functions only available on modern day CPUs, such as virtualization. RandomX has already been audited and is currently deployed on Epic Cash and will be deployed on Monero.
FAQ
Whats your profit / earnings: I mined with CPU only (Intel Core i7 3700) and earned about 1.1 EPIC per day at 960 hps (1st October 2019). You can find out more benchmarks at epic benchmarks.
Whats better – Solo Mining or Pool Mining: I’ve mining both solo and with the icemining pool. Pool mining was the best ways to start as I was able to find out my 24-h yield and move test send with smaller amounts of EPIC. Later one I migrated to solo-mining as I can minimize downtime as I ran my own wallet and node.
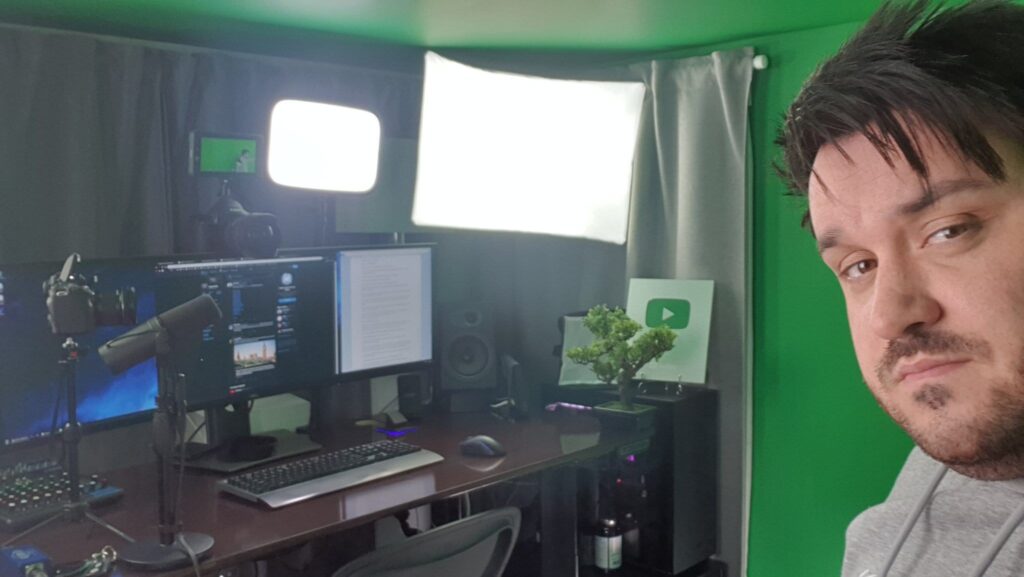
The age of YouTube has brought a new medium of communication and sharing – we can now share out thoughts and insights in 4K videos real time. I want to share my passion of making videos with you and reveal some of my secrets and tricks to get good quality videos produced on time. One of the big reasons why the Boxmining Channel grew was because I was able to get coverage of important events on time and share insights with the community.
I don’t have a big space to record my videos, so I try to make the best of it. I primarily use the Logitech Brio (it’s cheap and always ready to go, especially when we need to cover emergency events). For wider shots I have the Sony a7III which is connected to the computer via the camlink 4k – so I can switch cameras during live shows.
The rest of the stuff makes look like an Elgato shill, but the whole ecosystem system is pretty amazing. The Elgato Stream Deck is for switch between scenes and controlling the lighting.
This sound setup has to be honest a nightmare to get working well. I love the way the Shure SM7B sounds, especially since it’s directional and cuts out the noise from the nearby fans and air-conditioner unit. The only problem with the SM7B is that it’s very quiet requires a very good pre-amp. With help from Cameron (CryptoDaily), I got the Sound Devices Mix Pre-6. The preamps on the Mix Pre-6 is good enough to use the SM7B without a cloudlifter.
Vlog Setup
The Vlog setup is what I use when I’m travelling between conferences, meetups and even vacations. This is great for videos on the go or with motion in the background. Personally I don’t like carrying a lot bulky video equipment – nothing is worse than carrying a heavy tripod and camera case.
Osmo Pocket ($299) with audio 3.5mm audio adapter
Rode – VideoMic Pro+ ($299)
The main choice here is to use the Osmo Pocket as my main video camera. As a handheld Gimbal, the Osmo Pocket makes walking and talking scenes much more watchable. It’s also small enough to fit into my pocket most of the time. Unfortunately, the built in sound is pretty bad, so the audio adapter highly recommended.
Conference Setup
This setup is my go to setup for conferences and event coverage, mainly due to the versatility and low light performance. The Sony a7III performs extremely well in low light conditions, making it perfect for dimly lit rooms or conference venues.
The Sony a7III really shines – with a large battery and excellent video capabilities. When paired with the 24-70mm lens, the results look good (although it’s VERY heavy to carry).
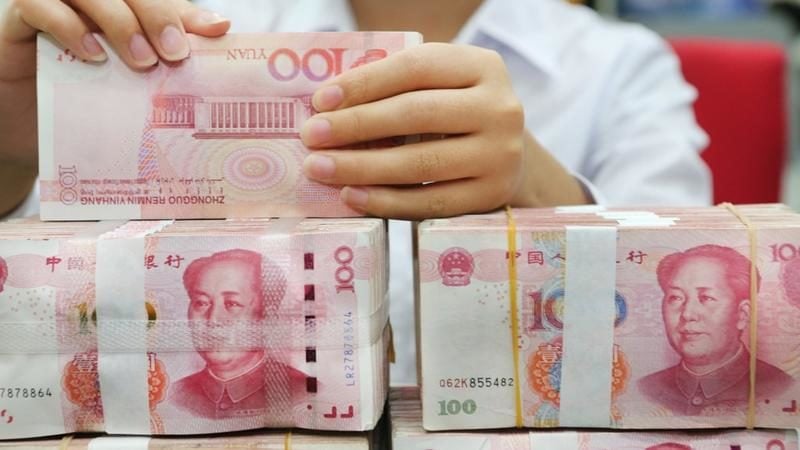
Tether is rumored to create a new stable coin “$CNHT” based on the Chinese National Currency, the RMB using offshore accounts. Tether is the creator behind the infamous stablecoin $USDT, which is used on many cryptocurrency exchanges. This could potentially be Tether’s way of beating the People’s Bank of China to issue the first digital version of the RMB. This news was immediately met with mixed reactions. On one hand, it might help with the adoption of cryptocurrencies by allowing for an easier on-ramp to crypto for Chinese. However, this might also been seen as a move to challenge the People’s Bank of China, which is known to have disastrous consequences.
This news has been “leaked” by DGroup founder Dong Zhao, who is a known investor in Bitfinex and Tether.
Challenging the People’s Bank of China?
China maintains a “closed” capital account, meaning companies, banks, and individuals can’t move money in or out of the country except in accordance with strict rules.
State owned People’s Bank of China (PBoC) has always had a tight group on the RMB. RMB transfers out of China are tightly regulated and have to go through government approval before it is sent. If Tether creates a digital version of the RMB, users can freely send the currency in and out of the country on the blockchain – without government oversight. Netizens were quick to point this out, as shown by the following reactions on Chainnode:
Break things first?
Tether has always had a reputation of breaking things first, then figuring out the legal ramifications. Tether and Bitfinex are currently under investigation by the NY attorney General. It is not too difficult for Tether to secure secret offshore bank accounts to hold RMB, then issue the tokens on the blockchain. The technology is already there from USDT – the issue is if they can keep the bank accounts from been frozen by authorities. Funnily enough, members of the chinese crypto communities have called for a boycott of $CNHT
The boycott of Tether’s $CNHT by local Chinese crypto OG already started 👀👀 this one is by Jun DU, former cofounder or Huobi, owner of the biggest Chinese crypto media JINSE and many others
His reason is “It will bring systematic risk to local Chinese crypto ppl and companies” pic.twitter.com/RrSbcPBW4f
— Dovey “Rug the fiat” Wan (hiring) (@DoveyWan) August 21, 2019
This guide is for setting up a physical Vechain Observer Node using Docker on Synology Attached Storage (NAS). We will create observer nodes that will receive transaction data and observe blocks being created on the network. This guide will run the same code that is on the 101 Authority nodes that power the network. This node will allow you to gain access to the Vechain API – so you start programming on the Vechain network and query transactions.
Note: This is a fun exercise that allows you to run a node that observes the network. In order to participate in Block creation (and gain block rewards), you’ll need to be selected as an Authority node by the Vechain Foundation.
Vechain’s code can be found on Github : https://github.com/vechain/thor. Nodes run the ‘thor’ client which is written in the GO language.
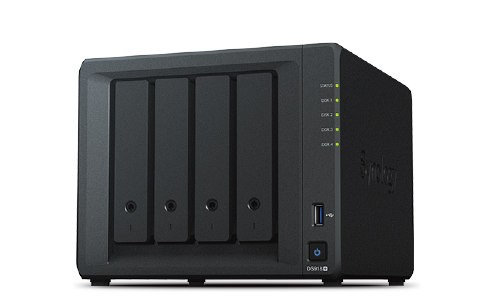
This guide requires a Synology Network Attached Storage. These are physical servers that you can store files on and also run software. This guide is tested with DS918+ running DSM 6.2.2.
Install Docker
For this guide, we’ll be using the official Docker package. This allows the easy install of the Vechain Thor node without the hassle of compiling the code from source. Install Docker via the “Package Center”
Pull the Vechain/thor docker image from the Registry
Open up Docker and access the “Registry” tab. Here you’ll get the option to search for “Vechain” and download the Vechain/thor docker image.
Launch the Docker Image
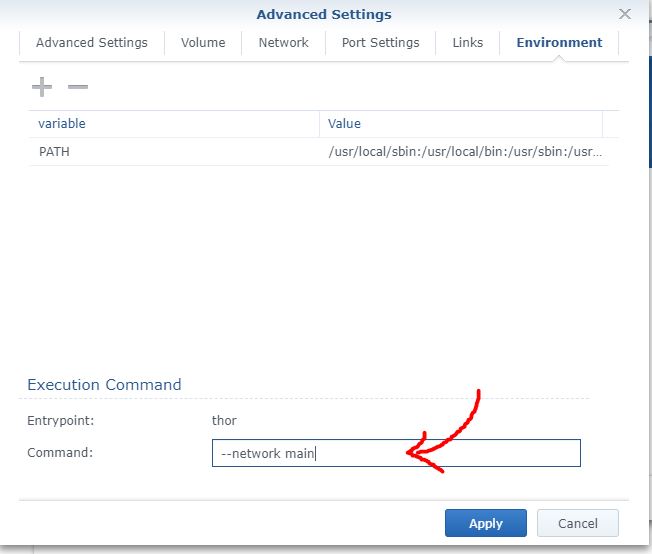
Now comes the final part – launching the Docker image with the correct settings. In the Launch menu, select “Advanced settings” -> “Volume” and add a folder. Personally I created a folder in “docker/vechain” and mounted it to “/root/.org.vechain.thor“. This will allow the client to store the blockchain safely a designated folder on your NAS.
Lastly add the execution command “–network main“. This tells Thor to connect to the vechain mainnet.
After this apply the settings and click “Next” and “Apply” to launch the Docker container.
Happy Observing
Now you’re done! The observer node should will be running and receiving blocks.
You can see the progress of the node as it synchronizes with the network.
This guide will get you started setting up a Lightning node to send and receive Bitcoin on the lightning network. The node will be always online – you’ll be able to send and receive lightning transactions at any time. We’ll be using a Docker container allow for faster deployment and updating. Remote Lightning nodes are great for anyone who wants to make some extra money routing lightning network transactions for passive income.
Difficulty: Intermediate
Time required: 1h
Setup type: LND with Docker
Prerequisites: Ability Deploy nodes on AWS or DigitalOcean
Note: For this guide we’re going to be using the Bitcoin Testnet – a test environment where we can make mistakes without serious consequences. Once you’re comfortable with deploying the node, you can switch over to the bitcoin mainnet by replacing “testnet” with “mainnet” in the code.
Remote Node Setup with Docker
For this setup, you’ll need to setup your own remote node on a cloud hosting service such as AWS or DigitalOcean. In this example, I deployed a t2.micro instance on AWS running Ubuntu Server 18.04. You can deploy any type of server, so long as it supports Docker you’re good to go. Note: must have 1GB or more of RAM on the VPS. Anything less will result in frequent crashes.
To get Docker, install it with these commands
sudo apt update
sudo apt install docker.io
Installing the Lightning node
For the container, we’ll be using an image built by Zap – it’s already pre-configured with everything you need to get started (lnd, lndconnect). The first step is to create a “volume” which allows our data to be preserved in case the container is destroyed in the future. The volume we are creating is called “lnd-data”.
Note: some installations docker don’t require “sudo”, if you run into problems, run docker without elevated “sudo” privileges.
sudo docker volume create lnd-data
Next step we’re going to run the latest image from “lnzap/lnd:latest”. We’re going to connect to the Bitcoin Testnet – this way if we make any mistakes we won’t be losing real Bitcoin.
We are also connecting to public neutrino clients – this greatly lowers the hard disk requirements for this node.
Before executing, make sure you fill in your IP in the YOUR_EXTERNAL_IP section.
This will give you a Bitcoin address where you can send Bitcoin to to fund the account. Since we’re on the Bitcoin Testnet, you can use https://coinfaucet.eu/en/btc-testnet/ to fund the account for free.
PRO TIP: You can check if your node is working by scanning port 10009 and 9735 using https://www.yougetsignal.com/tools/open-ports/. This is a great way to check if there are any firewalls blocking your node from communicating and if the overall setup is successful. Running nodes will always have an “OPEN” status for the 2 ports.
Connecting the Remote node with ZAP iOS app
The ZAP app on iOS allows you to easily access the node remote node, send transactions, manage channels and more. The ZAP app is free and downloadable from https://zap.jackmallers.com/
To connect ZAP with the remote node, run this command:
This gives you a QR code you can scan with your wallet (“Connect to a Remote Node”) to complete the binding. (Note: Older guides ask you to use zapconnect which no longer works and will give you an error).
Creating Channels with other nodes
To start making payments, you’ll need to create Lightning Channels with other nodes on the network. A great place to start finding other nodes is via https://1ml.com/testnet/. This is a list of all the testnet nodes.
You can scan the QR code for various servers via “Settings” -> “Manage Channels” -> “+”
Helpful Debugging tools and commands
Now you’re all done – the remote node is running and funded. To test out the configuration you can use these following tests:
Check LND status
This command checks for status of lnd and if you’re fully synchronized with the Bitcoin Network.
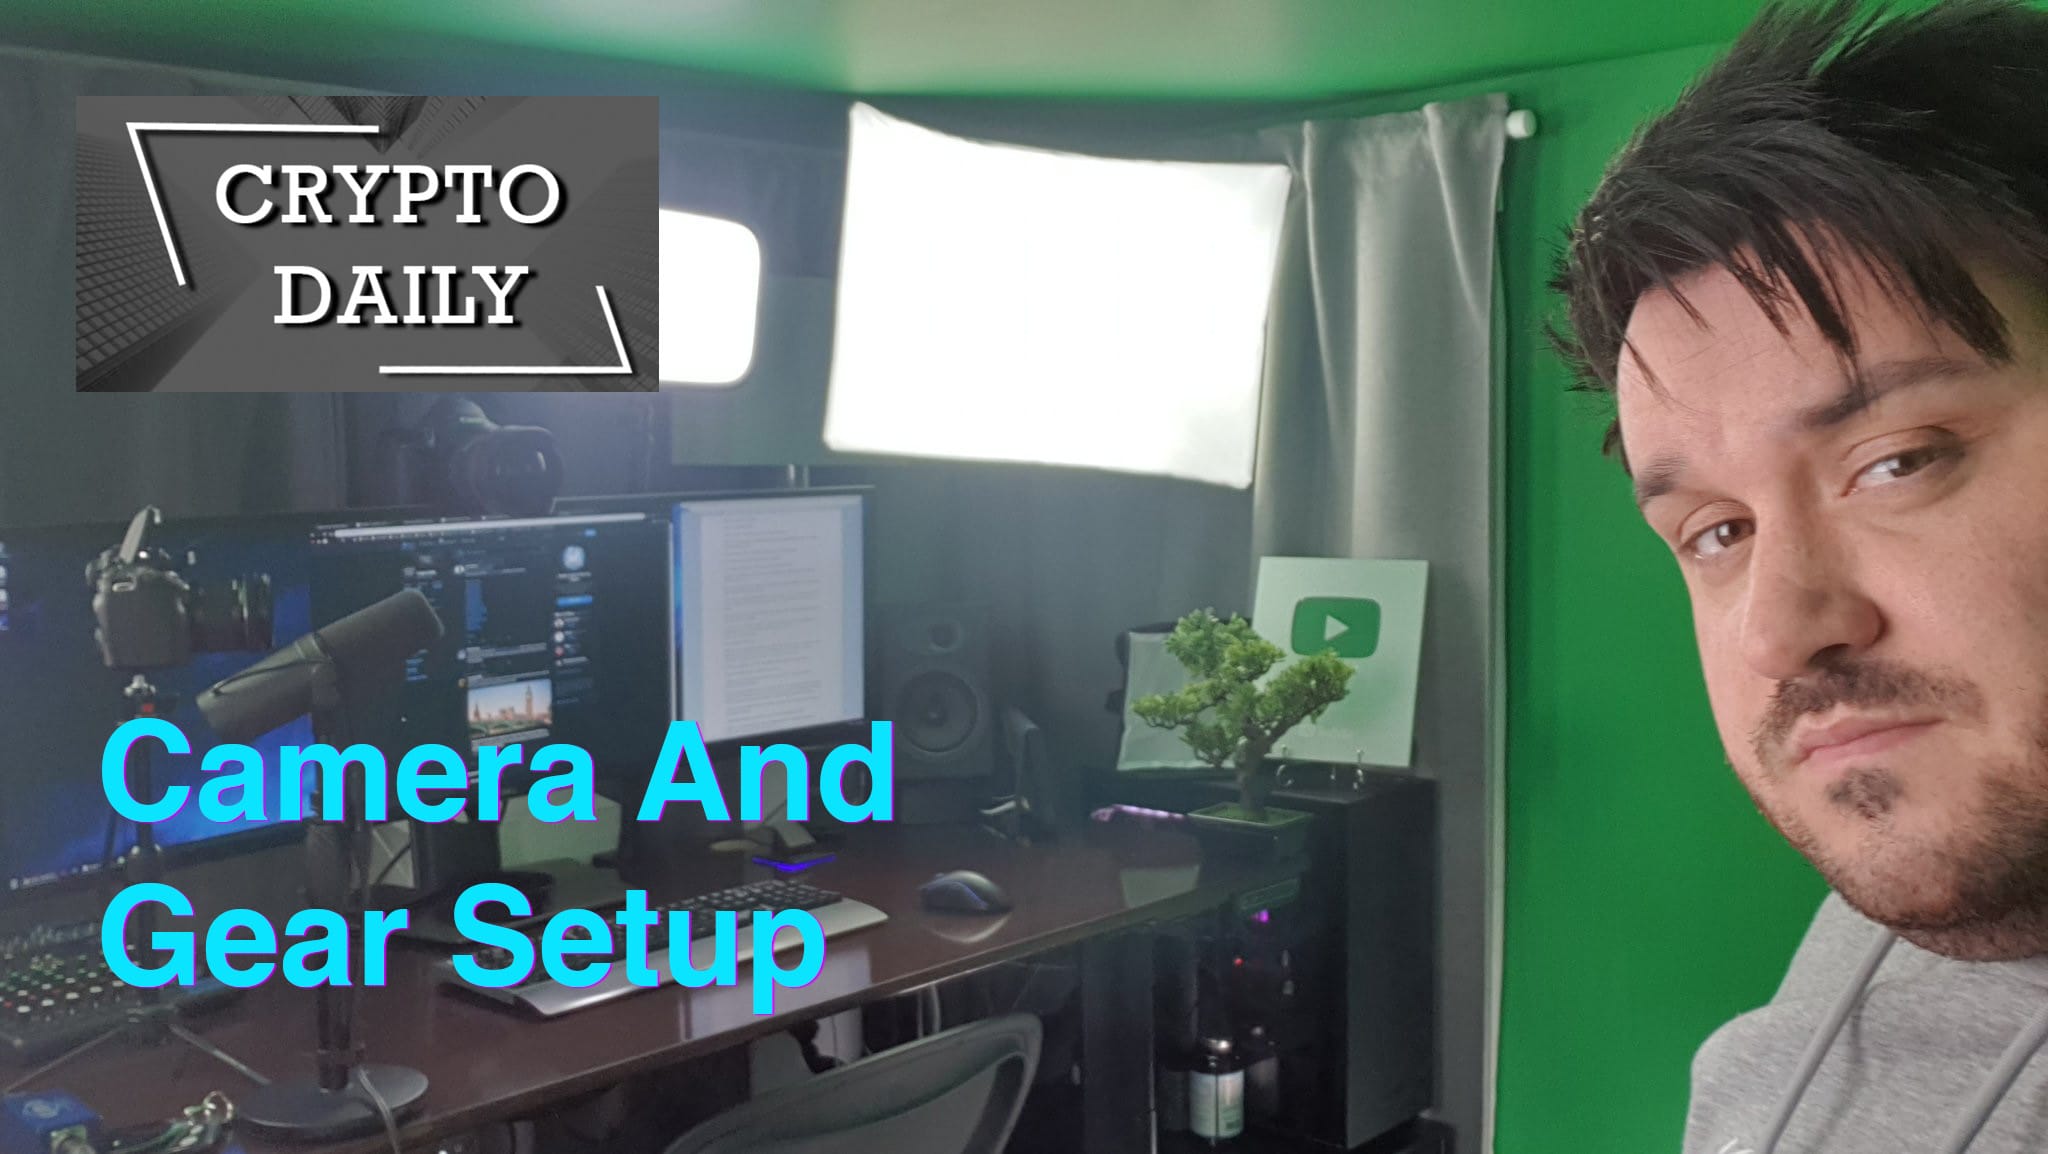
Cameron runs the wonderfully informative and hilarious CryptoDaily Channel. Something we notice straight away the high quality render of his rugged beard and perfect bed hair. Today we find out what camera and recording gear CryptoDaily uses to create his awesome content, direct from the man himself!
Main Camera – Canon 1DX Mark ii Lens – Canon EF 11-24mm f/4L USM Lens Viewfinder – SmallHD 5inch This camera again is totally unnecessary, but it gives great colour accuracy, sharp image and smooth 50fps. The 4k quality is quite important because it allows you to punch in without losing image quality.
Side Camera – Canon 80D Lens – Canon EF-S 10-18mm f/4.5-5.6 IS STM Lens This is the part of my setup I am least happy with. The lack of 4k quality on it is in stark contrast to the main camera, but provides 50fps smooth image also. The ultrawide lens is important so it can be quite close to you in an office without looking like it is.
Display – 49-Inch 5k Super Ultrawide Display – Dell U4919DW Totally unecessary, but it does allow me to have notes on the side, my main window being recorded in the middle, and my OBS on the other side as though it was a triple monitor setup with no bezels.
Mic – Shure SM7B Mixer – Yamaha MG10XU I love the sound of this mic. I’ve tried many in the past, nothing is better for podcast audio in my opinion.
Monitor Speakers – Audioengine A5+ Ideally you edit with a pair of quality headphones, but I try to be wireless where I can. This are monitor speakers so ideally what I am hearing is what most people will also have recreated when watching my videos.
Keyboard – Logitech G613
Mouse – Razer Mamba Wireless
PC – GTX 1080 graphics card, 8700K CPU, 32gb Ram, Maximus X Motherboard, NZXT AIO, NZXT Case, 4TB Samsung SSD.
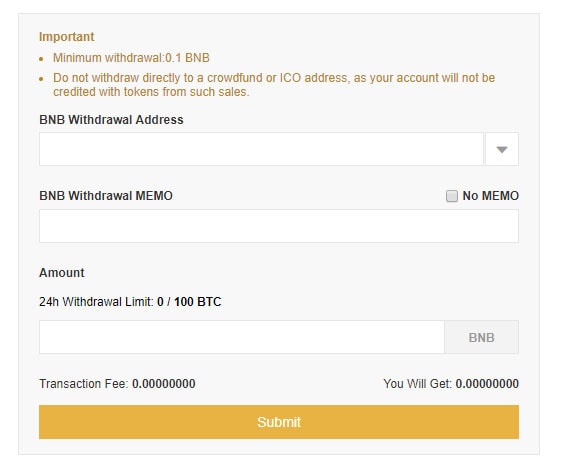
*Update: Added information about Binance Chain Memos and new withdraw panel
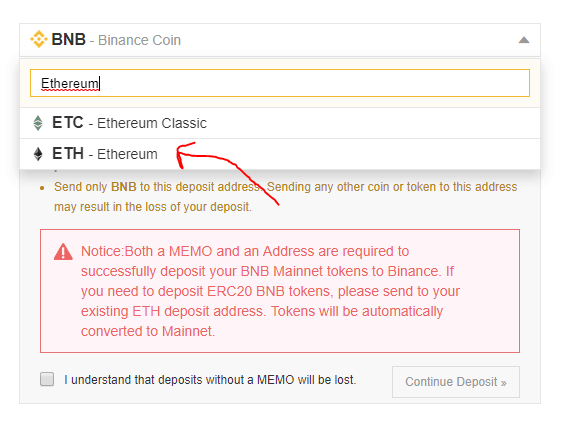
Binance just launched the Mainnet for Binance Chain – and there are significant changes such as a “BNB token swap” that you MUST know about. The Binance Token (BNB) will no longer be on the ethereum chain (ERC-20 Token), instead it will be fully migrated to Binance chain (BEP-2). This means if you hold BNB on an ethereum wallet, you must pay special attention or you might accidentally send it to the wrong address.
Binance has started the token swap for $BNB tokens. In the future, BNB address will begin with “bnb……” format instead of the ethereum “0x…” address.
New BNB withdraw page uses the MEMO feature that is unique to Binance Chain
BNB kept on Binance.com will automatically be swapped – no manual operation required. The new withdraw page will automatically use the Binance Chain address.
To deposit Ethereum based tokens based on the ERC-20 standard, $BNB tokens can be sent to the Ethereum deposit address on the Exchange.
Old ERC20 Binance BNB tokens can be deposited in “Ethereum” address for converstion
Once ERC20 BNB is deposited into the exchange, the token will be automatically swapped.
BNB Token Supply and Functionality
In terms of total supply, the amount of BNB remains the same. The initial supply of BNB will be 200,000,000 and 11,654,398 BNB will be burned on Binance Chain. Binance will burn ERC20 BNB tokens to keep the total supply constant as the token swap takes place
Binance DEX
Binance DEX has officially launched at Binance.org. This Decentralized Exchange is designed for advanced users who want to keep self-custody of their cryptocurrency assets (as opposed to centralized exchanges where funds are kept by exchanges).
Currently Binance DEX support their own token standard, the BEP2 token. For coins to be listed on the DEX, they need to be migrated to the Binance Chain. Whether coins are willing to migrate depends on what features they need:
Faster transactions – Accelerators and small number of Validators mean confirmation times are much faster
Centralized – Validators are pre-authorized and consensus is not open to general public
No smart contract support – Binance Chain is transaction only
Binance to Challenge Ethereum as top Token Issuance Platform?
With the introduction of the BEP2 token standard, Binance Chain can allow projects issue tokens via Initial Coin Offerings (ICO) or Initial Exchange Offerings (IEO). This feature allows BinanceChain to rival the ERC20 standard Ethereum which has been used by many popular projects such as Basic Attention Token (BAT) and OmiseGo (OMG). What sets BEP2 tokens apart is that it has a faster confirmation time and access to Binance DEX.
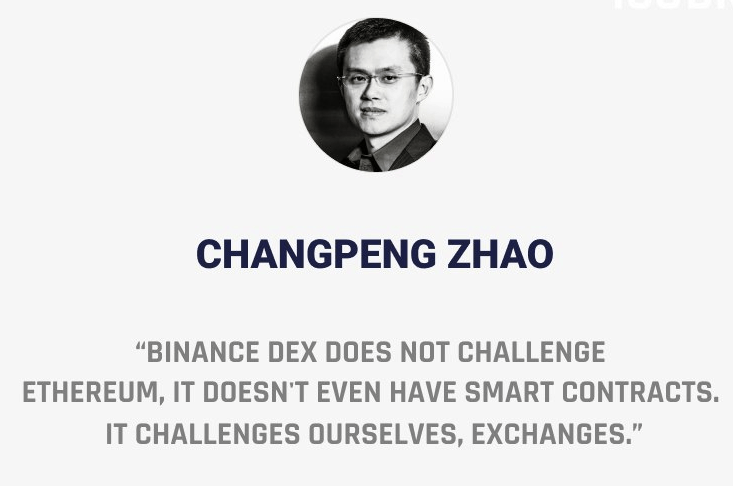
Whilst many have questioned if the success of Binance Chain would mean the demise of Ethereum, CEO Changpeng Zhao has denied this claim.
CEO Changpeng Zhao doesn’t see Binance Chain as a competitor to Ethereum
Currently Mithril (MITH) has chosen to migrate to be the first token to be migrated to the Binance Chain.
Disclaimer: Cryptocurrency trading involves significant risks and may result in the loss of your capital. You should carefully consider whether trading cryptocurrencies is right for you in light of your financial condition and ability to bear financial risks. Cryptocurrency prices are highly volatile and can fluctuate widely in a short period of time. As such, trading cryptocurrencies may not be suitable for everyone. Additionally, storing cryptocurrencies on a centralized exchange carries inherent risks, including the potential for loss due to hacking, exchange collapse, or other security breaches. We strongly advise that you seek independent professional advice before engaging in any cryptocurrency trading activities and carefully consider the security measures in place when choosing or storing your cryptocurrencies on a cryptocurrency exchange.
VeChain ToolChain could bring blockchain technology to the masses. Toolchain allows anyone to use the power of blockchain without complicated programming or engineering. We always hear a lot about blockchain projects including VeChain partnering with big names. Examples being DNVGL, BMW, PwC and others (Click here to find out more about Vechain and its partnerships).
According to statistics from the United Nations, over 90% of firms worldwide are Micro-, Small and Medium-sized Enterprises (MSMEs).
VeChain’s ToolChain seems to recognise their importance and is bringing its blockchain technology to them.
What is VeChain?
VeChain is a blockchain platform which supports the creation of smart-contracts. These are self executing contacts that have a guaranteed outcome without third party trust. This allows for the creation of decentralized applications which is intended to solve enterprise problems such as anti-counterfeiting and cold-chain logistics. To learn more, check out our article VeChain Explained or our VeChain in a Nutshell video below.
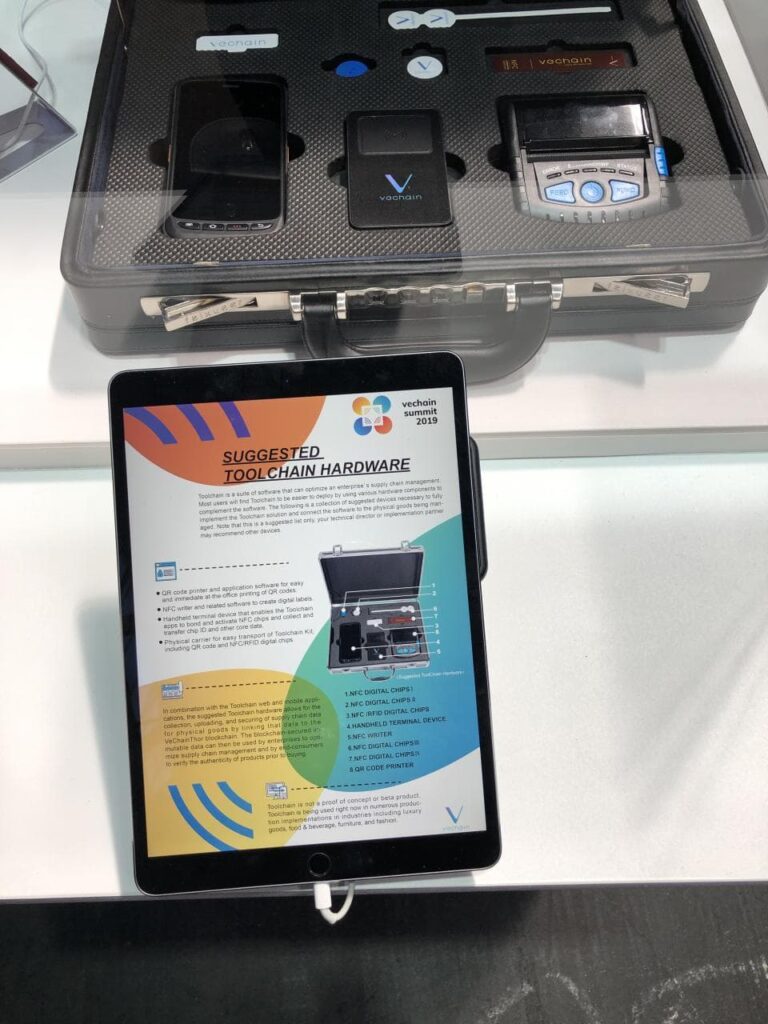
ToolChain is VeChain’s latest product. It was announced at the VeChain Summit 2019 (Click here for a recap).
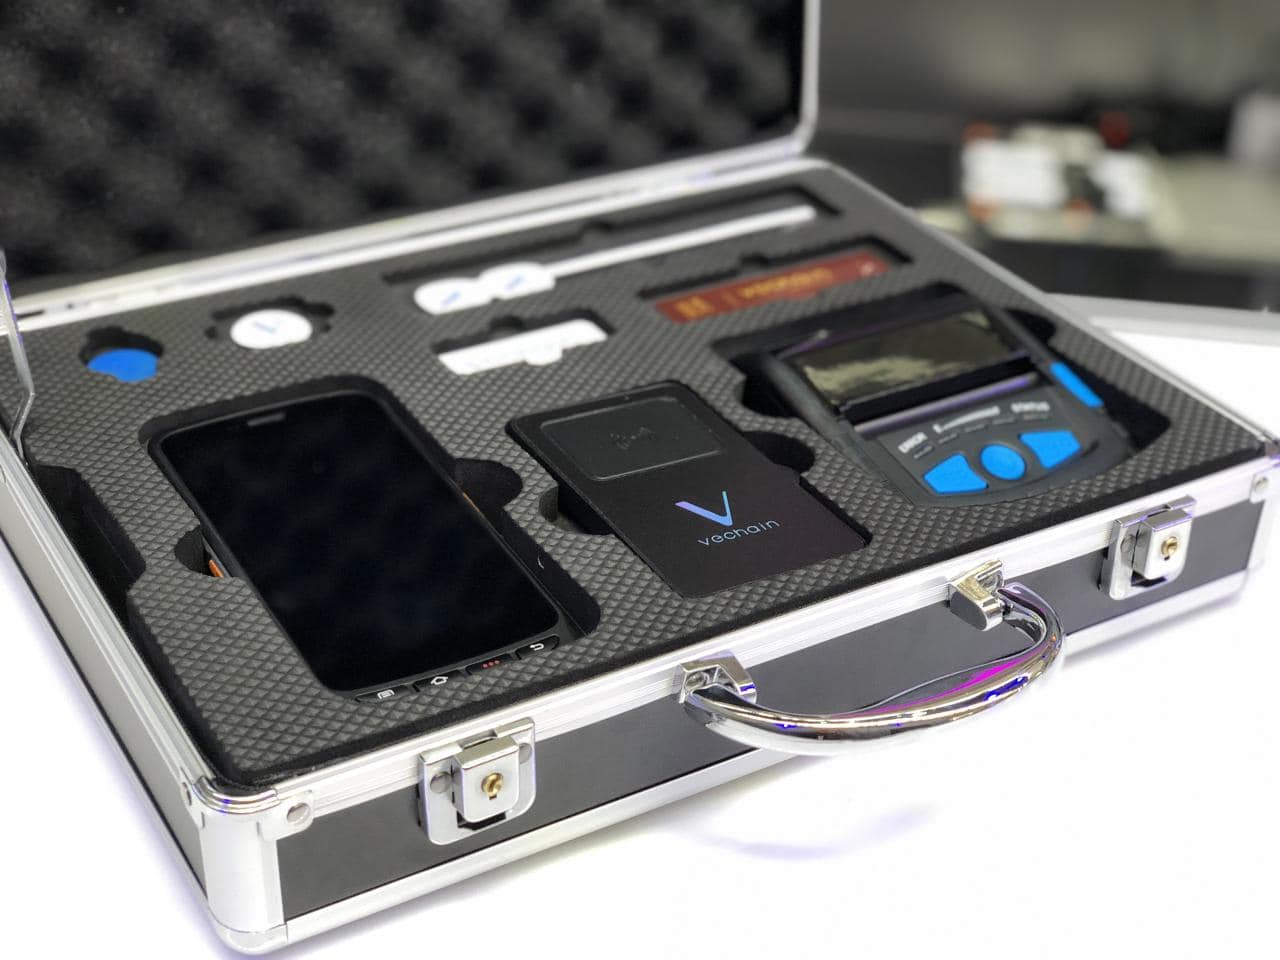
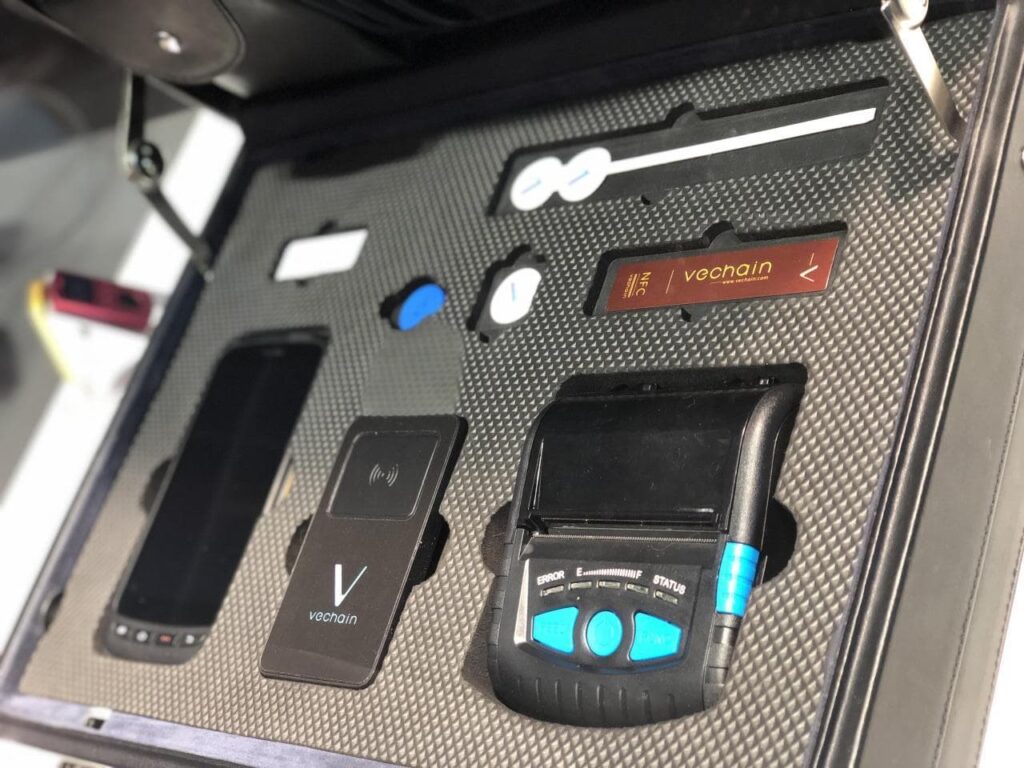
ToolChain hardware kit displayed at VeChain Summit 2019
ToolChain is a kit containing all the necessary hardware, software and service protocols to onboard a business onto the VeChainThor blockchain.
There are 3 Versions of the ToolChain kit: Standard, Developer and Channel Partner. This is so that businesses with any levels of technical capability can use VeChain’s technology.
Standard Version
The Standard Version provides standarized application modules, tools and Internet of Things (IoT) devices. It was designed for MSMEs without the capability to develop their own blockchain-based lifecycle management solution. Businesses can be onboarded onto the VeChainThor blockchain within 30 minutes.
Developer Version
The Developer Version is designed for enterprise customers with stronger technical capabilities. It will allow enterprises to develop various applications based on the VeChainThor blockchain tailored to their needs.
Channel Partner Version
Channel Partners will be able to have independent deployment and multi-dimensional customisation of ToolChain.
VeChain ToolChain at a glance
The ToolChain hardware kit contains:
QR code printer and application software to print QR codes.
NFC writer and software to create digital labels on NFC tags.
IoT devices, RFID chips and sensor devices
Handheld terminal devices which will enable ToolChain apps to bond and activate NFC chips, and transfer the data on them.
In terms of software:
ToolChain Admin Center: this app is a command centre. One of its features is that business owners can use this software to configure NFC and/or RFID chips. The Company can ship these NFC and/or RFID chips directly to businesses.
VeChain Work App: this app allows business owners or third party manufacturers to “bind” the physical product to the NFC/RFID chip. To learn more about this app, check out Bsc44’s article here.
VeChain Pro app: this app is already available to download. It will be pre-loaded onto the NFC scanner. It allows anyone to view the entire story of the product including proof of authenticity and origin.
Description of the ToolChain kit components
Examples of VeChain ToolChain in use
One of ToolChain’s notable users is SBTG Surplus & Co., a custom sneaker artist. SBTG uses NFC chips embedded into its limited edition sneakers. Customers can verify the sneakers’ authenticity, origin and other information by scanning them with the VeChain Pro app.
Best use of blockchain is real life use 🤩 – with @vechainofficial's help, these sneakers are impossible to counterfeit. An NFC tag is sewn into the shoe with a private key that's recorded on Vechain's Blockchain. $VET Now if only they have it in my size….😱😱😱😱 pic.twitter.com/NgFuZrsq5c
SBTG have recently partnered with Adidas and HBO Asia to produce limited edition Game of Thrones sneakers. These sneakers are powered with VeChain Technology.
SBTG x Game of Thrones sneakers with VeChain RFID chips
Problems with authenticity and quality assurance
MSMEs generally lack technical or financial resources. Hence they have difficulty in ensuring their products’ authenticity and quality. They are also vulnerable towards counterfeiters and bad actors in the supply chain. This in turn could seriously damage their reputation.
Even for products from larger corporations, product authenticity and quality assurance is not transparent. We as consumers do not have easy access to information on the supply chain of our products.
Consumers still rely on outdated authentication methods. This is true even for expensive luxury items. As an example, for luxury watches we would compare an items’ appearance or check its serial number. Meanwhile there are official databases of serial numbers. The numbers are only etched onto the watch and counterfeiters can easily copy this.
Thus, authenticating a luxury watch requires significant expertise and experience. Whilst counterfeiters are always trying to make their watches look more authentic.
Can VeChain ToolChain bring mass adoption through MSMEs?
ToolChain can be a simple and cost effective supply chain management solution for MSMEs. ToolChain could finally give MSMEs the same ability as large corporations to ensure product quality.
As mentioned above, most of the world’s businesses are MSMEs. ToolChain could finally bring blockchain to a substantial but overlooked group
Moreover, customers will be able to scan the NFC/RFID chip embedded into the product and see information pertaining to their exact item.
If you want to learn more about VeChain, check out our guide, VeChain explained.
Want to find out more interesting happenings at the VeChain Summit? Check out these videos below!
https://www.youtube.com/watch?v=ZRBuQ96ikPc
Check out our livestream with VeChain’s with Sunny Lu (CEO) and Kevin (COO), and Patrick from Plair
And don’t forget to check out our post VeChain Summit recap video!
Mass adoption is starting through…milk?
On 18th May 2019, VeChain announced that its enterprise partner, Bright Food (Group) Co., Ltd (“Bright Food”) has put its “Cupids Farm” milk on their BrightCode Commodity Confidence Index Platform (“BrightCode Platform”).
Cupids Farm milk
The BrightCode Platform is a blockchain-based commercial ecosystem built upon the Partner Version of VeChain ToolChain. To learn more about the Platform, check out Oliver’s article here.
Bright Food was founded in 2006 and mainly produces milk products, sugar, wine, snacks and canned goods. Bright Food’s products can be found in over 4000 online shops in China. The Company was listed as one of the ten Chinese companies to watch in the international arena by Forbes Magazine in 2015.
When customers can scan the QR code on bottles of “Cupids Farm” milk, they will be directed to the BrightCode Platform. There, key information on the bottle of milk’s lifecycle will be available. For example information on where it was produced, videos of the diary farm, production techniques etc.
VeChain’s other partner, DNVGL will be responsible for verifying the source data and tamper proof technology. So customers can be assured that the information presented is authentic.
Information shown to customers when they scan the QR code
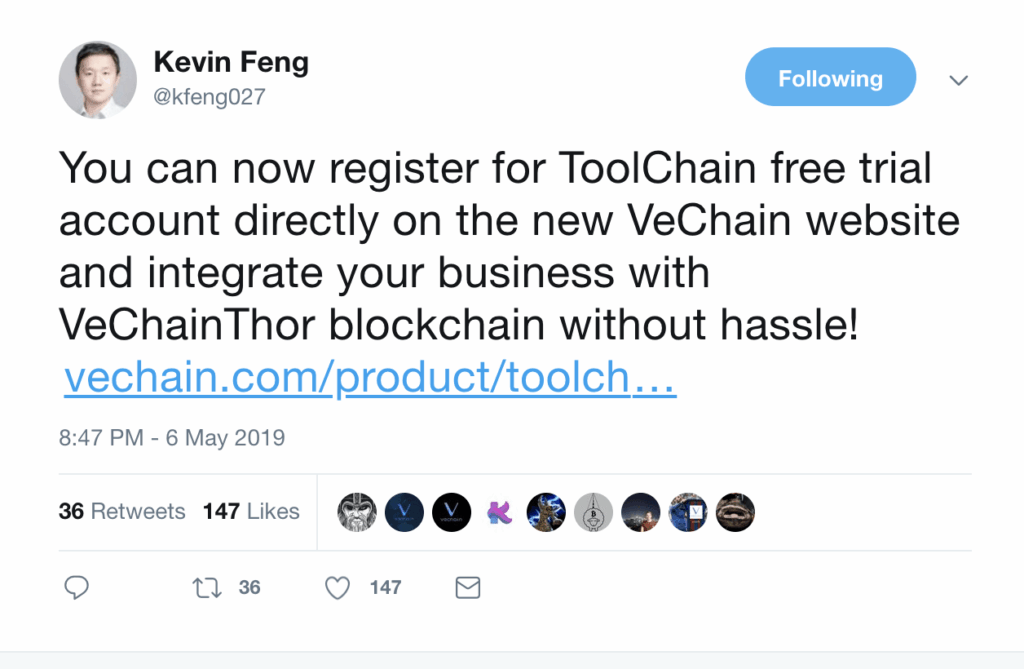
FREE trial now available!
You can now register for a FREE ToolChain trial account by signing up with them! Link Here!
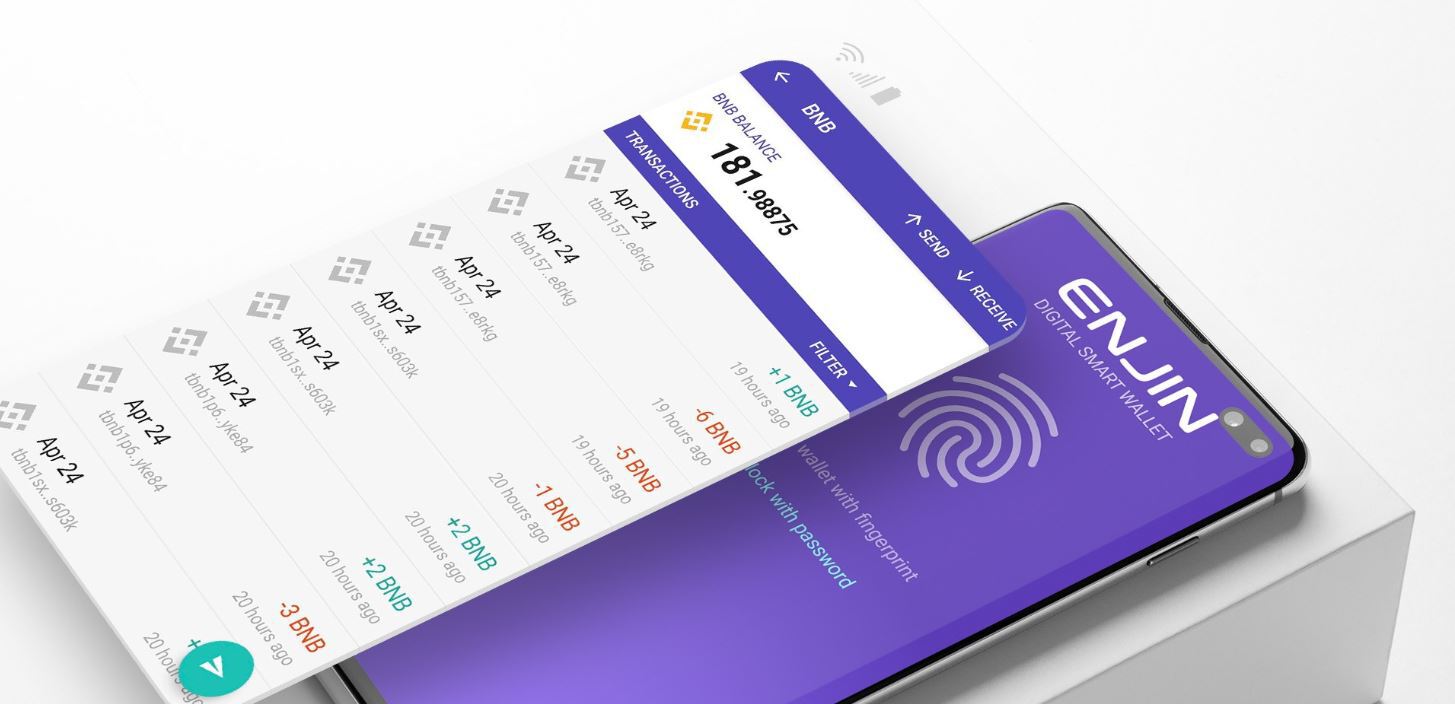
Enjin Wallet just added full native support for the Binance Chain and all BEP-2 (Mithril, ChangeNow) based assets. This means all Binance Chain assets can now be safely stored on both Android and iOS phones and transferred with ease (with “memo” support). This integrations comes merely a week after the official launch of the Binance Chain mainnet on April 23. Binance Chain boasts fast transactions, transaction finality and support for Binance Decentralized Exchange (DEX).
All Binance Chain assets can be added to the Enjin Wallet
This initiative is also a step in the right direction for Enjin, coming weeks after their collaboration with Samsung. With their partnership, Samsung Galaxy S10 Blockchain KeyStore will natively support ENJ, ERC-1155, Ethereum (ETH) and Ethereum based tokens.
“Like Enjin, Binance is a fast-moving, innovation machine — and one that we are proud to throw our support behind through this collaboration and many more to come.”
New Binance Coin (BNB) address start with “bnb…” instead of “0x….”
It’s Enjin Wallet is the most secure mobile wallet in the crypto space with a strong private key encryption mechanism and their own secure keyboard which. Enjin team claims these security features gives the wallet “hardware-like security. (www.spinabifida.net) ” To ease navigation, Enjin has a coin management system with features that allow one to customize fees and set limits.
Stronger BUIDLers stick together
Following this incorporation, Ted, lauded Enjin as a “community- and BUIDL-focused.” Apart from BNB support, Enjin also announced their plans of allowing clients to “place orders to Binance DEX’s on-chain order books—without leaving the Enjin Wallet’s secure interface” in coming days.
“We are excited to have the support of Enjin Wallet on Binance Chain. Enjin users will be able to transact from wallet to wallet on Binance DEX with full custody over their assets, increasing the level of freedom in the community.”
Ted Lin, the Binance Chief Growth Officer
If anything, this announcement complements Binance’s effort of launching a modern, liquid and easy to use decentralized platform effectively creating a liquid market place where participants can exchange digital assets without a third party via Binance Chain, a decentralized network from where the Binance DEX and all other Binance’s operations will operate from.
Binance CEO Changpeng CZ Zhao talks about the future of cryptocurrencies
“Binance Chain is a very simple chain in terms of application, but it can handle very large loads. It is our opinion that the load is more important than the features.”— Changpeng “CZ” Zhao, Binance CEO
Clearly, Enjin is strategically positioning itself and will tap on the success of Binance DEX. Besides, the announcement is a testament enough, revealing their code improvement and dedication of prioritizing the user which is the reason why the wallet as a 4.6-star rating at Google Store.