Cryptocurrency would essentially be useless without the ability to store, send, receive and make use of its special features. In this section we provide overviews and tutorials for crypto tools which can help you use cryptocurrencies to its fullest potential.
We look at the differences between the types of cryptocurrency wallets and some of the most well-known brands on the market today to help you choose which one is the best for you to store your cryptocurrencies safely, and troubleshooting tips such as what to do when your transactions are stuck. Exchanges are also an integral part of dealing with cryptocurrencies because they let you convert between different cryptocurrencies, and even fiat currencies. Therefore, we compare different exchanges to see which has the best features for your use, and some tips and hacks to save money on these exchanges.
As Ethereum is steadily approaching the transition to a Proof-of-Stake mechanism, one notable thing that has changed, aside from further protocol development, has been the change in terminology.
We have already covered Ethereum 2.0 extensively in one of our ongoing blogs where we go in-depth on everything you need to know about Ethereum’s transition to PoS:
Let’s take a closer look at the rebranding from Ethereum 2.0 to the Ethereum Merge, as well as go over the most recent developments in Ethereum’s roadmap as of May 2022.
Check out our latest video- Ethereum Merge: ALL you need to know (including ETHPOW)
Ethereum Merge: ALL you need to know (including ETHPOW)
The term “Eth2.0” was retired in early 2022 to avoid confusion and scams, and to better reflect Ethereum’s evolution—not replacement. The Merge, completed in September 2022, unified Ethereum’s original execution layer with the Beacon Chain’s Proof-of-Stake consensus. By 2025, this rebranding has proven prescient: Ethereum’s roadmap has expanded far beyond the original Eth2.0 vision, with Layer 2 rollups, proto-danksharding, and modular scaling now driving innovation. The shift in terminology helped clarify that Ethereum remains one chain, continuously upgraded—not split or replaced.
ETH Merge is a huge success!
On 15th September 2022 at 06:42:42 UTC at block 15537393, the Merge was completed.
And we finalized!
Happy merge all. This is a big moment for the Ethereum ecosystem. Everyone who helped make the merge happen should feel very proud today.
Missed our historical LIVE Merge party? Check it out here!
Ethereum Merge Party – Watch the Merge live!
Ethereum Post-Merge: Where Things Stand in 2025
Since the successful Merge on 15th September 2022, Ethereum has fully transitioned to Proof-of-Stake, eliminating mining and reducing energy consumption by over 99%. The focus has shifted from testing Merge readiness to scaling and optimizing the network. Key milestones since the Merge include:
Staking Growth: Over 30 million ETH is now staked, with thousands of validators securing the network.
Scalability Upgrades: Proto-danksharding (EIP-4844) was implemented in late 2024, significantly reducing Layer 2 fees and paving the way for full sharding.
Layer 2 Expansion: Rollups like Optimism, Arbitrum, and zkSync have seen explosive growth, handling the majority of Ethereum transactions.
Institutional Adoption: Ethereum’s energy-efficient design and predictable monetary policy have attracted major financial institutions and enterprise use cases.
The Merge is no longer a future milestone—it’s the foundation for Ethereum’s next phase: modular scalability, global adoption, and sustainable infrastructure.
Why the Ethereum Merge Still Matters to Crypto Traders in 2025
Although the Merge was completed nearly three years ago—on 15th September 2022—it continues to influence Ethereum’s trading dynamics in significant ways. Here’s why it remains relevant to traders today:
Reduced ETH Supply and Market Scarcity
The Merge reduced ETH issuance by approximately 90%. Combined with EIP-1559’s fee-burning mechanism, Ethereum has become deflationary during periods of high network activity.
This scarcity has strengthened Ethereum’s position as a store of value, attracting long-term investors and institutional interest.
Staking Rewards and Yield Opportunities
ETH holders can earn staking rewards by locking up their tokens. As of August 2025, staking yields range between 4% to 6%, depending on network conditions.
Traders now consider staking returns when evaluating ETH’s opportunity cost relative to other assets.
Layer 2 Growth and Transaction Efficiency
The Merge enabled scalability upgrades such as proto-danksharding (EIP-4844), which significantly lowered Layer 2 transaction fees.
A majority of ETH trading now occurs on rollups like Arbitrum, Optimism, and zkSync, offering faster execution and lower costs.
Environmental Sustainability and Institutional Access
Ethereum’s energy consumption dropped by more than 99% post-Merge, making it one of the most environmentally sustainable blockchains.
This shift has made ETH more appealing to ESG-conscious investors and funds that previously avoided energy-intensive assets.
Price Behavior and Market Sentiment
ETH’s price has shown resilience, supported by reduced sell pressure, staking lockups, and expanding utility across DeFi and NFTs.
Traders monitor staking inflows, validator performance, and Layer 2 activity as key indicators for ETH price trends.
Ethereum ($ETH) Price Trends Since the Merge: 2025 Insights
Since the Ethereum Merge on 15th September 2022, ETH’s price trajectory has been shaped by a mix of protocol-level changes, macroeconomic factors, and evolving market sentiment. Here’s a breakdown of how prices have responded and what traders are watching now:
Initial Reaction and Short-Term Volatility
In the hours following the Merge, ETH saw a modest price increase, briefly peaking above US$1,640 before settling below US$1,600.
Traders were cautious, anticipating potential forks or technical disruptions, which kept early momentum subdued.
Medium-Term Consolidation and Staking Dynamics
As staking rewards became more accessible and the supply of ETH decreased due to reduced issuance and fee burning, ETH entered a period of steady accumulation.
By mid-2023, ETH had stabilized in the US$1,800–US$2,200 range, supported by growing validator participation and reduced sell pressure.
Long-Term Growth and Institutional Interest
The implementation of proto-danksharding in late 2024 significantly lowered Layer 2 transaction costs, boosting network activity and reinforcing ETH’s utility.
By August 2025, ETH is trading above US$3,000, driven by deflationary pressure, staking lockups, and increased adoption across DeFi, NFTs, and enterprise applications.
Key Price Drivers in 2025
Environmental Appeal: Ethereum’s energy-efficient design has made it a preferred asset for ESG-focused investors.
Deflationary Supply: With issuance down and EIP-1559 continuing to burn fees, ETH’s circulating supply has declined, supporting upward price pressure.
Staking Yield: ETH staking yields remain attractive, encouraging long-term holding and reducing market liquidity.
Layer 2 Ecosystem: Rollups now handle the majority of Ethereum transactions, improving user experience and expanding use cases.
MetaMask is a secure crypto wallet to store and manage your Ethereum (ETH) and other ERC-20 tokens. It is also a gateway to other decentralized applications. This is beneficial for people who frequently use ETH and its tokens as it provides a secure and fast way to access their funds. This guide is a MetaMask tutorial for complete beginners. We will learn how to:
Set up a MetaMask account.
Deposit to MetaMask.
Send funds from MetaMask.
Change and add networks in MetaMask.
Use MyEtherWallet with MetaMask.
Fiat on-ramps: Buy Crypto Using Debit or Credit Cards.
Withdraw money or cryptocurrencies from MetaMask.
Collect airdrops using MetaMask.
Cash out your crypto to fiat using MetaMask.
You can also follow me as I walk through the steps in my video:
MetaMask Tutorial Guide
What’s more, there are rumors that MetaMask might also do a $MASK airdrop! Learn how to get some of that potential airdrop with our MetaMask ($MASK) Token Airdrop Guide!
How to set up a MetaMask account
Here’s how to set up a MetaMask account:
Download and install MetaMask.
Create a new wallet.
Download and install Metamask extension
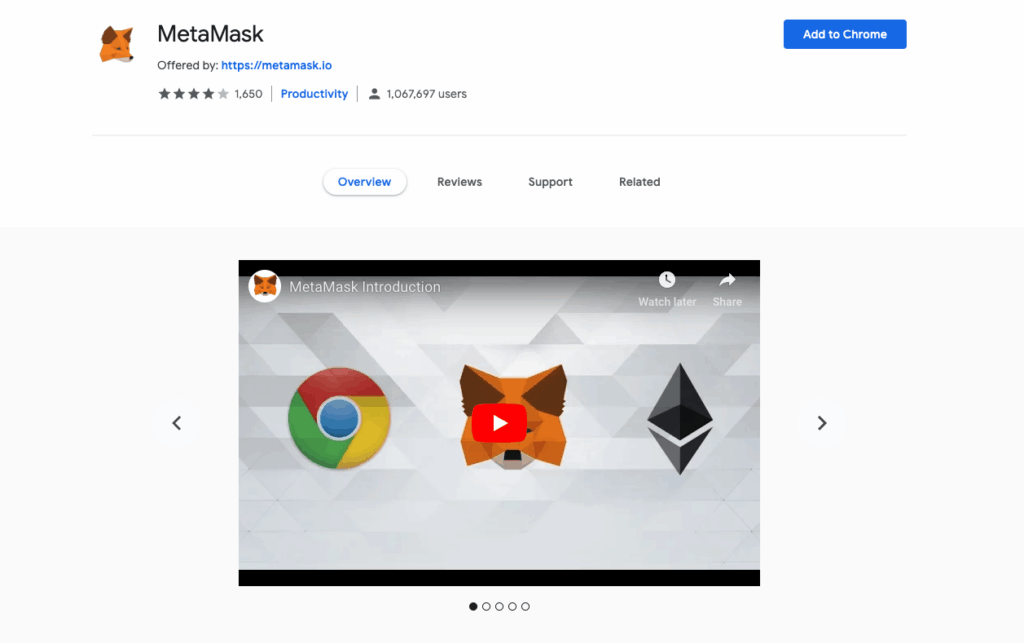
Download MetaMask. MetaMask has extensions for Chrome, Firefox, Opera, Edge and Brave browsers. At the extension store on these browsers, search for MetaMask and click “Add to” browser. Alternatively, installe the MetaMask mobile from the iOS App Store or Google Play Store.
Example: For Chrome users, click “Add to Chrome” and then “Add extension” when the popup window appears.
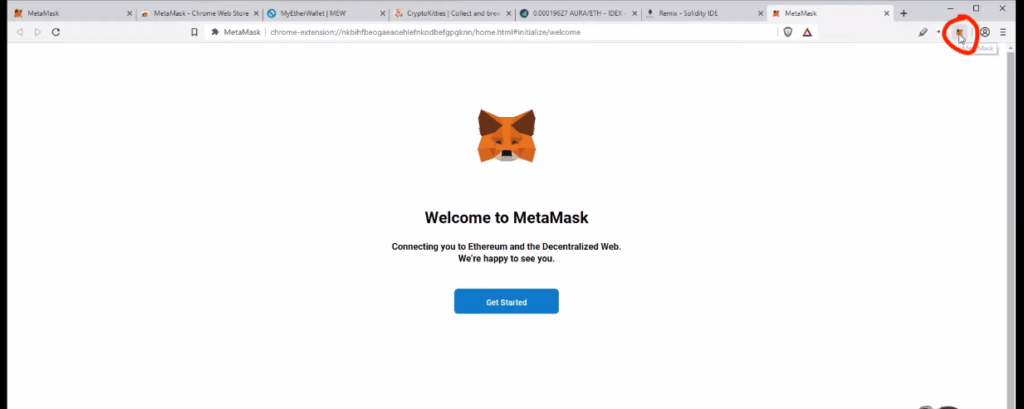
Once installed, the MetaMask icon will appear on the top right-hand corner.
The fox logo will appear on your browser once the extension is successfully installed
Create a new wallet
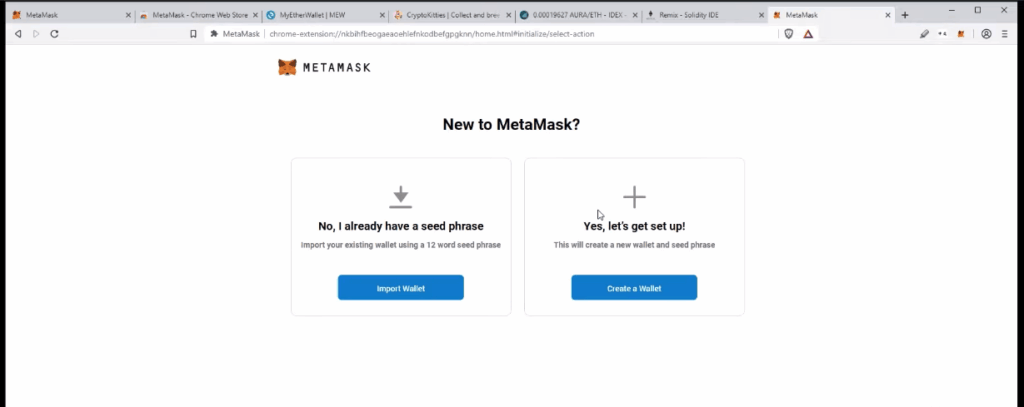
Click the “Get Started” button on the webpage and choose the option to make a new wallet when prompted. Afterward, you will be asked to choose your preferred security method:
Secret Recovery Phrase (SRP): The classic method using a 12-word phrase. You alone control access.
Social Login (Extension only): Link your Google or Apple account and set a password. Both are required to access your wallet.
Select the option to set up a new wallet
Set a strong password using a unique combination of letters, numbers and symbols. Avoid predictable passwords like birthdays. If you are using SRP, write down the 12-word phrase and store it in a secure, offline location.
How to send crypto from MetaMask?
Sending crypto from MetaMask is a straightforward process whether you’re using the browser extension or the mobile app. Here’s how:
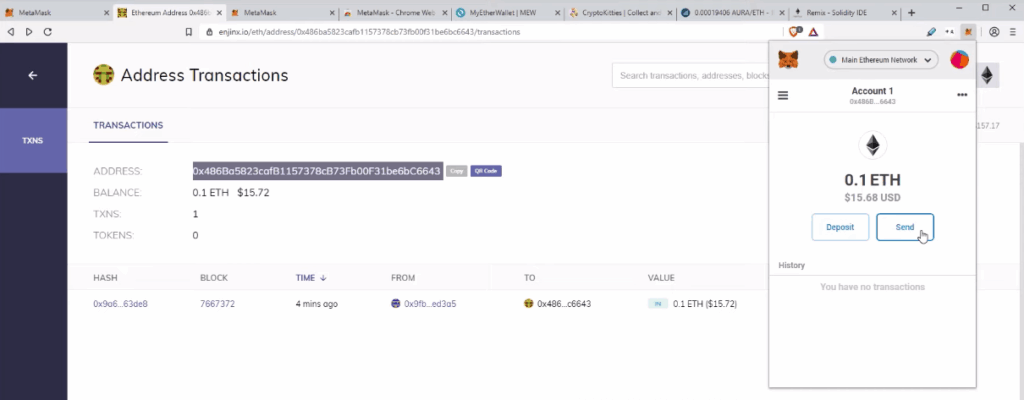
On browser extension
Open MetaMask: Click the MetaMask icon in your browser.
Select the Account: Make sure you’re in the correct wallet account.
Click “Send”: This opens the transaction window.
Enter Recipient Address: Paste the wallet address you want to send to. You can also select from saved contacts.
Choose Token and Amount: Select the token (e.g., ETH, USDC, etc.). Then enter the amount to send.
Review Gas Fees: MetaMask will estimate the gas fee. You can adjust the fee manually for faster or cheaper transactions.
Confirm Details: Double-check the recipient address, token type, and network. Click “Confirm” to send.
Track Transaction: Go to the Activity tab to monitor status. You will see a “Confirmed Transaction” notification once complete.
Click “Send” on the pop-up window.
On mobile app
Here is how to send crypto from MetaMask using the mobile app:
Tap the Actions button in the center of the tab bar.
Tap “Send”.
Paste or select the recipient address.
Choose the token and enter the amount.
Tap “Next” to view gas fees and transaction details.
Tap “Send” to confirm and complete the transaction.
Important notes
Gas Fees: Ensure you have enough of the network’s native token (e.g., ETH for Ethereum, BNB for BSC, POL for Polygon) to cover gas fees.
Network Match: Always verify that the sending and receiving wallets are on the same blockchain network.
Security Tip: Double-check the recipient address to avoid irreversible mistakes.
Change and add networks in MetaMask
MetaMask supports multiple blockchain networks beyond Ethereum, including Layer 2s and non-EVM chains. You can easily switch between networks or add new ones manually or via trusted platforms.
Switching networks
Open MetaMask (browser extension or mobile app).
Click the network dropdown at the top of the wallet.
Select from preloaded networks like: Ethereum Mainnet, Polygon, Arbitrum, Optimism, BNB Smart Chain or Linea.
MetaMask will automatically switch to the selected network.
Select network on MetaMask
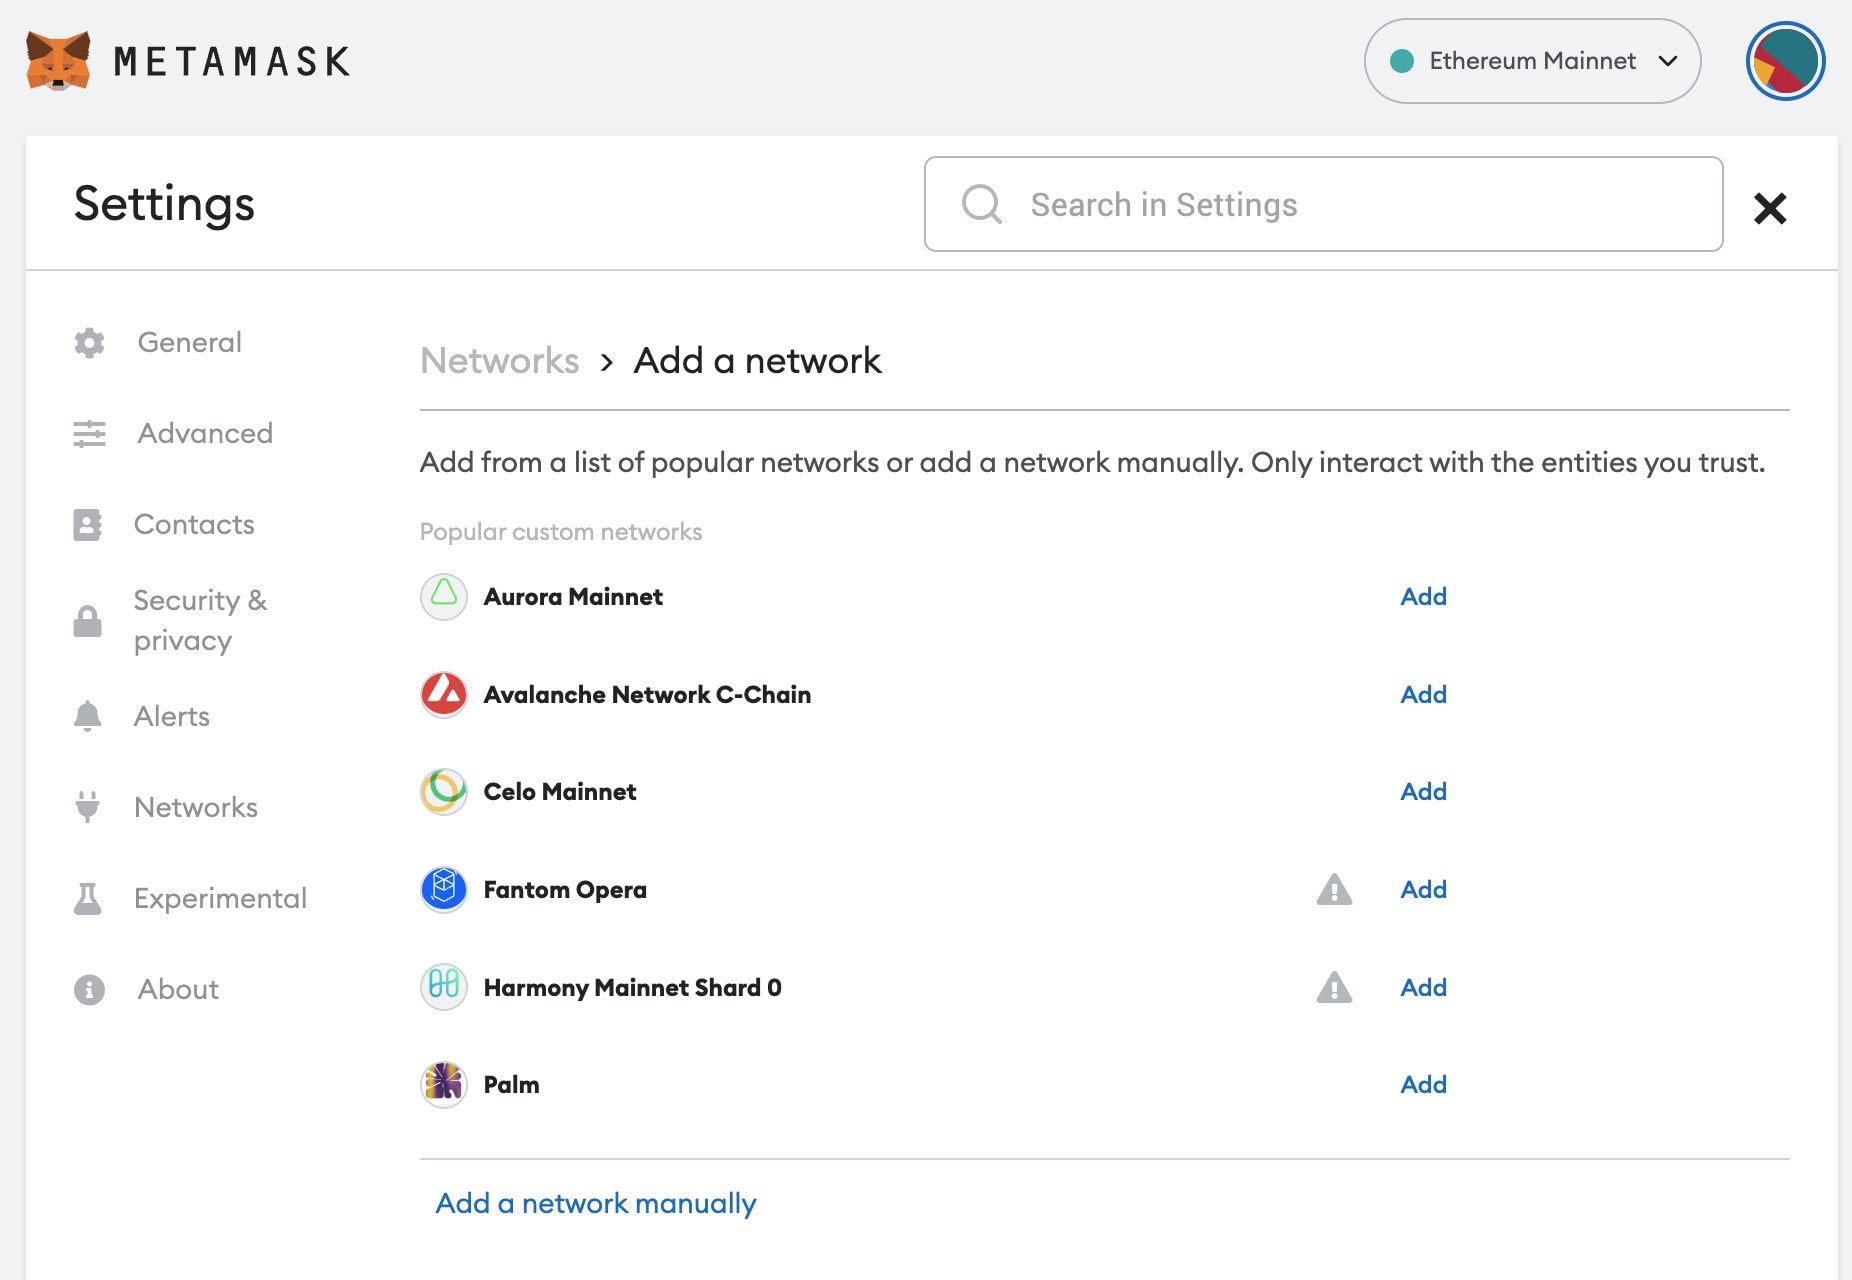
Adding a new network
For some newer or testnet networks, you may have to add them to MetaMask manually or via trusted services like Chainlist.
Option 1: Manual add
Go to Settings > Networks > Add Network.
Enter the required details: (1) Network Name; (2) RPC URL; (3) Chain ID; (4) Currency Symbol; (5) Bock Explorer URL (optional)
Search for the desired network (e.g., Avalanche, Base, zkSync).
Click “Add to MetaMask”, then approve and switch.
Tips and reminders
Verify RPC Details: Always get network info from the official project documentation.
Custom Networks: These are not verified by MetaMask. Be cautious of phishing or fake RPCs.
Testnets: Enable testnets via Settings > Advanced > Show test networks.
Non-EVM Chains: MetaMask now supports limited functionality for non-EVM chains like Bitcoin and Starknet.
How to use MyEtherWallet with MetaMask?
MyEtherWallet(MEW) is a free, open-source interface for interacting with the Ethereum blockchain. You can connect your MetaMask wallet to MEW to manage assets, interact with smart contracts, and access advanced features. Here is how to use MyEtherWallet with MetaMask:
Open MyEtherWallet: Go to the official MEW website. Always verify the URL to avoid phishing scams.
Access Your Wallet via Browser Extension: Click “Access My Wallet” on the homepage. Select “Browser Extension” as your access method.
Connect MetaMask: MetaMask will prompt you to select a wallet account. Click “Next”, then “Connect” to authorize MEW.
View MEW Dashboard Once connected, you’ll be redirected to the MEW dashboard where you can: (1)View your portfolio and balances; (2) Send and receive ETH and ERC-20 tokens; (3)Manage NFTs; (4) Interact with smart contracts; (5) Sign messages and transactions.
Switch Networks if Needed Ensure your MetaMask is on the same network MEW is using (e.g., Ethereum Mainnet, Arbitrum, Optimism). You can change networks directly in MetaMask’s dropdown menu.
Disconnecting MetaMask from MEW
If you want to disconnect MetaMask from MEW:
Open MetaMask.
Click the three dots in the top right corner.
Go to “Connected Sites”.
Find MEW and click “Disconnect”.
MetaMask Fiat On-Ramps: Buy Crypto Using Debit or Credit Cards!
MetaMask now offers a seamless way to purchase cryptocurrencies directly within the wallet using fiat payment methods. Through integrations with trusted providers like Transak, MoonPay, Coinbase Pay, and others, users can buy crypto using:
Debit or credit cards
Apple Pay and Google Pay
Bank transfers (in supported regions)
How to buy crypto in MetaMask
Open MetaMask (browser extension or mobile app).
Click the “Buy” button on the home screen.
Choose a provider (e.g., Transak, MoonPay, Coinbase Pay).
Select: (1) The cryptocurrency you want to buy (e.g., ETH, USDC, SOL); (2) The amount; and(3) Your preferred payment method
Follow the prompts to complete identity verification (KYC), if required.
Confirm the transaction and wait for the crypto to appear in your wallet.
Expanded network support
As of July 2025, MetaMask supports fiat purchases on non-EVM chains like Solana, allowing users to buy SOL directly in-wallet via Transak. This marks a major step toward chain-agnostic onboarding.
Security and compliance
All fiat on-ramp providers integrated with MetaMask comply with local regulations and offer tiered KYC processes.
MetaMask does not store payment information; transactions are handled by the selected provider.
Tips for smooth transactions
Ensure your wallet is on the correct network before purchasing.
Use a verified provider to avoid phishing risks.
Check fees and exchange rates across providers for the best deal.
How to withdraw money or cryptocurrencies from MetaMask
Withdrawing funds from MetaMask involves either converting crypto to fiat directly within MetaMask or transferring assets to a centralized exchange for cash-out. The method you choose depends on your location and the supported features in your region.
Option 1: Direct Fiat Withdrawal Using MetaMask’s Sell Feature
MetaMask now offers a built-in “Sell” feature that allows users to convert crypto to fiat and withdraw to a bank account or PayPal. This feature is available in select regions including the United States, United Kingdom, Germany, France, India, and Saudi Arabia.
Steps:Go to MetaMask Portfolio and connect your wallet.
Click on “Sell” in the left-hand menu.
Select your region and the token you want to sell (currently ETH on Ethereum Mainnet is supported).
Choose your destination account (bank or PayPal).
Enter the amount to sell and select a quote from available providers.
Link your fiat account on the provider’s site.
Confirm the transaction and send your crypto.
Track the transaction in the Sell tab. Fiat may take a few days to arrive.
Option 2: Withdraw via centralised exchange
If the Sell feature is not available in your region, you can withdraw by transferring your crypto to an exchange like Binance or Coinbase:
Create and verify an account on a trusted exchange.
In MetaMask, swap your tokens to a widely supported asset like ETH or USDT.
Copy your deposit address from the exchange and paste it into MetaMask’s “Send” field.
Confirm the transaction and wait for the funds to arrive in your exchange wallet.
On the exchange, sell your crypto for fiat.
Withdraw fiat to your bank account or PayPal using the exchange’s withdrawal options.
Points to note
Always verify the network and token compatibility before sending.
Ensure you have enough native tokens (e.g., ETH) to cover gas fees.
Use only official exchange platforms to avoid scams.
MetaMask does not directly connect to banks; all fiat withdrawals are processed through third-party providers or exchanges.
How to collect airdrops using MetaMask?
MetaMask is frequently used to claim airdrops from decentralized projects. Airdrops are free token distributions to users who meet certain criteria, such as holding a specific token, completing tasks, or interacting with a protocol. MetaMask’s growing ecosystem now includes structured campaigns like MetaMask Missions, which may increase eligibility for future airdrops.
To collect airdrops using MetaMask:
Visit the official airdrop or project website. Always verify the URL to avoid phishing scams.
Switch to the correct blockchain network in MetaMask. Many airdrops are network-specific (e.g., Ethereum, Linea, Arbitrum).
Connect your MetaMask wallet to the site. Use the “Connect Wallet” button, typically located in the top right corner.
Complete any required tasks. These may include swaps, bridging tokens, staking, or minting NFTs.
Click the “Claim” button if available. MetaMask will prompt you to approve the transaction and pay any gas fees.
Confirm the transaction. Once approved, the tokens will appear in your wallet.
Disconnect your wallet from the site after claiming. In MetaMask, go to “Connected Sites” and remove access.
To increase your chances of receiving future airdrops:
Actively use MetaMask’s built-in features such as swaps, bridges, and staking.
Participate in campaigns like MetaMask Missions, which run periodically and reward users for completing on-chain tasks.
Hold eligible tokens and interact with new protocols early.
MetaMask does not guarantee airdrops, but consistent engagement with decentralized applications and networks through MetaMask may improve your eligibility.
Cash out your crypto to fiat using MetaMask
MetaMask now offers a built-in “Sell” feature that allows users to convert supported cryptocurrencies into fiat currencies and withdraw funds directly to a bank account or PayPal. This feature is available through integrated off-ramp providers such as MoonPay and Transak.
To cash out using MetaMask:
Open MetaMask Portfolio at portfolio.metamask.io or use the MetaMask mobile app.
Select the “Sell” option from the menu.
If it is your first time, choose your region and confirm that the service is supported in your location. The feature is currently available in the United States, United Kingdom, and parts of Europe.
Choose the token you want to sell, such as ETH or supported stablecoins.
Enter the amount to sell and select a quote from the available providers.
You will be redirected to the provider’s website to complete identity verification and link your bank or PayPal account.
Return to MetaMask Portfolio and confirm the transaction.
Track the progress in the “Sell” tab. Fiat withdrawals may take a few business days to complete.
Points to note:
Only supported tokens with sufficient liquidity can be sold. Airdropped or obscure tokens may not be eligible.
MetaMask does not store personal banking information; all fiat processing is handled by third-party providers.
If your region is not supported, you can transfer your crypto to a centralized exchange like Binance or Coinbase to cash out.
MetaMask tips, tricks, and hacks for ADVANCED users
Congratulations on setting up your account! Now you are ready for ADVANCED tips and tricks such as:
how to save your frequently used contacts (addresses) to MetaMask;
how to speed up stuck transactions….and more!
Check out our video which will walk you through the process step by step:
Advanced MetaMask tips and tricks you MUST know
Frequently Asked Questions (FAQs)
Is MetaMask suitable for beginners?
Yes. It’s simple to use and ideal for newcomers.
Is MetaMask secure?
Yes, if you protect your Secret Recovery Phrase and avoid phishing sites.
Can I use MetaMask on multiple devices?
Yes. Import your wallet using your recovery phrase.
Do I need crypto to use MetaMask?
No, but having tokens unlocks full features.
How do I add crypto?
Buy via fiat on-ramps or receive from another wallet.
How do I send crypto?
Click “Send,” enter the address, choose the token, and confirm.
How do I cash out to fiat?
Use the “Sell” feature to withdraw to bank or PayPal in supported regions.
What scams should I watch for?
Fake sites and messages asking for your recovery phrase.
Should I use a hardware wallet?
Yes, for large or long-term holdings. For hardware wallet recommendations, check out our review for the Ledger Nano X and the Trezor Safe 5
How do I fix or cancel a transaction?
Use “Speed Up” or “Cancel” options in MetaMask.
Is MetaMask available on mobile?
Yes. Download from the App Store or Google Play.
How do I connect to a website?
Click “Connect Wallet” and approve the prompt in MetaMask.
Disclaimer: Cryptocurrency trading involves significant risks and may result in the loss of your capital. You should carefully consider whether trading cryptocurrencies is right for you in light of your financial condition and ability to bear financial risks. Cryptocurrency prices are highly volatile and can fluctuate widely in a short period of time. As such, trading cryptocurrencies may not be suitable for everyone. Additionally, storing cryptocurrencies on a centralized exchange carries inherent risks, including the potential for loss due to hacking, exchange collapse, or other security breaches. We strongly advise that you seek independent professional advice before engaging in any cryptocurrency trading activities and carefully consider the security measures in place when choosing or storing your cryptocurrencies on a cryptocurrency exchange.
The increasing popularity and adoption of cryptocurrency has expanded the wallet market. Now that many well-known traditional and crypto brands accept crypto as a payment option, enthusiasts are constantly on the lookout for safer ways to store their digital assets.
Ledger remains a leading name in hardware crypto wallets. Since the launch of the Nano S in 2016, Ledger has become a trusted choice for securing digital holdings. Over the years, Ledger has introduced several models, including the Nano S, Nano X, and Nano S Plus. The latest addition, the Ledger Flex, offers an E Ink touchscreen and enhanced security features, making crypto storage even more accessible. The Ledger Nano S Plus is still available and remains an affordable option at US$79.
The Nano S Plus is Ledger’s third release from its Nano series, a line of pocket-sized hardware crypto wallets. Ledger’s Nano S Plus has all of the features of the original Nano S but with a few unique features and upgrades.
New features of the Ledger Nano S Plus
Ledger introduced the Nano S Plus with an exciting list of features and improvements over the two previous releases. Some of the major new features on the Nano S Plus include:
NFT & DeFi Support: Users can securely store, send, and receive NFTs through the Ledger Live app and interact with various DeFi applications.
Expanded Asset Compatibility: Supports over 5,500 digital assets, allowing users to manage multiple cryptocurrencies and blockchain-based assets.
Improved Storage Capacity: With 1.5MB of storage, the device can run up to 100 different cryptocurrency apps simultaneously—significantly more than the original Nano S.
Enhanced Display: Features a 128 x 64-pixel screen, similar to the Nano X, making transaction verification easier.
Industry-Leading Security: Uses Ledger’s Secure Element chip (CC EAL5+ certification) to protect user funds from phishing and cyber threats.
Compact Design: At 62.39mm x 17.40mm x 8.24mm and weighing just 21g, it remains highly portable.
Low cost. The Nano S Plus comes at an affordable price of US$79, making it an attractive option for all levels of crypto traders.
Security features: is the Nano S Plus safe?
Ledger Nano S Plus continues to provide industry-leading security for cryptocurrency and NFT storage, featuring the following security enhancements:
Secure Element Chip (CC EAL5+): This certified security chip protects against hacking attempts, phishing, and unauthorized access.
PIN Code & Passphrase Protection: Users must set a secure PIN, and an optional passphrase adds another layer of security.
Transaction Confirmation: Every transaction must be manually verified on the device’s screen, preventing remote interference.
Anti-Tampering Measures: Ledger hardware wallets are designed to resist physical attacks and unauthorized modifications.
Ledger Live Integration: The wallet works seamlessly with Ledger Live for secure asset management, allowing users to interact with DeFi platforms safely.
To learn more about the security features of the Nano S Plus and Nano X, click here.
5/5 Security Rating
Cryptoasset support
A major Nano S Plus feature is the huge roster of supported crypto assets and apps. The Nano S Plus supports over 5,500 assets and can accommodate up to 100 different apps. Some supported assets include:
Bitcoin (BTC)
Ethereum (ETH)
ERC-20 tokens
Dogecoin (DOGE)
XRP
BNB
Cardano (ADA)
Polygon (MATIC)
Litecoin (LTC)
Tron (TRX)
The Nano S Plus has 1.5MB of storage and with that can run over 100 apps simultaneously. On Ledger devices, an “app” refers to the app required to be installed to access a cryptocurrency on the device e.g. in order to access your BTC on the device you need to install the app on the Ledger first. Meaning that, unlike the Nano S which can only run 3 apps simultaneously, users are not required to delete apps in order to access other cryptocurrencies which do not have the apps already installed.
But what is truly unique about the Nano S Plus is that it is the first Ledger device to offer NFT support. Users of the Nano S Plus can securely hold, send, and receive NFTs via the Ledger Live app. Ledger has made this process user-friendly, as owners can authenticate transactions right from the wallet’s interface.
Users of the Nano S Plus can also buy, exchange, lend, and stake cryptocurrencies directly via Ledger Live, enhancing accessibility to decentralized finance platforms.
The NFT support and DeFi app access give the Nano S Plus an even bigger boost in features compared to the Nano S and for that reason, we rank this category even higher than the Nano X.
4.8/5 cryptoasset support
Hardware design
Similar to the Nano S, the Nano S Plus also has two hardware buttons located on the top of the device.
The Nano S Plus has a much larger screen than its predecessor, which makes usage very easy. Same as the Nano X, the 128 x 64-pixel screen makes operating the device simple and helps users navigate the product’s features. The main benefit of the larger screen is that users can see the entire wallet address clearly displayed as one line on the screen. The screen also blends well into the rest of the device, adding to the Nano S Plus’ aesthetic appeal. And whilst the screen size on the Nano S Plus is the same as the Nano X, the Nano S Plus is a much smaller device overall.
The Ledger Nano S Plus’ measurements are smaller than the Nano X at 62.39 x 17.40 x 8.24 mm, and weighs in at only 21g. The wallet is about the size and weight of an average USB flash drive and is easy to carry around. It also uses a Type-C USB interface for quick setup and seamless connectivity with computers and Android devices.
4.5/5 for hardware design
4.5/5 for ease of use
What’s in the Ledger Nano S Plus Box?
The Nano S Plus wallet comes with the following inside the box:
The Ledger Nano S Plus hardware
A Type-C USB cable to connect the Ledger to a computer
An orange box with three notepads for the Secret Recovery Phrase
A purple box with the manual instructions
A key-holder chain with a Ledger logo
Final Verdict
The Ledger Nano S Plus remains an excellent choice for users seeking a secure, reliable, and user-friendly hardware wallet. It continues to provide industry-leading security with a CC EAL5+ certified Secure Element chip, ensuring robust protection against hacking and phishing threats.
With support for over 5,500 digital assets, including NFTs and DeFi applications, the Nano S Plus is well-equipped for modern crypto users. Its expanded storage capacity allows for up to 100 apps to be installed simultaneously, making it a practical option for managing multiple cryptocurrencies without needing to delete and reinstall applications.
The affordable price of US$79 makes the Nano S Plus an attractive entry point for both beginners and experienced investors looking to secure their holdings. While Ledger has introduced newer models like the Ledger Flex, the Nano S Plus remains a cost-effective and compact alternative with reliable functionality.
Ledger Stax Review: A premium hardware wallet with strong security, a curved E Ink touchscreen, and extensive cryptocurrency support, helping investors protect their digital assets.
Ledger Flex Review: User Friendly Security – A deep dive into the Ledger Flex, highlighting its intuitive touchscreen and security features.
Ledger Nano S Plus Review – Covers the affordability and enhanced capacity of the Nano S Plus, making it a great entry-level option.
Top 3 Cryptocurrency Hardware Wallets: Which One’s Best? – A comparison of the Ledger Nano X, Trezor Model T, and KeepKey, analyzing their security, design, and ease of use.
Four.meme is the first memecoin launchpad on the Binance Smart Chain (BSC) network. The platform aims to be a streamlined and low-cost pathway to bring more meme tokens into this world. Here is our Four.meme review.
Check out our video Four.meme review and guide!
What is Four.meme?
Four.meme is the first memecoin fair launch platform on Binance Smart Chain (BSC). Here are the main features of Four.meme:
Fair Launch: Every meme coin launched on Four.meme uses a fair launch mechanism. This ensures there will be no pre-sale, seed round, or team allocation. As a result, this creates a level playing field for all participants.
Community-Driven: Four.meme is built around the power of community, empowering creators, traders, and opportunists in the BNB Chain ecosystem.
Four.meme fees
Here are some of the fees for using the Four.meme platform as a memecoin creator or trader:
Launching fee: To launch a memecoin, you will only need to pay for the transaction fee which is around 0.005 BNB.
Seeding fee: Once your memecoin project reaches 100% of the bonding curve (approximately 24 BNB), the seeding process begins. The platform will then set up a liquidity pool on Pancake paired with 24 BNB.
Trading fee: Memecoin traders will need to pay a transaction fee the platform a 0.5% trading fee (minimum 0.001 BNB).
What is the Four.meme token?
Four.meme has not announced its own token yet. However, they currently have an airdrop campaign where you can receive Four.meme Points. These Four.meme Points are redeemable for rewards. For example, you can exchange Four.meme Points for USDT and memetokens such as $FOUR and $WHY, which are strategic partners of Four.meme. The type of token redeemable and exchange ratios will be announced after the end of the airdrop campaign. Four.meme Points can also be redeemed for special airdrop packages of meme tokens and exclusive NFTs.
Four.meme has a launchpad which allows creators to make their own meme coins and tokens efficiently. Here’s a step-by-step guide on how to launch your own project on Four.meme:
Configure Your Token
Set up your token’s name, symbol, and other key details. Then, use the user-friendly interface to configure these settings efficiently.
Launch Your Project
Launching requires no technical skills and takes only a few seconds. Developers can purchase a portion of their token supply to protect against snipers. To launch your project, simply confirm the transaction to complete the launch.
Pay fees
Launching Fee: Only the transaction fee (~0.005 BNB). Trading Fee: 0.5% per trade (minimum 0.001 BNB). Seeding Fee: Once the project reaches 100% of the bonding curve (24 BNB), a liquidity pool is established on PancakeSwap.
Optional settings
You can set the start time for trading, as well as limiting the maximum buy-in per user (e.g., 10,000,000 tokens = 1%).
Is Four.Meme safe?
Four.meme is the first memecoin fair launch platform on the Binance Smart Chain (BSC). Here are some key points to consider:
Fair Launch: Every meme coin launched on Four.meme uses a fair launch mechanism, ensuring no pre-sale, seed round, or team allocation. This aims to create a level playing field for all participants.
Community-Driven: Four.meme emphasizes community involvement. Users should assess their financial situation, risk tolerance, and do their own research before trading in any meme coins on the platform.
Hacks and exploits: While the Four.meme platform itself hasn’t been hacked or exploited yet, remember that investing in highly volatile meme tokens carries risks, so users may want to always be cautious.
Therefore, while Four.meme aims to provide a fair and transparent environment, remember that all investments carry inherent risks.
Conclusion: Pros and Cons of Four.meme
In conclusion, here is a review of some pros and cons of the Four.meme platform:
Pros
Fair Launch: Every meme coin on Four.meme uses a fair launch mechanism, ensuring no pre-sale, seed round, or team allocation. This promotes a level playing field for all participants.
Community-Driven: Four.meme empowers creators to launch meme coins directly, connecting with their audience. It fosters community engagement and support.
Integrated Trading Tools: The platform plans to integrate with trading bots and AI-powered market analysis services, enhancing utility and informed investment decisions.
Built on Binance Smart Chain (BSC): BSC offers fast transactions, low costs, liquidity, and security.
Cons
Risk: As with any investment, meme coins carry inherent risks. Users should exercise caution and conduct due diligence.
Market Volatility: Meme coins can experience extreme price fluctuations due to market sentiment and trends.
Short-Lived Relevance: Some meme tokens may lose relevance quickly, impacting their value.
Gitcoin passport helps verify your identity online by collecting proof from different sources without sharing your personal information. Having a Gitcoin passport above a certain score is important because many protocols set it as a requirement to be eligible for their token airdrops. However, getting the required number of points (usually projects require 20 points) can be difficult and time-consuming. Here is our Gitcoin passport guide on how to get maximum points for airdrops.
What is Gitcoin Passport?
Gitcoin passport is an identity verification aggregator for Web3, allowing users to collect verifiable credentials, known as “Stamps,” from various authenticators while preserving privacy. Here are its main features:
Identity Verification: Gitcoin Passport serves as a Web3 identity verification aggregator, enabling users to gather verifiable credentials (called “Stamps”) from different authenticators.
Privacy Preserving: It ensures user privacy by creating verifiable credentials without collecting personally identifiable information.
Versatile Applications: While designed to be application-agnostic, it is particularly useful for personhood proofs and organizational designs.
Web2 and Web3 Integration: Users can connect Stamps from both Web2 (e.g., Google, LinkedIn) and Web3 (e.g., Holonym, Civic) platforms.
Why do you need Gitcoin Passport for airdrops?
Many protocols and projects require you to have obtained a certain minimum score from Gitcoin passport in order to be eligible to receive their token airdrops. The main purpose of Gitcoin Passport is to combat against sybils, this is where people use multiple accounts to get airdrops, giving them an unfair advantage over others. Therefore, most projects will require users to have at least 20 points in order to qualify for their token airdrops.
How to get maximum Gitcoin Passport points for airdrops
Time needed: 2 hours
Here is our guide on how to get maximum (at least 20) Gitcoin Passport points for airdrops.
Click “Connect” and “Verify” to connect your Discord account.
Google (0.53 points)
Click “Connect” and “Verify” to connect your Google account.
LinkedIn (1.53 points)
Click “Connect” and “Verify” to connect your LinkedIn account.
Github (total 7.06 points)
Click “Connect” and “Verify” to connect your Github account. You will receive 2.02 points for contributions on at least 30, 60, and 120 respectively, totaling 7.06 points. Contributions include committing to a repository’s default branch or gh-pages branch, creating a branch, opening or answering a discussion, proposing a pull request or submitting a pull request review.
Ethereum activity (up to 16.04 points)
Click “Connect” and “Verify” to allow Gitcoin to assess your engagement milestones and Ethereum activity metrics. Engagement milestones categorise users into 3 tiered levels based on their commitment and dedication: ETH Enthusiast (10.01 points), ETH Advocate (2 points) and ETH Maxi (2.01 points). On the other hand, Ethereum Activity metrics looks at the amount and duration of activities on the Ethereum network and awards points as follows: Spend more than 0.25 on gas (1 point), execute over 100 transactions (0.51 points), active on over 50 distinct days (0.51 points).
NFT holder (up to 15.13 points)
Click “Connect” and “Verify” to allow Gitcoin to assess your journey as an NFT collector and verify your NFT ownership. Gitcoin categorises users’ NFT collector journeys into 3 levels based on their engagement and size of their ERC-721 and ERC-1155 NFT collections: Digital Collector (10.03 points), Art Aficionado (2.03 points) and NFT Visionary (2.04 points). Meanwhile, NFT ownership verification requires you to hold at least 1 ERC-721 NFT for 1.03 points.
Idena (up to 10.08 points)
Idena is one of the more difficult verifications to complete as you need to wait to participate in their “validation ceremony”. These are simultaneous puzzle tests that happen at regular intervals that participants must complete to prove their humanity. You will be awarded points in 3 categories depending on how many times you have validated your identity by achieving a specified score on the tests: Newbie (6.03), Verified (2.03) and Human (2.03).
GTC staking
GTC staking allows you to boost the reputation of yourself and/or those you trust. When you stake GTC, the amount becomes locked until the specified lockup period ends. There are 2 GTC staking mechanisms: Self GTC Staking and Community GTC Staking. For Self GTC Staking, points are awarded on 3 tiers based on the amount of GTC staked: Bronze- 5 GTC (1.04 points), Silver- 20 GTC (2.04 points) and Gold- 125 GTC (3.04 points). Meanwhile, for Community GTC, points are awarded based on staking actions: Beginner Community Staker (1.51 points), Experienced Community Staker (2.52 points), Trusted Citizen (4.04 points).
Gitcoin Grants (up to 7.56 points)
The Gitcoin Grants stamp requires users to donate to grant rounds officially funded by Gitcoin i.e. Citizens rounds, GG18, GG19 etc. Points are awarded based on the minimum amount donated as follows: US$10 (0.52 points), US$100 (2.02 points) and US$1,000 (5.02 points).
ZkSync (up to 5.62 points)
Click “Connect” and “Verify” to allow Gitcoin to verify your zkSync Era transactions. Users are categorised into tiered levels as follows: Engagement Explorer (1.67 points), L2 Believer (1.67 points), zkSync Champion (1.67 points). Users can also earn the “Verified Transactor” status for transactions on zkSync Era that have achieved verified status (0.61 points).
Guild membership and roles (up to 1.26 points)
Joining and having Owner or Administrator roles in qualifying Guilds with more than 250 members allows you to earn points: Guild Admin (0.72 points), Guild Passport Member (0.54 points).
Snapshot (0.84 points)
Create a DAO proposal. Afterwards, get at least 1 account to vote on your DAO proposal.
Gnosis Safe (0.82 points)
To get the Gnosis Safe stamp, you need to create a Safe account on Ethereum at https://app.safe.global/welcome. Then, on the Gitcoin passport dashboard, click “Connect” and “Verify”.
BrightID (0.8 points)
Sign up for a BrightID account at brightid.org. Complete the video verification and get the BrightID app on your phone.
Trusta Labs (0.51 points)
Click “Connect” and “Verify” on Gitcoin, making sure that you are on the Ethereum network. This will allow Gitcoin to assess your on-chain activity.
ENS domain (0.41 points)
For the ENS domain stamp you will need to purchase or own an Ethereum domain. You can get an ENS domain at https://ens.domains/.
Coinbase (16.04)
Confirm your Coinbase verified ID, this however requires you to have a Coinbase account and complete their KYC process. This verification may not be worth completing if you do not already have and use a Coinbase account.
Binance (16.02)
Confirm your Binance Account Bound Token, this however requires you to have a Binance account and complete their KYC process. This verification may not be worth completing if you do not already have and use a Binance account.
Zerion is a non-custodial crypto wallet that gives you access to a broad range of opportunities across DeFi and NFTs. Zerion currently does not have its own token, but there is speculation that they may launch one in the future and potentially airdrop it to early users of the platform. Since it is such a useful protocol, it is definitely worth using it regardless of any airdrop! Here’s our step-by-step guide to a potential Zerion token airdrop.
Zerion Token Airdrop Step-by-step Guide
Here’s how you can get a potential Zerion token airdrop:
Go to the Zerion dashboard and connect your wallet
Zerion is a non-custodial wallet for crypto that gives you access to a broad range of opportunities across DeFi and NFTs. With Zerion Wallet you can easily lend out your funds and private keys without cross-associating of wallet addresses. Zerion has both a mobile and web app that allows you to manage your DeFi and NFT portfolios, trade across 10+ networks and connect to any decentralized application with one wallet. One helpful feature of Zerion is that it allows wallet tracking, so you can have instant notifications of any deposits or withdrawals into your crypto wallets.
Zerion does not have its own token yet and has not announced any airdrop. However, there are rumours that they may do an airdrop to early supporters if they launch a token.
How to Get a Potential Zerion Token Airdrop?
Time needed: 30 minutes
Here’s how you can get a potential Zerion token airdrop.
Go to the Zerion dashboard and connect your wallet
Zerion has both a mobile (iOS and Andriod) and desktop app. Go to https://zerion.io/ and select your preference by either downloading the mobile app or connecting your wallet to their site. Zerion supports their own wallet, Metamask, Plaid, WalletConnect, Coinbase Wallet, Trustwallet, Ledger, Fortmatic or with your email address.
Import wallet
You can also import your wallet by clicking the arrow next to your wallet address and “Connect another wallet” on the drop down menu. Zerion supports their own wallet, Metamask, Plaid, WalletConnect, Coinbase Wallet, Trustwallet, Ledger, Fortmatic or with your email address. Alternatively, you can click the add wallet icon on the top right hand corner of the mobile app and choose “Import existing wallet”. Then enter your private key and click “Import”.
Swap assets using Zerion
To swap assets, click “Swap” on the left sidebar (web version) or “Swap” on the top of the page (mobile app). Choose the network, type of cryptocurrency you want to send, and the type you want to receive, as well as the amount. Then, click “Swap” and confirm the transaction.
Send assets using Zerion
To send assets, click “Send” on the left sidebar (web version) or “Send” on the top of the page (mobile app). Then, input the address you want to send your cryptocurrencies to, the type of cryptocurrency and the amount. Then click “Review”, check that the details of the transactions are correct and click “Send”.
Bridge assets using Zerion
To send assets between networks, click “Bridge” on the left sidebar (web version) or the three dots and “Bridge” on the top of the page (mobile app). Then, choose the networks you want to send your cryptocurrencies to and from, the type of cryptocurrency and the amount. Then, click “Send” and confirm the transaction on your wallet.
Airdrop Review
When reviewing an airdrop, there are several factors to consider. First, the likelihood the project will even do an airdrop in the first place. Then, to look at how many tokens the project intends to allocate towards airdrop campaigns, as well as the difficulty in participating in their airdrop. It is also important to look at the utility of the token so that there will be an actual use and purpose in participating in the airdrop in the first place. Finally, a factor to consider when reviewing an airdrop is whether the airdropped tokens are subject to any lockup period.
Likelihood of Airdrop: Zerion has not announced a token or an airdrop. But there could be a chance they would do one in the future based on how effective airdrops are for crypto projects to gain wider audiences.
Airdropped Token Allocation: Zerion has not announced a token yet.
Airdrop Difficulty: Swapping, sending and bridging assets is not difficult. In fact you may even use these features as part of your usual crypto trading routine!
Token Utility: Zerion has not announced a token yet.
Token Lockup: Zerion has not announced a token yet.
The first line of defense to an online account is a username and a password. However, malicious actors sprawling the internet have made the traditional account security combo unreliable and risky per se.
Therefore, SMS-based two-factor authentication (2FA) has been heavily utilized to provide another layer of security. Unfortunately, skilled hackers can still find a way to intercept SMS codes.
To detach account security from the monopoly of software-focused methods, universal second-factor (U2F) authentication was developed. The technology uses open standards under the Fast Identity Online (FIDO) Alliance.
Check out our video explaining what is YubiKey, and its pros and cons.
YUBIKEY REVIEW AND GUIDE: How to keep your Bitcoin and cryptocurrency SAFE
What is YubiKey?
FIDO works to reduce the reliance on passwords when securing internet accounts. YubiKey is a U2F-enabled hardware key developed by Yubico to secure web-based services. Businesses, individuals, and developers can use it.
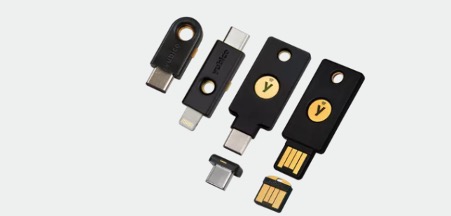
YubiKey
The key is available in different shapes and connectivity functionalities. While earlier versions only support physical insertions into USB ports on a host device, the YubiKey five series accommodates connection through near field communication (NFC).
NFC allows interaction with the device without physically plugging it into a port. However, the key and the host device must be near each other.
YubiKey Reviews on Amazon
From the reviews left by buyers on Amazon and other platforms, it is evident that the key is a must-have for security-conscious internet users. In fact, over 80% of buyers left a five star score for the YubiKey.
One of the reviewers recommended the Yubico YubiKey to developers, IT pros, and “security-minded users.” Furthermore, they praised its manufacturer for providing GUI-enabled YubiKey manager for those having a hard time on where to start.
Others attributed their happiness to the key’s support for password managers such as LastPass. YubiKey users hail it for ease of use as a smart card and its compliance to the Health Insurance Portability and Accountability Act (HIPAA).
Unfortunately, not everyone is happy with their hardware key. Although the negative reviews are minimal, some raise valid concerns.
Among the main problems is documentation, which isn’t user-friendly. Additionally, a buyer on Amazon notes that the key “is still too complicated for the average consumer, as it’s not exactly a plug and play device.”
How to Start Using YubiKey
The process of enjoying world-class security on your online accounts starts with purchasing the hardware piece from a reliable platform. After receiving a key, visit Yubico’s website, and choose your key from the list.
Specifying the purchase key from the list helps filter the services where it can be used to provide security. On the services list, select the account you need YubiKey’s hand in boosting its security.
Each service is followed by step-by-step instructions on how to connect to the hardware security key.
For example Binance lets you use your YubiKey with their cryptocurrency exchange. This means that your YubiKey is required for authentication before approving any transactions. Note however that Yubikey authentication is not supported on Binance’s Apps and mobile websites.
How to set up your YubiKey on Binance
Login to your Binance account and click on your profile avatar.
Choose “Security” from the options, then “Setup.” On the 2FA section, click on “Security Key.” Note that it only provides the needed extra security layer when accessing the Binance.com website.
Read the note and hit “Continue anyway.”
Insert the key in any available USB port and press the button at the hardware’s center to activate it.
Activation needs to be done within one minute after inserting the key. However, it can be repeated if you miss this activation window.
Once activated, hit “Allow” to the message “Allow this site to see your security key.”
Next, verify your account. Note that Binance will need you to provide the authentication code from Google Authenticator if you had previously enabled this step.
Binance will then send you an email at the registered address for you to confirm the addition of a new 2-step verification method using something you physically have.
After verifying the email, you are done.
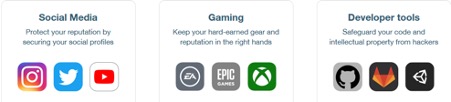
Examples of YubiKey-Supported Services
YubiKey works with a host of services such as cloud-based systems, password managers, email platforms, social media, gaming developer tools, cryptocurrency platforms, offline computers, among others.
Examples of cloud-based systems compatible with the security key include Dropbox, DigiCert PKI Platform, DocuSign. Cryptocurrency platforms that support YubiKey include Binance, Coinbase, Kraken, Bitfinex, and Gemini.
Cloud-based systems compatible with YubiKey
Social media platforms with inbuilt support for the hardware key include Facebook, Twitter, Instagram, and YouTube.
For developers and offline computer users, YubiKey is enabled for popular services such as Github and Bitbucket for developers and can be used to login into Mac and Windows computers.
Latest YubiKey Series
The hardware piece is developed in sets, with keys in one batch having additional features than those in previous models.
Yubico YubiKey 5 Series – Keys in this group are compatible with conventional and new systems. It has enhanced passwordless, multi-factor, and 2F authentication. Also, it has a touch-to-sign button, can be inserted on USB-A and C ports, and has NFC capabilities.
Security Key Series – Its salient features include dual NFC and USB-A connectors. Additionally, hardware security pieces in this cluster are crush and water-resistant.
YubiKey FIPS Series – These are certified hardware security keys that can be used for regulated environments such as government institutions. This set weds different functionalities such as one time passwords (OTP), smart card technology, and U2F. Keys in this group have USB-A and USB-C compatibility.
YubiKey 5C NFC – It has support for NFC, USB-C, and provides a fast yet secure authentication process. This series has a longer list of supported operating systems and browsers than other versions.
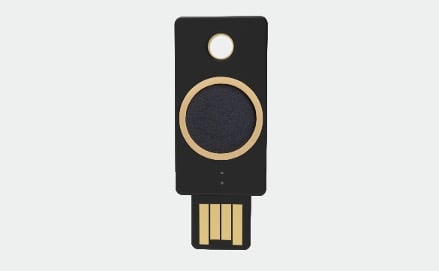
YubiKey Bio – When released, this will be the latest Yubico YubiKey in the market. Its major selling-points are fingerprint recognition, enhanced security, minimal helpdesk calls, and PIN-based login.
Coming soon: YubiKey bio
Conclusion
From the reviews, it’s clear the YubiKey hardware security key is effectively guarding users against account takeovers. However, which Yubico YubiKey is best suited for your needs depends on its cluster. The newer the series, the more the features and services it can provide.
Despite some users citing complicated documentation, exerting effort to set this up can indeed give that extra layer of security that would keep your accounts safe and give you peace of mind.
Disclaimer: Cryptocurrency trading involves significant risks and may result in the loss of your capital. You should carefully consider whether trading cryptocurrencies is right for you in light of your financial condition and ability to bear financial risks. Cryptocurrency prices are highly volatile and can fluctuate widely in a short period of time. As such, trading cryptocurrencies may not be suitable for everyone. Additionally, storing cryptocurrencies on a centralized exchange carries inherent risks, including the potential for loss due to hacking, exchange collapse, or other security breaches. We strongly advise that you seek independent professional advice before engaging in any cryptocurrency trading activities and carefully consider the security measures in place when choosing or storing your cryptocurrencies on a cryptocurrency exchange.
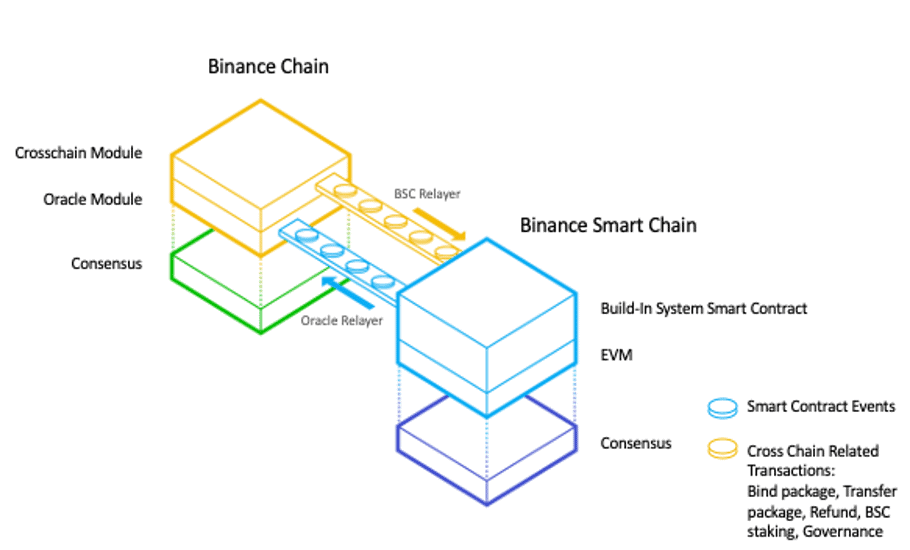
Binance Chain was launched by Binance in April 2019. Home of the Binance Token ($BNB) currency, it is optimized for ultra-fast trading. To achieve this, it had to make certain trade-offs, one being that it wasn’t as flexible from a programmability standpoint as other blockchains. Smart contracts in a system optimized for fast trading could significantly congest the network. Like how CryptoKitties brought Ethereum blockchain to a standstill at the height of its popularity and scalability remains one of the most challenging hurdles to blockchain development.
Binance Smart Chain aims at changing this problem. It is a new blockchain with a full-fledged environment for developing high-performance decentralized applications. It was built for cross-chain compatibility with Binance Chain to ensure that users get the best of both worlds. Binance Smart Chain went live on mainnet on September 01, 2020, activating the parallel blockchain to Binance Chain, enabling the creation of smart contracts and the staking mechanism for BNB.
Binance Smart Chain (BSC) is best described as a blockchain that runs in parallel to the Binance Chain. However, unlike Binance Chain, BSC boasts smart contract functionality and compatibility with the Ethereum Virtual Machine (EVM). The design goal here was to leave the high throughput of Binance Chain intact while introducing smart contracts into its ecosystem.
BSC is not a layer two or off-chain scalability solution for the existing Binance Chain. It’s an independent blockchain that could run even if Binance Chain went offline. Because BSC is EVM-compatible, it makes it easy for developers to port their projects over from Ethereum. For users, it means that applications like MetaMask can be easily configured to work with BSC with just tweaking a couple of settings.
Binance Smart Chain vs Binance Chain: Differences?
Binance Smart Chain was envisioned as an independent but complementary system to the existing Binance Chain with the idea being that users can seamlessly transfer assets from one blockchain to another. In this way, rapid trading can be enjoyed on Binance Chain, while powerful decentralized apps can be built on BSC.
Binance Smart Chain supports the BEP-20 token standard, which uses the same functions as its Ethereum counterpart ERC-20, while Binance Chain, supports the BEP-2 token standard. BEP20 is a developer-friendly token standard that allows anyone to deploy fungible digital currencies or tokens on Binance Smart Chain. What’s more, leading digital assets on other chains can be ported onto Binance Smart Chain in the form of pegged BEP20 tokens. For example, you could use Binance Bridge to swap bitcoin (BTC) for BTCB (BEP20) tokens backed by BTC. BTCB (BEP20) tokens can then be deployed in DeFi protocols to earn yield on bitcoin. The same goes for ETH, XRP, DOGE, and many more.
To move tokens from one chain to another, the simplest method is perhaps to use the Binance Chain Wallet, available on Chrome and Firefox. The cross-chain transfer is the key communication between the two blockchains. Essentially the logic is that the transfer-out blockchain will lock the amount from source owner addresses into a system-controlled address/contracts. The transfer-in blockchain will unlock the amount from the system-controlled address/contracts and send it to target addresses.
Binance cross-chain transfer (Image credit:BSC Whitepaper)
Ethereum-Compatible
Smart contracts, which are Ethereum-compatible, are supported by BSC. Through this feature, developers can build or migrate DApps, tools and other ecosystem components on the BSC network without much friction.
Proof-of-Staked-Authority
The platform runs on a proof-of-staked-authority consensus model. This combines both delegated PoS and proof-of-authority (PoA) to achieve network consensus and maintain blockchain security.
In this model, there are elected validators who take turns in confirming transactions on the network and are tasked to produce the blocks in a PoA manner, which puts the amount of their stake and their reputation in the community into consideration. To become a validator, a user must stake BNB.
This consensus model allows BSC to achieve around three-second block times. If a block proposed by the validator gets added to the chain, they receive the transaction fees incurred in that block as their reward. PoA is known for its capacity to thwart 51% attacks, as well as its tolerance for Byzantine attacks.
Validator Quorum
A validator quorum is required to secure the BSC network. The blockchain has 21 validators that are elected by BNB stakers every 24 hours. Anyone can be a candidate for election as a validator, but only those who belong to the top 21 highest-staked nodes will be chosen for the next validator set.
There is an “epoch” period for the platform, where validator sets can update the BSC network as needed. Every epoch period consists of 240 blocks, which is around 20 minutes. BSC also implements “slashing” to disincentivize malicious actors from validating inaccurate transactions or double signing. Slashing is designed to expose an attacker and make their attempts extremely expensive to execute.
Key Metric Comparison
Binance Smart Chain has made immense traction in early 2021 so far partly thanks to Ethereum’s congestion and gas fee issues, which has caused developers and staking investors to look for other options.
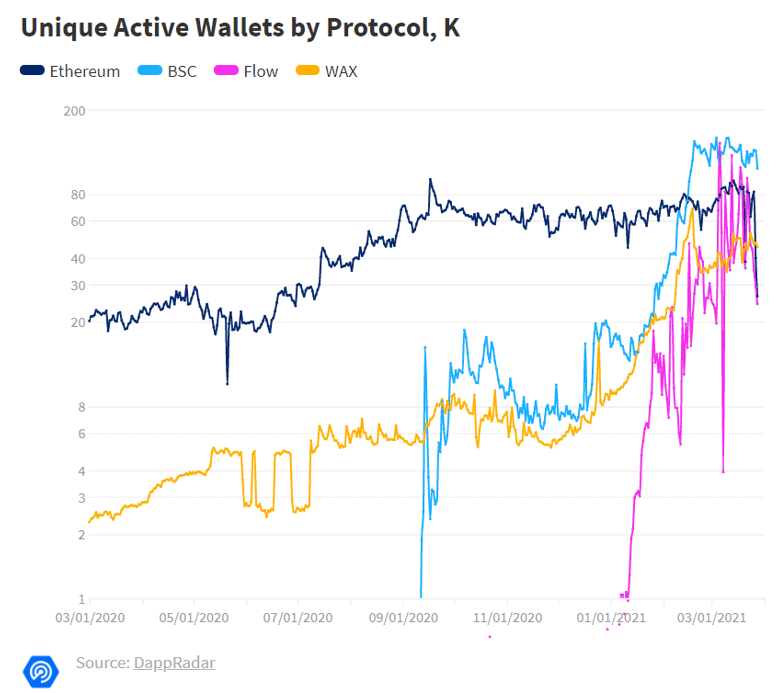
BSC is the most used blockchain in terms of unique active wallets averaging 105,000 in March 2021.
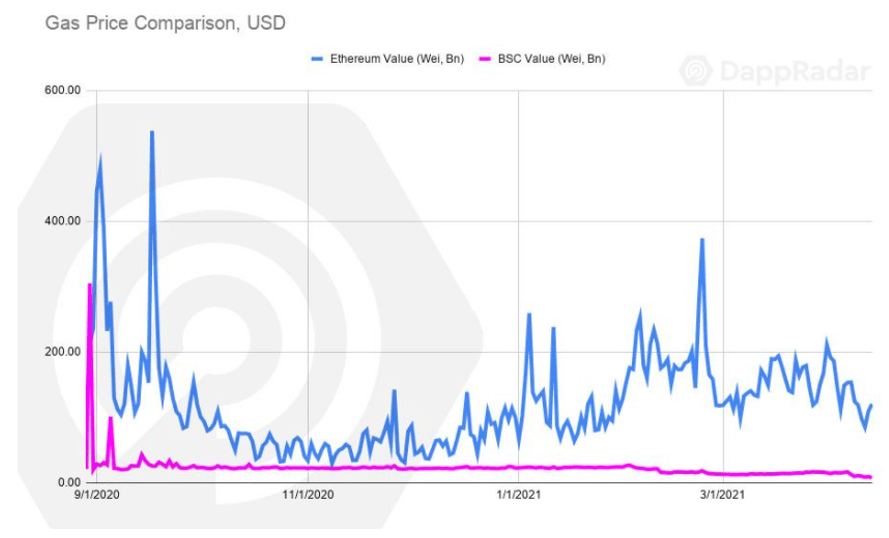
Gas prices were almost 14 times lower on BSC if compared to Ethereum in 2021 Q1.
Although Ethereum is still leading in terms of TVL with $54 billion. BSC TVL saw 121% growth month-on-month.
BSC finance dapp Venus has surpassed Compound and Uniswap in terms of TVL reaching $6.3 billion at the end of Q1 2021.
The BSC community made the network even more appealing to new users as a cost-effective and stable alternative, by lowering its gas fee from 15 Gwei to 10 Gwei to counter Binance Coin (BNB)’s price jump to over $600 in April 2021. At the end of March 2021, BSC gas fees were 14 times lower than on Ethereum. As a result, in Q1 2021 BSC generated record-high figures.
BSC vs Ethereum gas price comparison (Image credit: DappRadar)
According to the “DappRadar Q1 industry report”, in terms of key metrics, daily unique active wallets grew by 639% year-on-year from 62,000 in 2020 Q1 to more than 458,000 in 2021 Q1. BSC has led the pack with average daily unique active wallets of 105,000. In March, the chain also had the biggest increase in terms of unique active wallets by 50% month-on-month. The Ethereum and Flow blockchains generated an average of around 75,000 and 53,000 daily unique active wallets respectively.
Unique active wallets by protocol
Binance Smart Chain dAPPs
Some of the most popular decentralized applications on BSC are listed below with the full list of dApps available in DappRadar:
PancakeSwapis the number one automated market maker (AMM) on Binance Smart Chain. The ascent of BSC in 2021 cannot be described properly without mentioning the PancakeSwap exchange. The BSC-based decentralized exchange has seen remarkable growth in 2021, both for trading volume as well as its governance token CAKE. Like Uniswap or SushiSwap, you can do token swaps for BEP-20 tokens on PancakeSwap. Users can also earn passive income by providing liquidity, take part in lottery to win NFTs, participate in token sales, compete for spots on the leaderboard, and so on. PancakeSwap has become the second most popular DEX after Ethereum’s UniSwap.
BakerySwap is a decentralized automated market-making (AMM) protocol on BSC and its first NFT trading platform, ‘Bakery NFT Supermarket’. BakerySwap aims to be a faster and cheaper version of Uniswap. BAKE token is the native BEP-20 governance token of the platform and users can earn BAKE tokens by providing liquidity on BakerySwap. BAKE can be used to compose a random combo meal, which is a unique NFT(None-fungible token). Your unique NFT combo is not only a collectible item, but also a BAKE farming tool. Each NFT combo has a staking power and can be staked to earn BAKE.
Venus can be seen as a hybrid of Compound and MakerDAO on BSC. It is a borrow-lending protocol like Compound or Aave on Ethereum. It’s a decentralized money market where you can borrow and lend BEP-20 tokens with algorithmically set interest rates. Venus also enables a decentralized stablecoin called VAI, which is backed by a basket of cryptoassets.
Autofarm is a leading DeFi yield aggregator on BSC that has 3 products as part of the Autofarm ecosystem, namely Vaults (yield optimizer), AutoSwap (DEX Aggregator), and farmfolio. The yield optimizer implements the most optimal strategies at the lowest cost to maximize users’ yields and AutoSwap implements optimizations to route users swap trades so that users can find the best price and swap rates. Lastly, farmfolio is an intelligent portfolio manager and tracker which helps users manage their assets across various DeFi farming projects. The AUTO token is the platform’s native token. Tokenomics are deflationary and AUTO holders get to benefit from fees from cross-chain vaults, DEX aggregator, and the token will also be used for governance.
Spartan Protocolis a synthetic asset protocol on BSC. It allows users to create liquidity pools for BEP-20 tokens like other AMMs. However, it aims to allow for the creation of synthetic assets collateralized by liquidity pools, as well as lending and on-chain derivatives moving forward. Spartan Protocol provides community-governed and programmable token emissions functions to incentivize the formation of deep liquidity pools. This strong base of liquidity will be utilized to provide asset swaps, synthetic token generation, lending, derivatives and more. The common base asset SPARTA provides an internal pricing mechanism without reliance on external oracles. Binance Smart Chain was chosen as the protocol’s home to allow for near-instant settlement and extremely low gas fees.
To interact with the applications on BSC we require a wallet. Two of the most used wallets are MetaMask and the Binance Chain Wallet. In addition to these, you can also use Trust Wallet, Math Wallet, Ledger, TokenPocket, Bitkeep, ONTO, Safepal, and Arkane.
Connecting MetaMask to Binance Smart Chain
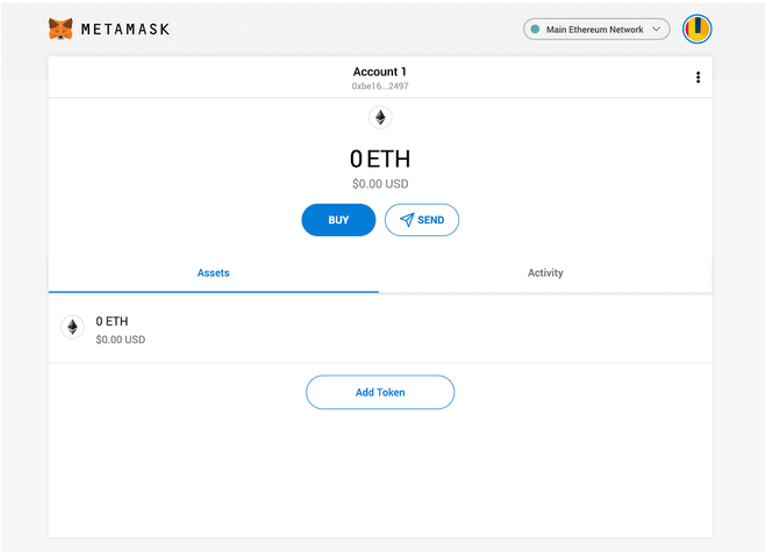
MetaMask can be downloaded on Chrome and Firefox, or on iOS and Android from the MetaMask Download page. From there, select whichever platform you’re using, and follow the steps to install it on your device and create a wallet.
MetaMask main page
The MetaMask wallet inherently interacts with the Ethereum public chain as seen from the top right corner of the screen which mentions the “Main Ethereum Network”. At this stage, we would be unable to interact with the Binance Smart Chain dApps. To change this, we need to access settings and point the wallet towards Binance Smart Chain nodes.
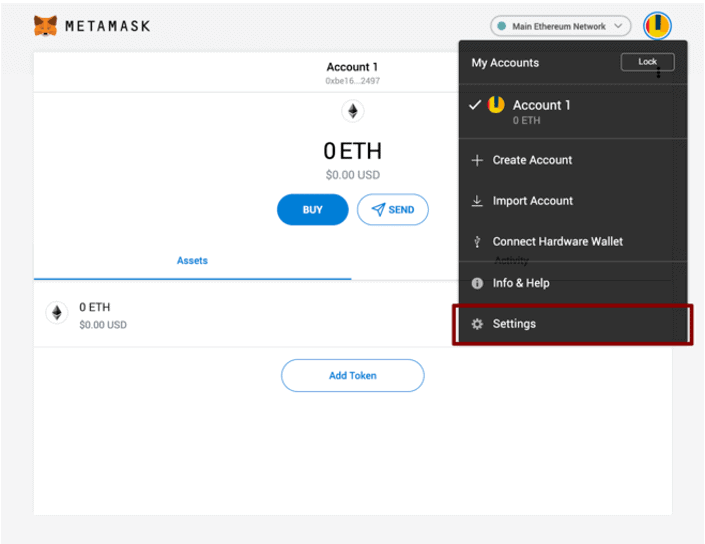
MetaMask drop down menu
On the Settings page, locate the Networks menu.
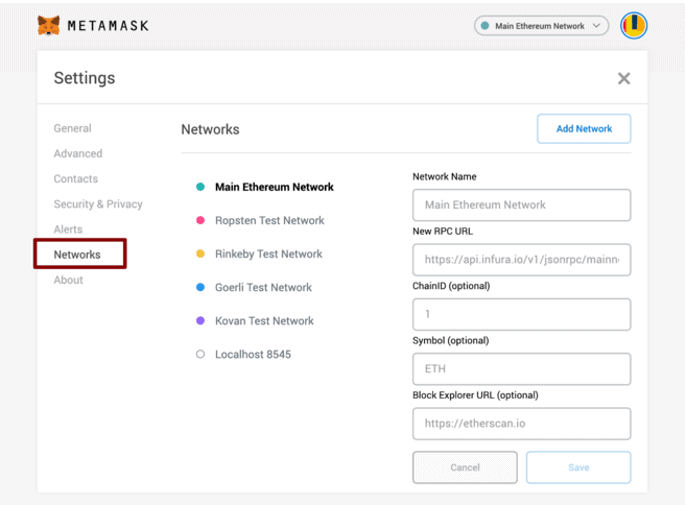
MetaMask settings page
Next click on Add Network in the top-right corner to manually add the Binance Smart Chain. It’s important to note that there are two networks we can use here: the testnet or the mainnet. Below are the parameters to fill in for both Binance Smart Chain Mainnet and Testnet.
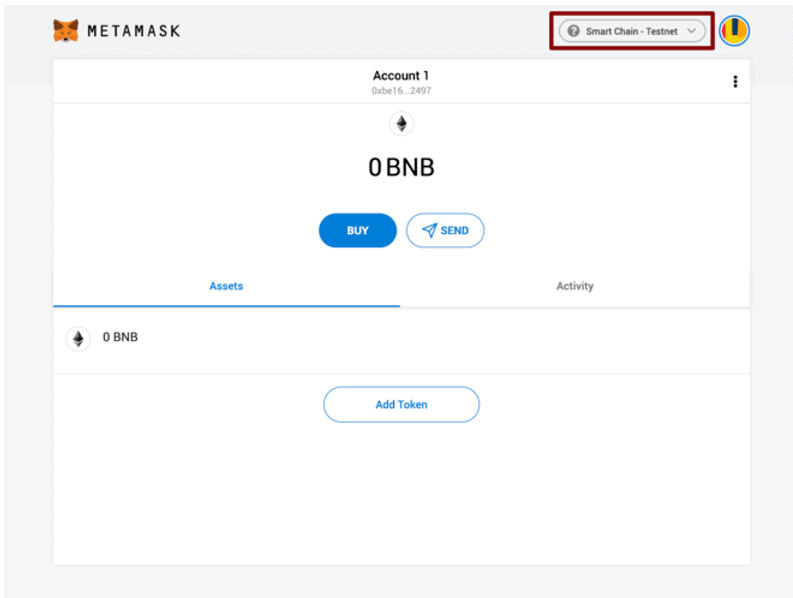
Once you Save the Network and return to the main view, you’ll notice two things: the network has automatically been set to the one you just entered, and the units are no longer denominated in ETH, but in BNB. You might still see the Ethereum logo, but we are now interacting with the BSC.
MetaMask Binance Smart Chain
How to deposit cryptocurrencies on Binance Smart Chain using MetaMask
Once a wallet has been set up, we can withdraw from our Binance account or use the Binance Bridge.
To track our activity on the BSC blockchain, we can use BscScan which is made by the same team that made EtherScan.
Withdrawing from Binance Exchange to a BSC wallet
If you already have a Binance account, this may be the easiest option to simply withdraw from your Binance account to a BSC wallet.
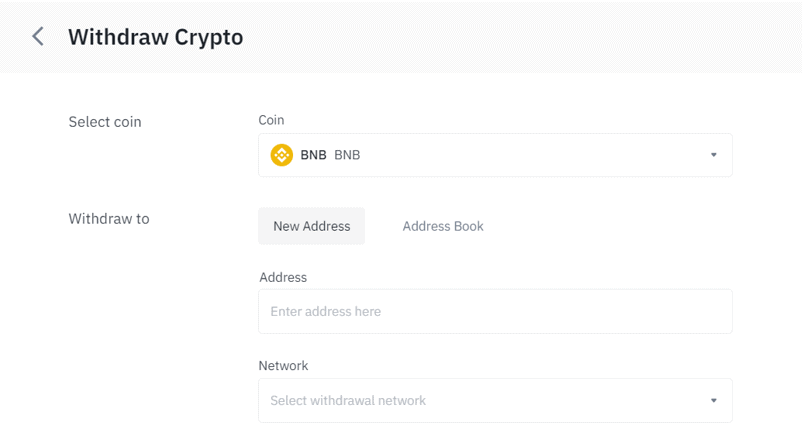
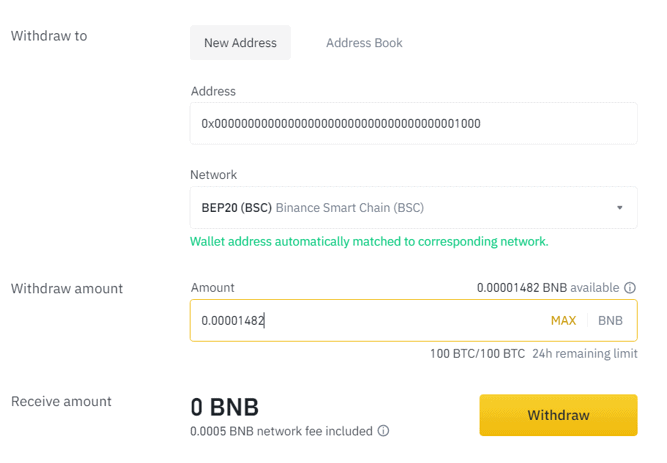
Select the BEP20 compatible token, here we have taken BNB as an example. Select Withdraw and you will land on this page
MetaMask select coins
In the “Address” section, put in your BSC wallet address. Binance will automatically change the “Network” to “BEP20 (BSC)”. If it doesn’t, change it manually.
MetaMask select network
Then simply enter the amount you wish to send and click on withdraw. After a few conformations, you should see the funds arrive in your MetaMask BSC wallet.
MetaMask withdraw coin
How to use the Binance Chain Wallet Extension
Download the Binance Chain Wallet Extension from the web store. Binance Chain Wallet Extension is available ob Chrome and Firefox.
Binance Chain Wallet Extension
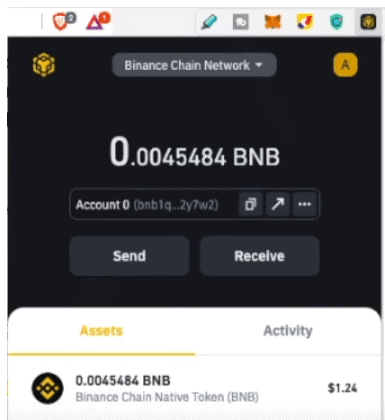
Transfer some funds from your Binance Exchange or MetaMask over to this Binance Chain wallet. We will use BNB as an example here.
Binance Chain Wallet Extension fund transfer
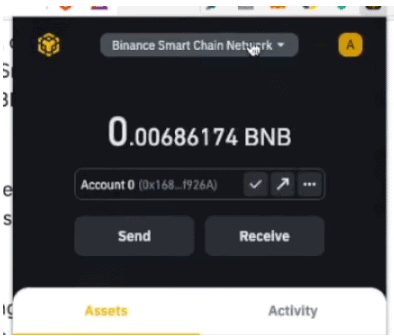
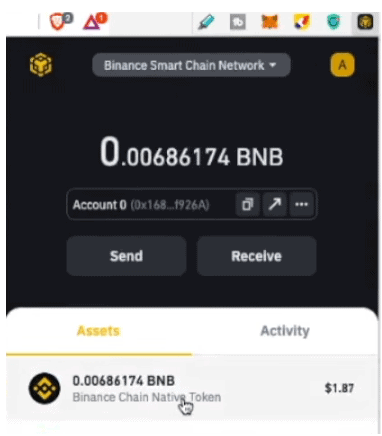
Click on “Binance Chain Network” on the top and change it to “Binance Smart Chain Network”. Copy the address and switch back to “Binance Chain Network”.
Switch to Binance Smart Chain NetworkSwitch back to Binance Chain Network
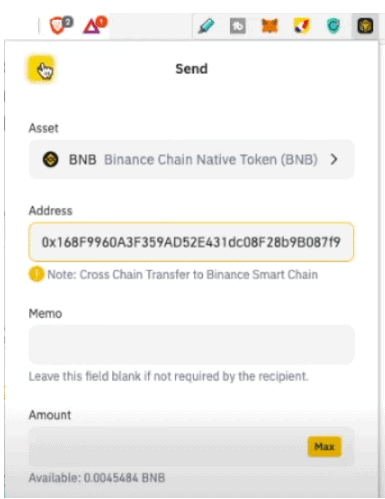
Click on Send. Paste the BSC address and click on the arrow next to send on the top left corner of the screen.
Copy address on Binance Chain Wallet Extension
Change the network back to “Binance Smart Chain Network” and congratulations, your funds will near instantly be transferred cross chain.
Another great way to bring assets to BSC is using the Binance Bridge. You can select many of the biggest blockchains, such as Ethereum or TRON, and convert their native tokens to wrapped tokens on BSC. The bridge works in both directions. You can monitor the on-chain reserve that ensures that the wrapped tokens on BSC are sufficiently collateralized by the native tokens in the Proof of Assets.
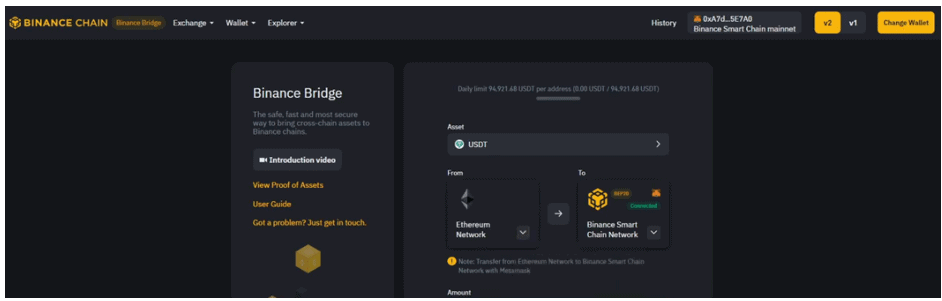
Go over to Binance Bridge and connect your MetaMask by clicking on “Change Wallet” in the top right corner of the screen. Make sure to change the settings over on MetaMask so that its pointing towards the BSC.
Binance Bridge
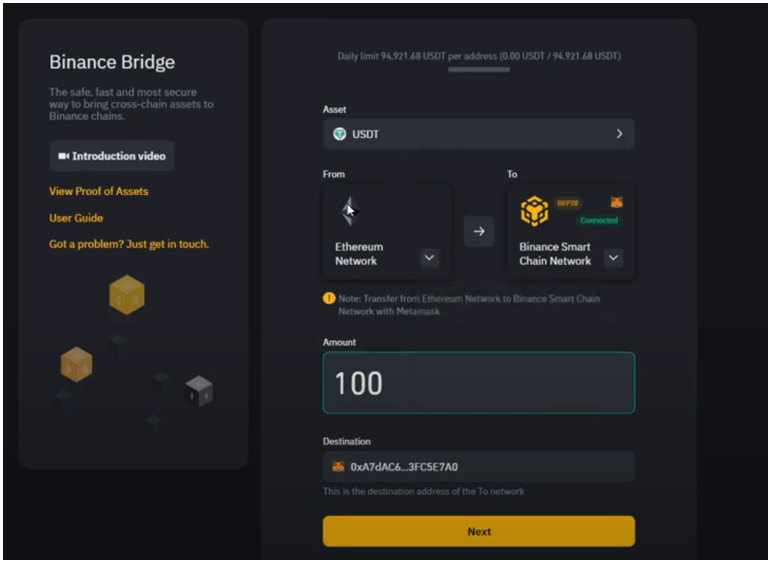
Once connected, pick you token you would wish to port over to your BSC. Here we have selected USDT as an example. Enter the amount you wish to send and click on next. Make sure to doublecheck the destination address.
Binance Bridge select token
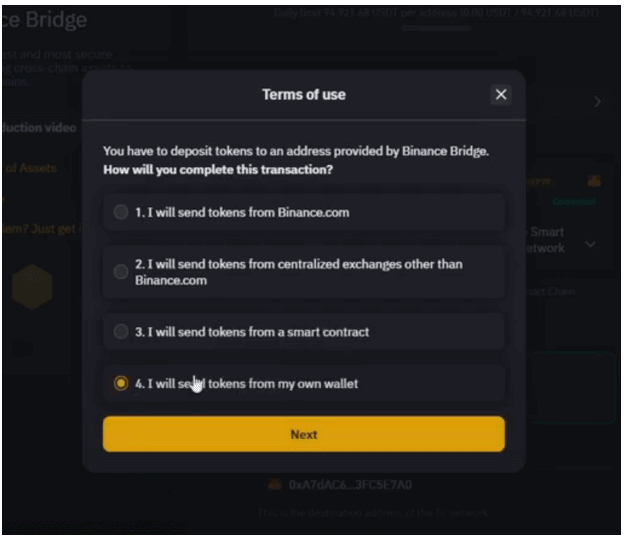
Next you will be greeted with options on how you wish to complete the transaction. Select “I will send tokens from my own wallet”
Binance Bridge select transfer method
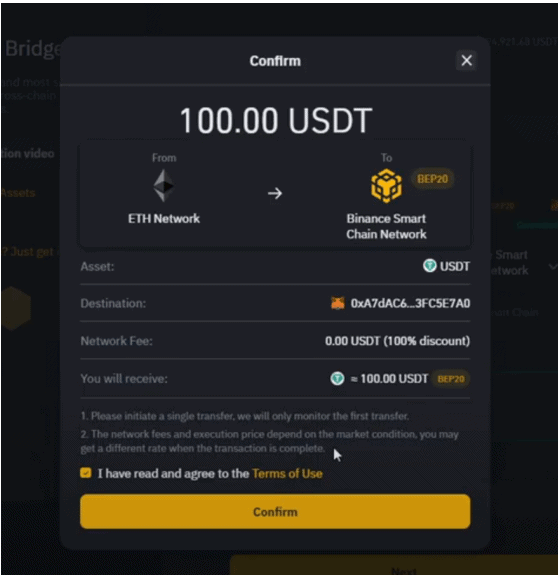
Once selected, a popup will appear with the truncation summary and confirmation. Click on Confirm.
Binance Bridge confirmation page
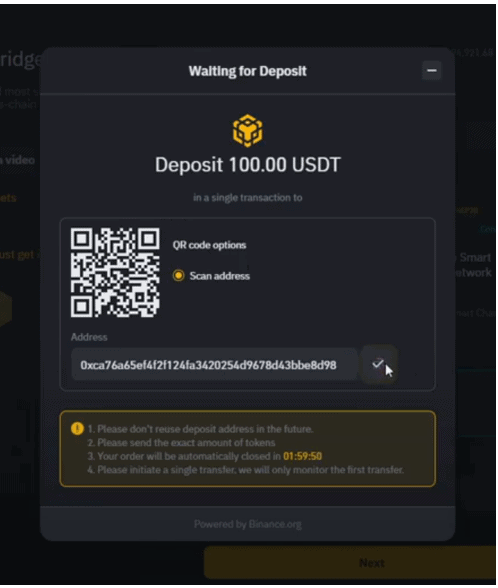
Next there will be a popup asking you to send the selected token and amount to an address.
Binance Bridge deposit page
Go back to your MetaMask, switch back to your Ethereum network, and send the funds from your Ethereum wallet to the address mentioned above. Switch the network back to BSC and after a few conformations, you should see your funds arrive in your MetaMask BSC wallet.
Closing thoughts
Binance Smart Chain greatly extends the functionality of the original Binance Chain. Though still in its infancy, the promise of BNB staking alongside EVM compatibility makes the platform an ideal engine for developers building powerful decentralized applications. And as long as the most popular smart contract-based blockchain, Ethereum, continues to struggle with congestion, slow transaction speeds, and exorbitant transaction fees, we can expect to see the increased adoption of more affordable alternatives like BSC, Polkadot and Cardano to continue.
However, we must keep in mind that the centralized nature of the BSC is a problem for its DeFi narrative. The only way to get onto BSC is via the central crypto exchange Binance or the central Binance Bridge. Here, the central provider has full control and can stop deposits and withdrawals on BSC at any time creating a direct bottleneck that centralizes BSC. Binance suspended withdrawals from the Binance Smart Chain to prevent a fraudster from laundering stolen cryptocurrencies. Although victims were happy about the measure, this intervention highlighted how centralized BSC ultimately is. Ethereum advocates, therefore, see BSC as more of a centralized database.
Regardless of the increasing demand for BSC and other options, Ethereum remains on top. Numerous detailed and tested documentation makes life easier for developers and the existing infrastructure, security, decentralization, and network effects adds to its appeal. The high transaction fees are an imposition, especially for smaller market participants, but at the same time show that the Ethereum network is more popular than ever before. Serious developers and companies still choose to develop their applications on Ethereum with the EIP-1559 update planned for July 2021 and Ethereum 2.0 in the horizon. Second layer solutions, such as Optimism, which promises faster and cheaper transactions, are also supposed to eliminate the scalability problem.
So, can Binance Smart Chain dethrone Ethereum? While the size and influence of the Binance exchange and the market cap of the BNB coin make it a strong contender, its centralized nature runs counter to the central ethos of the crypto economy, so it’s unlikely to replace Ethereum anytime sson. Ultimately, though, the crypto economy is not a zero sum game so a more likely scenario is that both will flourish, with the competition between them driving innovation on both networks. A deep dive into the BSC technical side can be found in the whitepaper.
Disclaimer: Cryptocurrency trading involves significant risks and may result in the loss of your capital. You should carefully consider whether trading cryptocurrencies is right for you in light of your financial condition and ability to bear financial risks. Cryptocurrency prices are highly volatile and can fluctuate widely in a short period of time. As such, trading cryptocurrencies may not be suitable for everyone. (https://attap.umd.edu/) Additionally, storing cryptocurrencies on a centralized exchange carries inherent risks, including the potential for loss due to hacking, exchange collapse, or other security breaches. We strongly advise that you seek independent professional advice before engaging in any cryptocurrency trading activities and carefully consider the security measures in place when choosing or storing your cryptocurrencies on a cryptocurrency exchange.
While crypto trading bots can be profitable for users, like with any form of automated trading, there are always risks involved. Therefore, it is important to consider whether or not using a trading bot is the right decision for you. In this article, we will explain how crypto trading bots work, the advantages they offer, and the risks involved.
What are Crypto Trading Bots?
Crypto trading bots are software programs that use algorithms to analyze market data and automate trading tasks. Users can enter specific parameters for the bots to buy and sell crypto, depending on the users’ trading strategies and goals. Spot trading is the most common way to use trading bots. More experienced traders can also use bots in leveraged trading, arbitrage trading, options, and futures.
It is important to remember that trading bots are NOT money-making machines. They only execute trading orders automatically based on the commands you give them. It is essentially an extension of your trading skills. Before operating one, you should have some understanding of technical analysis (identifying bullish or bearish trends) and risk management.
How do Crypto Trading Bots Work?
Crypto trading bots typically access a user’s crypto exchange account by using the exchange’s application programming interface (API). An API is a set of protocols and tools that allow one piece of software to interact with another. The user will first need to create an API key for the exchange. This key will grant the trading bot access to the user’s account and allow it to execute trades on the user’s behalf.
It is important to note that users must specify which specific permissions the API key should have before connecting the bot to the exchange account. Users should ONLY allow bots to execute trades, and disable other personal options such as withdrawing funds and viewing account information.
There are many reputable platforms that provide trading bot services such as 3Commas, Pionex, Cryptohopper, TradeSanta, and KuCoin Trading Bot. However, this does not mean they are risk-free. Users should carefully do their research and select the one they trust to hand over their API keys. We will cover more about the entailed risks below.
Advantages of Using Crypto Trading Bots
Crypto trading bots are generally considered to be more effective than manual trading for several reasons.
Execute orders faster and more accurately
Based on predefined rules and algorithms, trading bots can track market data for hundreds of trading pairs on several markets simultaneously and execute large trades in a matter of a few milliseconds. On the other hand, a human trader would have to spend a lot more time analyzing market conditions one by one and make decisions based on their own judgment.
Operate 24/7 without human emotion
Additionally, trading bots only follow logic, removing the emotional and psychological biases that are the bane of human traders. Trading bots can also operate 24/7 and trade on multiple crypto exchanges, taking advantage of market opportunities that may be difficult for a human trader to spot. Therefore, trading bots help automate and streamline the trading process, which saves a lot of time and reduces human error.
Efficient in building wealth over time
The efficiency of trading bots allows them to execute hundreds of trades within an hour if there is enough trading volume and volatility for the asset being traded by the bot. This is also achieved by setting the take-profit percentage low for the bot to consistently enter and exit trades. This is essentially dollar-cost averaging (DCA) on a much smaller time frame — profits are compounded over time, leading to continuous growth of the crypto portfolio.
Risks of Using Crypto Trading Bots
Though crypto trading bots are useful tools, the risk they pose is twofold: security and market conditions.
API Key Leak/Hack
One major risk is the potential for the API key to be hacked or otherwise compromised, potentially allowing an attacker to gain access to the user’s account and steal their funds or sensitive information. Additionally, if the API key is not properly secured, it may be possible for unauthorized users to access the user’s account and make trades without the user’s knowledge or consent.
Following the collapse of FTX, there have been numerous reports of unauthorized trades initiated via API keys, suggesting a database leak in trading bot platforms such as 3Commas. Though shortly after the attack, 3Commas provided evidence that the attacks were not a result of a leak from their database. They believed that victims’ API keys were phished or compromised from an outside source.
Extremely Volatile Market Movements
Sudden market movements can have a significant impact on the performance of crypto trading bots. Because these bots are designed to buy and sell cryptocurrencies based on pre-programmed rules, they cannot adapt quickly to sudden changes in the market. This could lead to bots triggering unfavorable buy orders, in which their take-profit order will never close as the market continually declines. Bots are only profitable if there is enough volatility for them to get in and out quickly and regularly.
For human traders, this is when they perform better than bots. They can take breaks and step away from the market when necessary. For these reasons, it is important for users to monitor the market and be prepared to adjust their trading strategies as needed in response to sudden changes.
Key Takeaway
While crypto trading bots can help traders take advantage of market opportunities, their risks are arguably greater than their benefits, especially given the shortcomings of many centralized platforms today. By sharing your API keys, you are practically giving a third party access to your crypto exchange accounts. Should they get hacked or become fraudulent, you run the risk of losing all your funds.
However, that is not to say that crypto trading bots are bad, especially in the longer scheme of things. After all, 90% of the stock market’s total turnover are done by algorithmic trading (trading bots), according to JPMorgan research. But with repeated cases of centralized failure in the crypto industry, it is best to approach these platforms with caution for now.
Aries Market is a decentralized cryptocurrency exchange built on Move, the same programming language used by Aptos to build its blockchain. Aries Market provides a wide range of decentralized finance (DeFi) products such as borrowing, lending, and margin trading on 1 single platform. Products include lending, borrowing, margin trading, swapping, and account risk management.
What is Aries Market?
Aries Market is a decentralized crypto exchange offering a wide range of DeFi products on a unified platform. On Aries Market, users can have a unified margin account on which they can borrow from various liquidity pools, earn interest on deposits, and do swaps and trades.
What products are available on Aries Market?
Aries Market is currently in a “soft launch” phase where all its features are not available yet. At present, the following products are available on Aries Market: lending, borrowing, swaps, and global account management. Notably, trading features are not yet available on Aries Market.
There are, however, deposit limits for the available asset pools on Aries Market. The limits are as follows: 4 million zUSDC (LayerZero), 4 million USDC (Wormhole Bridge), 500,000 APT, 10,000 SOL.
Aries Market
Supported assets
Aries Market currently supports the following assets: zUSDC (LayerZero), USDC (Wormhole Bridge), APT and SOL. The team expects more assets to be listed soon.
Coming soon on Aries Market
The Aries Market team expects the following features to be available in the coming months:
Full set of features will be available on Aries Market;
integration of Aries Market with Aptos; and
Gamified events and campaigns on the Aries Market and Aptos community.