Tag: nano s

  • Buying Cryptocurrency Using Ledger Live: A Step-by-Step Guide

    Buying Cryptocurrency Using Ledger Live: A Step-by-Step Guide

    Ledger Live now lets users buy cryptocurrencies directly with credit/debit cards or bank transfers, thanks to integrated services from MoonPay, Ramp, Sardine, and PayPal. Purchased assets are sent straight to your Ledger Nano S Plus, Nano X, or Stax, eliminating the need for external exchanges. This guide walks you through the steps on securely buying cryptocurrency using Ledger Live.

    Available Cryptocurrencies

    Ledger Live now supports over 500 cryptocurrencies natively, with additional access to 5,000+ coins and tokens through third-party wallet integrations. Users can securely buy, send, receive, swap, and stake many of these assets directly within the Ledger Live app.

    Here are some popular cryptocurrencies available on Ledger Live:

    • Bitcoin (BTC)
    • Ethereum (ETH)
    • Tether (USDT)
    • USD Coin (USDC)
    • Ripple (XRP)
    • Binance Coin (BNB)
    • Solana (SOL)
    • Cardano (ADA)
    • Dogecoin (DOGE)
    • Polkadot (DOT)
    • Litecoin (LTC)
    • Avalanche (AVAX)
    • Tron (TRX)
    • Monero (XMR)
    • Shiba Inu (SHIB)
    • Tezos (XTZ)
    • Cosmos (ATOM)
    • Uniswap (UNI)
    • Algorand (ALGO)

    Token Support

    Here are the types of tokens supported by Ledger Live:

    • ERC-20 tokens on Ethereum
    • BEP-20 tokens on Binance Smart Chain
    • SPL tokens on Solana (via third-party wallets like Phantom)
    • Polygon tokens and NFTs

    Third-Party Wallet Compatibility

    For assets not natively supported in Ledger Live, users can connect their Ledger device to wallets such as:

    • MetaMask (Ethereum and EVM chains)
    • Phantom (Solana)
    • Electrum (Bitcoin)
    • Yoroi (Cardano)

    To view the full list of supported assets and compatible wallets, see Ledger’s official supported crypto page.

    How to Buy Cryptocurrencies Using Ledger Live

    Follow these steps to buy cryptocurrencies using Ledger Live:

    1. Set up your Ledger device and Ledger Live app from ledger.com. . Connect your Nano X, S Plus, or Stax and complete device initialization.
    2. Open Ledger Live, go to “Accounts”, and add a crypto account by installing the relevant app and syncing your device.
    3. Go to “Buy/Sell”, select your crypto asset and desired amount. Ledger Live shows offers from providers based on your location and payment method.
    4. Choose a provider and follow prompts to complete the purchase. Crypto is sent directly to your Ledger wallet.
    5. Supported payment options include credit/debit cards, bank transfers (SEPA, ACH), and Coinbase Pay.
    6. Most providers require ID verification. Purchases are protected by Ledger’s Clear Signing on your device.

    How to Register a Coinify Account on Ledger Live

    Here is a step by step guide on how to register a Coinify Account on Ledger Live:

    1. Open Ledger Live and go to the Buy/Sell tab. Select Coinify as your provider.
    2. Click “Create account” and enter your email and password.
    3. Confirm your email address via the link sent by Coinify.
    4. Complete the Know Your Customer (KYC) process: Provide your full name, residential address, and intended use of the account. Upload a valid government-issued ID (passport or national ID card). Finally, perform a facial scan using your device’s camera.
    5. Coinify will automatically verify your identity. The process typically takes around 2 minutes.
    6. Once verified, your Coinify account is ready to use for buying or selling crypto directly through Ledger Live.
    Create a Coinify account
    Create a Coinify account

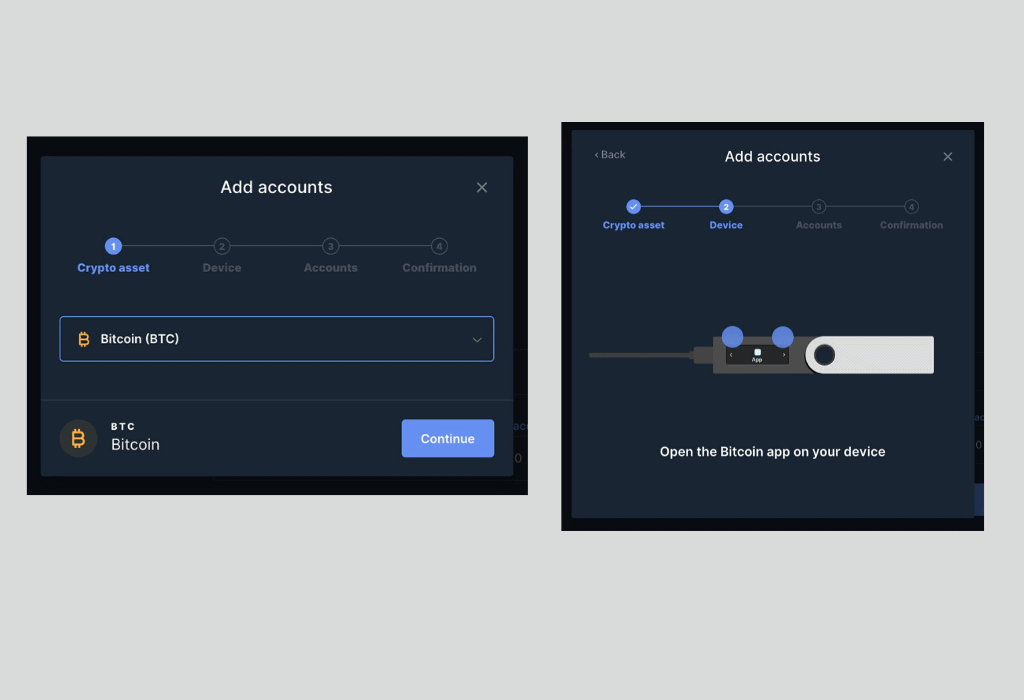
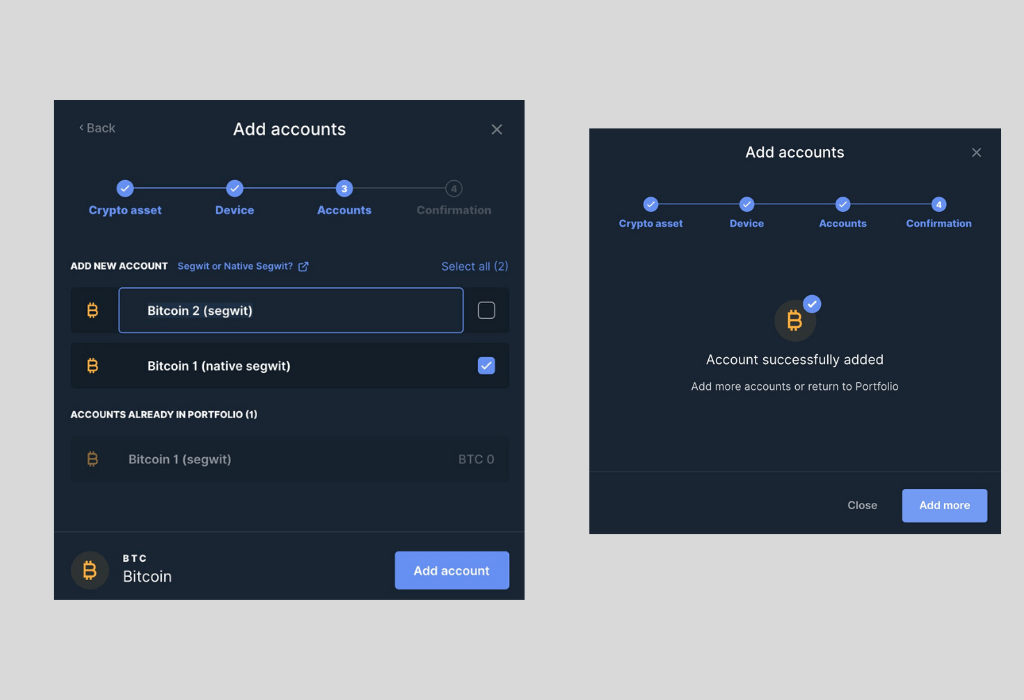
    How to Add a New Account on Ledger Live for Cryptocurrency Purchases

    Here is a step by step guide on how to add a new account on Ledger Live to buy cryptocurrencies:

    1. Open Ledger Live and ensure you’re using the latest version. As of August 2025, the latest version of Ledger Live is 2.120.1, released on July 17, 2025.
    2. Connect and unlock your Ledger device (Nano S Plus, Nano X, or Stax).
    3. Install the required crypto asset app on your device (e.g., Bitcoin app for BTC, Ethereum app for ERC-20 tokens).
    4. In Ledger Live, go to the “Accounts” tab and click “Add account”.
    5. Select the cryptocurrency you want to add from the dropdown list.
    6. Open the corresponding app on your Ledger device when prompted. Ledger Live will sync with the blockchain.
    7. Choose to add a new account or import an existing one. Note: You can’t add a second account for the same asset unless the previous one has at least one transaction.
    8. Assign a name to your new account and click “Add account”. You can repeat the process to add more accounts or click “Done” to finish.

    How to Purchase Cryptocurrencies on Ledger Live with Other Partners

    Ledger Live allows users to buy crypto through integrated providers like MoonPay, BTC Direct, Coinbase Pay, Transak, Ramp, Mercuryo, Coinify, and Wyre (U.S. only). These partners are accessed via the Buy/Sell tab.

    Here is a step by step guide on how to purchase cryptocurrencies on Ledger Live with other partners:

    1. Open Ledger Live and go to Buy/Sell.
    2. Connect and unlock your Ledger device.
    3. Select the crypto to buy and input location and payment method.
    4. Review quotes from available providers.
    5. Complete KYC verification (email, name, address, ID, and selfie/scan).
    6. Choose payment method: credit/debit card or bank transfer.
    7. Confirm purchase; crypto is sent directly to your Ledger wallet.

    Supported fiat currencies include USD, EUR, GBP, JPY, HKD, and AUD. Note that provider and payment method availability vary by country. Purchases are protected by Ledger’s Clear Signing protocol and non-custodial delivery.

    User Experience and Conclusion

    Ledger Live offers a secure, streamlined way to buy crypto directly through verified partners like Coinify, MoonPay, BTC Direct, and Wyre. Users retain full control of their assets, which are sent straight to their hardware wallet—avoiding exchange custody risks.

    KYC is still required for first-time purchases, but the process is fast (under 5 minutes) and compliant with global standards. The interface is now more intuitive, and Clear Signing ensures transaction details can be securely verified on the device.

    Whether you’re new to crypto or an experienced trader, Ledger Live remains a reliable and user-friendly choice for managing and acquiring digital assets securely.

    Click below to BUY NOW!

  • Ledger Nano S Guide: How to Properly Set Up Your Device

    Ledger Nano S Guide: How to Properly Set Up Your Device

    This setup guide helps you set up your new Ledger Nano S hardware wallet. It will teach you how to backup your wallet and install apps so you can access your cryptocurrencies with it. You can read our full Ledger Nano S review here.

    The wallet is one of the most advanced cryptocurrency wallets in the market today. It supports over 1800 cryptocurrencies. The Ledger Nano S also offers better support, compact design, mobility, and security for your crypto-assets. The device retails for USD 59 or you can save 27% when buying a family pack of 3 for USD 129. Important to note that Ledger plans on discontinuing the Nano S sometime during 2022 once they’ve sold the last 10,000 Final Edition units.

    Ledger Nano S Unboxing

    You can also follow our step-by-step video setup guide here.

    Ledger Nano S – Setup and Guide

    The first step when you receive your hardware from the store is to check if the box is correctly sealed. If the box is not sealed correctly, return it to the store because there is a high chance that the wallet has been tampered with.

    After verifying that the seal is intact then unbox your device and confirm that all the contents are there. The contents in the box should include:

    1. Ledger Nano S device;
    2. Blank sheet to write down your recovery phrase;
    3. USB cable to allow you to connect it to the computer;
    4. Setup guide manual that contains instructions on how to install and use your device; and
    5. Keyring and lanyard to take your device on the go.
    Inside the Ledger Nano S box
    Inside the Ledger Nano S box

    Verify that the 24-word recovery phrase card is blank. This 24-word recovery phrase allows access to your private and public key details in case your login details have been lost. If it is already pre-determined, it means that your device has been tampered with.

    Setting up the Ledger Nano S

    Connect the device to your computer using the USB cable included.

    A welcome screen immediately flashes up your device and prompts you to press the two buttons on top to begin.

    It will then ask “Configure as a new device?”. Click:
    – “x” to restore an old device using your recovery phrase; or
    – “✓” to set up a new device.

    Setting the PIN Code and Recovery Phrase

    Setting the PIN Code

    The device will ask you to set a new PIN code. In future, this is what you will enter to access your device.

    Input your chosen 4 to 8 digit PIN code by pressing the buttons on either side to choose the digit, then pressing both buttons together to confirm. Re-enter your PIN code to confirm and conclude the PIN code setup process.

    Setting the Recovery Phrase

    You now need to set a recovery phrase that you will use to restore your wallet on another physical device.

    Press the 2 buttons of your Ledger Nano S device simultaneously to start.

    The device will start displaying the 24 words that make up your recovery phrase one by one. Press both buttons simultaneously to move onto the next word. Write them down in order on the blank recovery sheet provided.

    DO NOT take a photo of your recovery words or write them down on your computer- keep it locked away. This is because anyone with your recovery phrase will be able to restore your account on another Ledger device and steal your funds.

    Afterwards, the device will prompt you to confirm your 24-word recovery phrase by asking you to input some of the words. Do this to complete the recovery phrase setup.

    Your device is now set up and ready to use!

    Ledger Live Application Setup

    Keep your device connected to your computer. You need to download and install the Ledger Live app to your computer.

    Open the Ledger Live app and select: “Initialize as new device.” Click “Ledger Nano S” and follow the instructions that check whether you have installed your hardware wallet correctly. You will then be asked to setup a Ledger Live password.

    To use the device with a particular cryptocurrency, you will need to download the corresponding app on Ledger Live.

    Afterwards, the Ledger Live app will ask you to install apps or add accounts. Select “Open Manager” which will allow you to install or uninstall apps.

    For example, to use Bitcoin with your device, select “Open Manager”, find “Bitcoin” in the app catalog and simply click “install”. You will now see the Bitcoin app on your device.

    The Ledger Nano S only supports between 3 to 11 apps after its 1.6 firmware upgrade. So if you want to use your device with more than 3 cryptocurrencies, you might find it difficult to fit all of the different apps onto your device in which case you will have to uninstall some apps to make room.

    You will not lose your cryptocurrencies if you uninstall the corresponding app. But of course installing/uninstalling apps to use your device is seriously troublesome.

    Your Ledger Nano S is now ready to use!

    Ledger Nano S setup guide: Conclusion

    The Ledger Nano S is relatively easy to set up. The instructions are very clear and intuitive.

    Again, ensure that your PIN code and recovery phrase is kept offline and secure. Others can access your funds using your PIN code or restoring your device using the recovery phrase.

    The Ledger Nano S is limited to between 3 and 11 apps, depending on the individual app sizes for specific coins. If you have or intend to use more than that amount of cryptocurrencies regularly, you may have to use multiple devices. Or consider getting a Ledger Nano X? Check out our Ledger Nano X review to learn more.

  • FIX Ledger Nano Compatibility problems with latest Windows 10 1903

    FIX Ledger Nano Compatibility problems with latest Windows 10 1903

    Update: Official Ledger response to this issue.

    The new Windows 10 May 2019 update adds new security features that break certain browser (Chrome, Brave and Edge) based dapps for Ledger Nano S (and Nano X). This is the latest “big” update that is part of Microsoft’s plan to add additional functionality and security to Windows 10. Currently the update has already been scheduled for public release, although it is not mandatory. A new pop-up will display when connecting to the hardware wallet labeled “Windows Security“.

    New Windows Security Prompt to interact with Ledger Nano S

    This prompt is not present in previous versions of Windows 10 and is a new feature that is meant to prove hardware security. Unfortunately some websites like MyEtherWallet, MyCrypto and IDEX will have certain delay issues when unlocking the wallet.

    Unlock Device error: UNKNOWN_ERROR (0x6804)

    Fixing Ledger Nano issues on Windows 10 1903 Update:

    To fix comparability issues between Ledger Nano (S or X) and Windows 10, try the following:

    • Install Latest Ledger Live
    • Update to the Latest Ledger Nano Firmware
    • Do not click or interact with the pop-window.

    This is not an issue with hardware wallet itself but rather an interaction issue with various websites. These websites need to be updated to reflect changes with hardware security in Windows 10. As of now, there are no known methods to disable new security features in Windows 10. Please refer to the official response from Ledger on this compatibility issue.

    Ledger Live is Unaffected

    Ledger Live App’s operation is not affected by the new security changes. Currently asset management and Leger Manager operations are fully functional as of this update. It seems that the new security changes only affect the web based applications.