Category: Free Crypto Wallets

Free Software based Crypto Wallets for your computer or mobile phone.

  • MetaMask Tutorial: The Ultimate Beginners How-to Guide

    MetaMask Tutorial: The Ultimate Beginners How-to Guide

    MetaMask is a secure crypto wallet to store and manage your Ethereum (ETH) and other ERC-20 tokens. It is also a gateway to other decentralized applications. This is beneficial for people who frequently use ETH and its tokens as it provides a secure and fast way to access their funds. This guide is a MetaMask tutorial for complete beginners. We will learn how to:

    1. Set up a MetaMask account.
    2. Deposit to MetaMask.
    3. Send funds from MetaMask.
    4. Change and add networks in MetaMask.
    5. Use MyEtherWallet with MetaMask.
    6. Fiat on-ramps: Buy Crypto Using Debit or Credit Cards.
    7. Withdraw money or cryptocurrencies from MetaMask.
    8. Collect airdrops using MetaMask.
    9. Cash out your crypto to fiat using MetaMask.

    You can also follow me as I walk through the steps in my video:

    MetaMask Tutorial Guide

    What’s more, there are rumors that MetaMask might also do a $MASK airdrop! Learn how to get some of that potential airdrop with our MetaMask ($MASK) Token Airdrop Guide!

    How to set up a MetaMask account

    Here’s how to set up a MetaMask account:

    1. Download and install MetaMask.
    2. Create a new wallet.

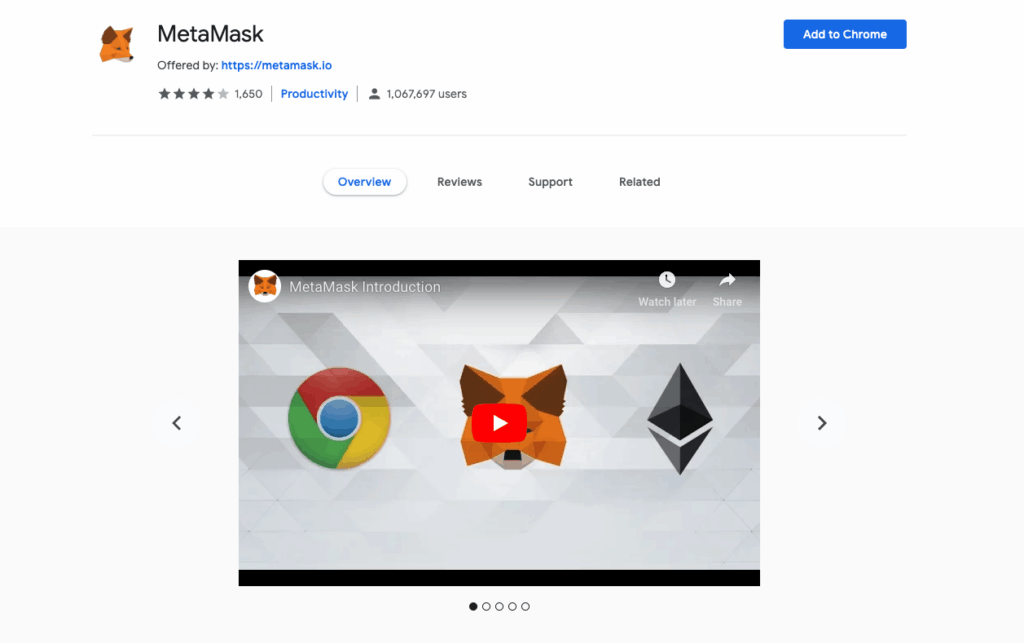
    Download and install Metamask extension

    Download MetaMask. MetaMask has extensions for Chrome, Firefox, Opera and Brave browsers. At the extension store on these browsers, search for MetaMask and click “Add to” browser.

    Example: For Chrome users, click
    Example: For Chrome users, click “Add to Chrome” and then “Add extension” when the popup window appears.

    Once installed, the MetaMask icon will appear on the top right-hand corner.
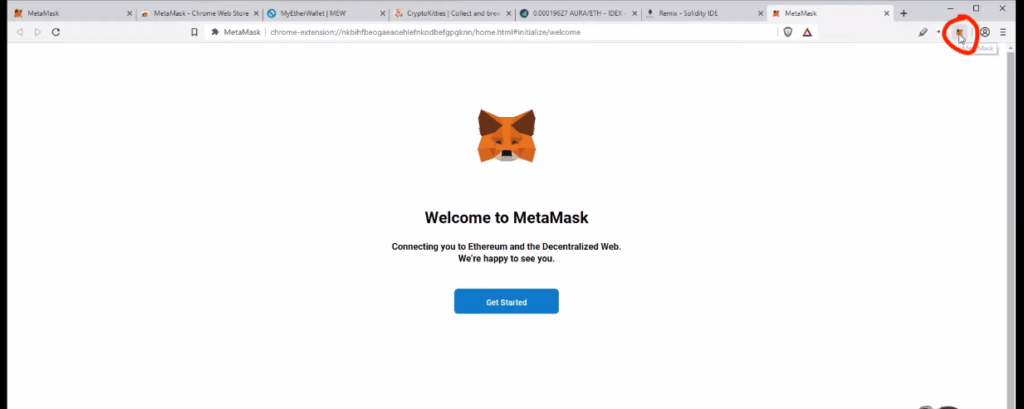
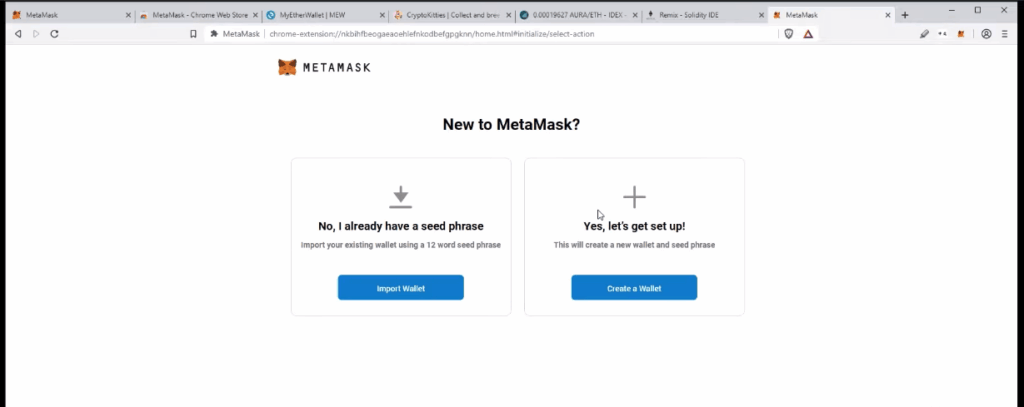
    The fox logo will appear on your browser once the extension is successfully installed
    The fox logo will appear on your browser once the extension is successfully installed

    Create a new wallet

    Click the “Get Started” button on the webpage and choose the option to make a new wallet. Afterward, you will be asked to come up with a password for your account. It is best to make a strong password that other people can’t easily guess, like your birthday. This means that your password should have numbers and letters arranged in a unique way.

    Select the option to set up a new wallet
    Select the option to set up a new wallet

    Back up your wallet with the special 12-word code. It is best to write this code down on a piece of paper and store it in a secure place. Do not let hackers access the code by saving it on your computer. Instead, to keep your money safe, write the code on paper instaMask account address, click on the extension and then copy the address at the top. You can also click “…” and “Account details” to get your full deposit address and a QR code. Make sure you’re on the same network on MetaMask as the wallet or exchange you’re sending tokens from. To deposit tokens, either copy the address onto the “send” address on the wallet or exchange you’re sending from, or scan the QR code.

    To check if you have received tokens, open the MetaMask window and look for the token you added. If it is there, you can see your balance. If it is not there, you need to manually import the token contract. To do this, go to CoinGecko or CoinMarketCap, find the token you want, click on “Contract” and the MetaMask logo. On the MetaMask window, click “Add token”. Once the token is added, you can see your balance in the MetaMask wallet. Change “The balance was seen in the MetaMask wallet” to “You can see your balance in the MetaMask wallet.”

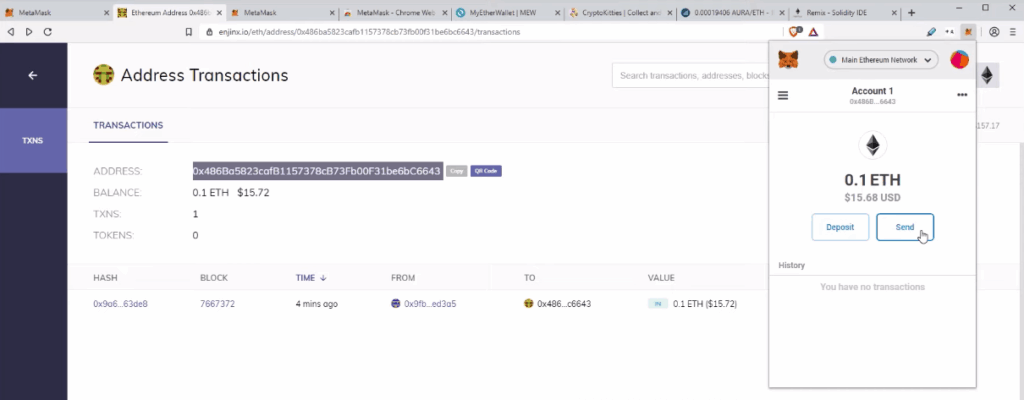
    How to send crypto from MetaMask?

    You can send cryptocurrencies in your MetaMask to other wallets, and exchanges, or make purchases. Click on the extension and “Send” on the pop up window.

    Click
    Click “Send” on the pop-up window.

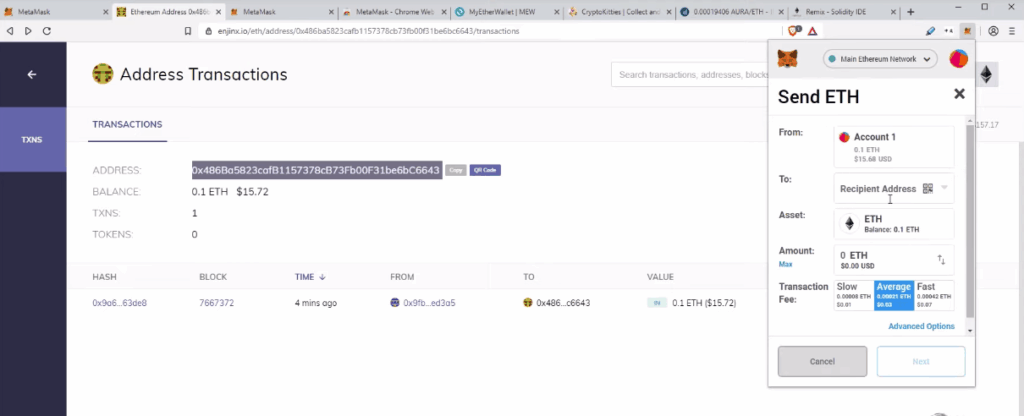
    Once you have filled in the address of the person you are sending the cryptocurrency to, the type of cryptocurrency (e.g. ETH) and the amount, double-check that the address, type and network are all the same. Confirm the amount to be sent, the gas fee and the total amount including the fee, then click “Next”. When the cryptocurrency has been sent, you will get a notification saying “Confirmed Transaction” on your web browser.

    Fill in the details and click
    Fill in the details and click “Send”, then “Confirm”

    Change and add networks in MetaMask

    Ensure the correct network is selected on both the sending and receiving wallets to ensure funds are sent. To do this, click on the top bar of your wallet and select the network you want to use. This could be Ethereum, or Layer 2 blockchains such as Optimism, Arbitrum, or Polygon. Once you have chosen the right network, you can safely send and receive tokens.

    Select network on MetaMask
    Select network on MetaMask

    For some newer or testnet networks, you may have to add them to MetaMask manually. To do this, click “Add network”, search for the network, and click “Add”.

    Search and add network to MetaMask
    Search and add network to MetaMask

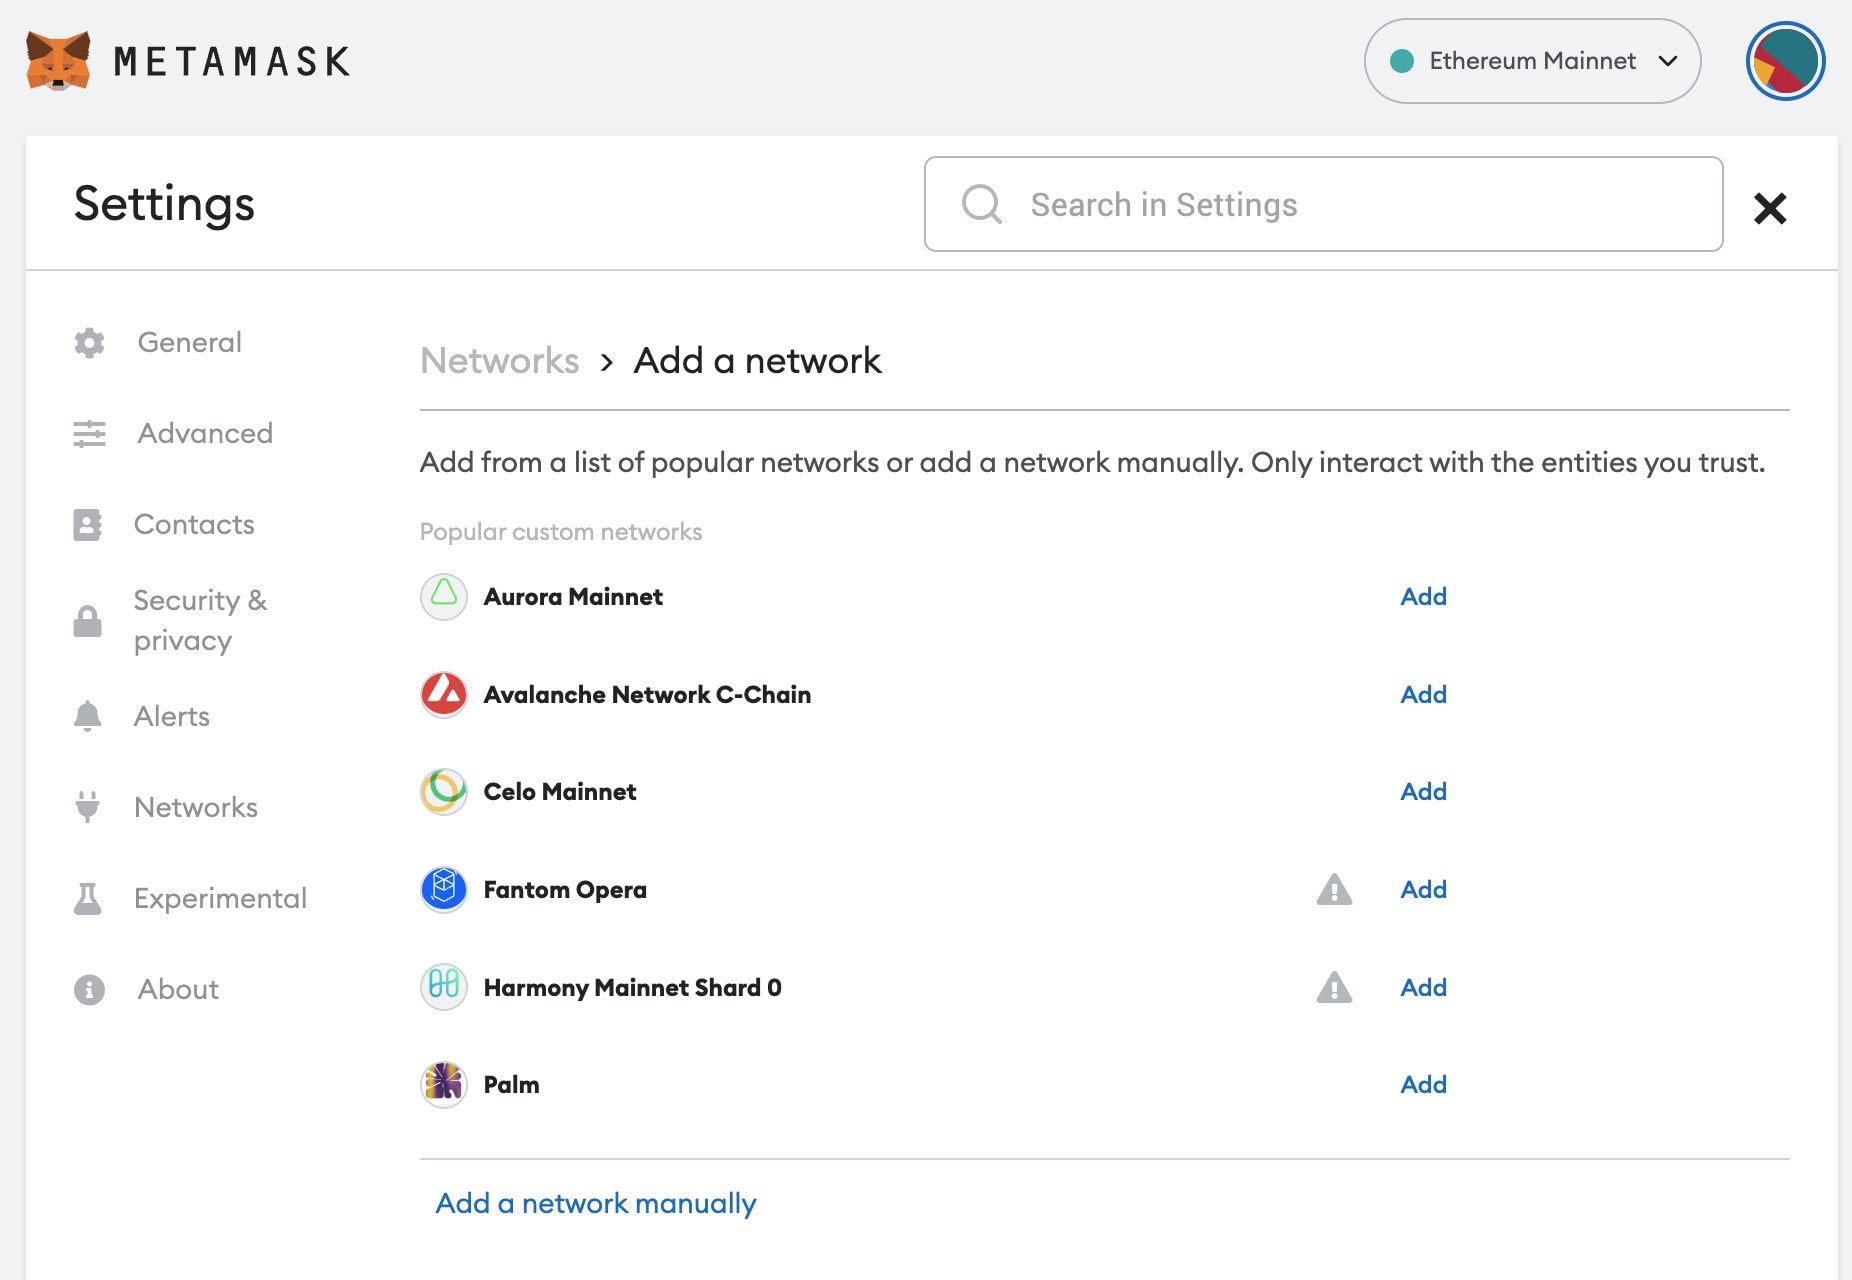
    If you can’t find your network, you can add it manually. Get the details from the project’s documentation and fill them in.

    Learn more about Ethereum Layer 2 networks such as Arbitrum, Optimism, Polygon and Ethereum 2.0 here.

    Adding a network using Chainlist

    Here’s how to add a network to your MetaMask using Chainlist :

    1. Connect your MetaMask to Chainlist.
    2. Find the network you want to add and click “Add Chain”.
    3. On MetaMask, click “Approve”, then “Switch network”.

    How to use MyEtherWallet with MetaMask?

    MyEtherWallet is a free program that helps people make wallets and use smart contracts. On their website, click “Access my wallet” and “Browser extension”. On MetaMask, pick your wallet, then press “Next” and “Connect”. You’ll then be able to see the MyEtherWallet dashboard. Here, you can check your portfolio, manage your NFTs, send and receive cryptocurrency, and sign messages.

    MetaMask Fiat On-Ramps: Buy Crypto Using Debit or Credit Cards!

    MetaMask makes it easy to buy cryptocurrencies without ever leaving the app. It works with Coinbase Pay, Transak and MoonPay, so you can use your credit card or Google Pay to purchase different types of digital coins. Depending on the company, you’ll be able to buy a variety of cryptocurrencies. Here’s how to do it:

    1. On MetaMask, click “buy” and choose which company you wish to buy from.
    2. On the page, select how much crypto you want to buy, the payment method, and the type of cryptocurrency. Then click “Buy now”.

    How to withdraw money or cryptocurrencies from MetaMask

    To take out your money or digital currencies from MetaMask, you must first transfer them to an exchange that can turn them into fiat currency. To do this, look at our list of the Top Cryptocurrency Exchanges 2023. This will help you find a platform that can convert your crypto into the currency you need.

    1. Have a cryptocurrency exchange account set up. For recommendations, check out our Top Cryptocurrency Exchanges 2023.
    2. To send your cryptocurrency from MetaMask to a crypto exchange, it’s best to first convert your cryptocurrencies into one of the more popular coins, like Bitcoin or Ethereum. This makes it simpler to send all your coins in one go, and also because these two coins are accepted by most exchanges.
    3. On the exchange, sell your cryptocurrency for fiat currency.
    4. Withdraw your fiat currencies (USD) to your bank account.

    How to collect airdrops using MetaMask?

    Airdrops are a great way for people to get free tokens, which is like getting FREE MONEY. To get the tokens, you will need to do certain tasks. After that, you will need to connect your MetaMask wallet to collect and sell the tokens. Here’s how to collect airdrops using MetaMask:

    1. Go to the airdrop site.
    2. Depending on the project, you may need to change your network. To do this, click on the top bar on MetaMask and select your network.
    3. Connect your MetaMask to the site. The button is usually at the top right-hand corner.
    4. Choose which wallet you want to connect to the site.
    5. Click the claim button on the website.
    6. Confirm the transaction on MetaMask and pay any gas fees.
    7. After you are done, disconnect from the airdrop site by clicking on the three dots on MetaMask. Then “Connected Sites” and disconnect.

    Don’t know where to get airdrops? Check out Upcoming Crypto Airdrops.

    Cash out your crypto to fiat using MetaMask

    MetaMask has launched it’s long-awaited Sell feature, allowing users to finally cash out their crypto to fiat on MetaMask. Currently, MetaMask allows you to cash out your crypto to fiat currencies such as USD, EUR and GBP. Your converted currencies can also be directly deposited to your bank account or PayPal. Note however that MetaMask’s Sell feature is only available in some states in the US, UK, and parts of Europe. Also for the time being, MetaMask Sell only supports ETH on Ethereum Mainnet. However, more layer 2 networks will be supported soon.

    Here’s how to sell or cash out crypto to fiat using MetaMask

    1. Connect your wallet

      Go to. https://portfolio.metamask.io/ and connect your wallet.

    2. Go to Sell page

      Click on “Sell” on the left hand menu bar.

    3. Select region

      Select your region. Note that MetaMask Sell is only available in some states in the US, UK, and parts of Europe.

    4. Select token and network

      Select the token and network you want to sell from. For example, ETH on the Ethereum Mainnet network.

    5. Select destination account

      Select where you want your cashed out fiat to be deposited (e.g. bank account or PayPal balance).

    6. Enter sell amount

      Enter the amount of crypto you want to sell. Note MetaMask Sell currently only supports ETH.

    7. Select quotation

      MetaMask will provide a range of quotations from different providers. Select your preferred quote to continue.

    8. Link fiat account

      You will then be redirected to your selected provider’s website to sign up and link your fiat account. Afterwards, you will be directed back to MetaMask Portfolio.

    9. Send crypto and confirm transaction

      Click “Send ETH to [Provider]” to send your crypto from your wallet to your fiat account. Then, confirm the transaction.

    10. Track your transaction

      Go to the “Sell” tab to track your transaction. Please note that transaction speeds may vary and your fiat currencies may take a few days before it appears in your bank account or Paypal balance.

    MetaMask tips, tricks, and hacks for ADVANCED users

    Congratulations on setting up your account! Now you are ready for ADVANCED tips and tricks such as:

    1. How to reduce transaction fees;
    2. how to cancel incorrect transactions;
    3. how to use your Ledger cryptocurrency hardware wallet with MetaMask;
    4. how to save your frequently used contacts (addresses) to MetaMask;
    5. how to speed up stuck transactions….and more!

    Check out our video which will walk you through the process step by step:

    Advanced MetaMask tips and tricks you MUST know

    Frequently Asked Questions (FAQs)

    Is MetaMask good for beginners?

    MetaMask is absolutely suitable for beginners, if not essential for every cryptocurrency trader. MetaMask also has a clean and straightforward interface. The fact that it is an extension of your browser also makes it very easy to use.

    Is MetaMask safe?

    MetaMask has not suffered any major hacks. However, there are ongoing phishing attacks by outside parties against MetaMask users.

    Halborn, a cybersecurity firm, discovered a case in June 2022 where a compromised computer had unencrypted private keys on its disk. MetaMask has since fixed this vulnerability in its extension versions 10.11.3 and later.

    What are some MetaMask scams?

    Halborn, a cybersecurity company, has cautioned MetaMask users about active phishing scams. These scammers send emails with the MetaMask header and logo, asking people to verify their wallets by following KYC regulations. If the recipient clicks on the call to action button, they are taken to a fake website. This website then requests the user to enter their seed phrases, which the scammers can use to steal their crypto funds.

    These MetaMask scam emails can usually be identified by spelling mistakes in the email e.g. “metamaks.auction”. Another red flag in the email is that it is not personalised.

    When should I use MetaMask or cryptocurrency hardware wallets such as Ledger Nano S, Ledger Nano X or Trezor?

    For everyday transactions, MetaMask is a great choice. However, for larger amounts of money, it is best to use a hardware wallet. The Ledger Nano S, Ledger Nano X and Trezor are all secure options.

    How do I fix stuck transactions on MetaMask?

    MetaMask can have transactions stuck when too many people are trying to process them on the network. To fix this, you can speed up the transaction. To do this, click “speed up” on MetaMask, then select the options available. Choose “Fast” and click “save”. This will create a new transaction with higher gas fees, but it will make the transaction go through faster.

    How do I buy Ethereum (ETH) on MetaMask

    Buying Ethereum on MetaMask is easy. MetaMask has partnered with Coinbase Pay, Transak, or MoonPay (depending on the country) to make it simple. All you have to do is click “Buy” on MetaMask, then pick which company you want to buy ETH from. You can compare each company’s rates and payment methods to decide which one you like best. After that, in the pop-up window, select the amount you want to buy and your payment method, then click “Buy Now”

    How to cancel transactions on MetaMask?

    To undo a transaction on MetaMask, press the “Cancel” button on the MetaMask window. If you chose a lower fee option, it will take longer for the transaction to go through, but it will also give you more time to cancel it

    How to use MetaMask on mobile?

    MetaMask is available for both iOS and Android mobile devices. And can be downloaded on the Google Play Store or the Apple App Store.

    How to connect MetaMask to website?

    MetaMask is available as a web browser extension for Chrome, Firefox, Brave, Edge and Opera. You can download the extension on their website and install it.

    How to use MetaMask on Andriod?

    You can download MetaMask for Android from the Google Play Store.

    Disclaimer: Cryptocurrency trading involves significant risks and may result in the loss of your capital. You should carefully consider whether trading cryptocurrencies is right for you in light of your financial condition and ability to bear financial risks. Cryptocurrency prices are highly volatile and can fluctuate widely in a short period of time. As such, trading cryptocurrencies may not be suitable for everyone. Additionally, storing cryptocurrencies on a centralized exchange carries inherent risks, including the potential for loss due to hacking, exchange collapse, or other security breaches. We strongly advise that you seek independent professional advice before engaging in any cryptocurrency trading activities and carefully consider the security measures in place when choosing or storing your cryptocurrencies on a cryptocurrency exchange.

  • Enjin Wallet Review and Tutorial (2022)

    Enjin Wallet Review and Tutorial (2022)

    Enjin Wallet Review

    Enjin wallet is a secure and easy to use mobile cryptocurrency wallet (iOS/Android). It’s extremely simple to use and contains advanced features such as Dapp Browser, QR code airdrops, Cryptocurrency Exchanges and Enjin’s own NFT marketplace integration. It’s the most secure mobile wallet we’ve tested with a two-layer security encryption and secure keyboard. Enjin wallet supports a wide range of cryptocurrencies such as Bitcoin, Ethereum (all ERC-20 and ERC-1155 Tokens), Binance Chain, Litecoin, Polkadot and Kusama. Enjin wallet is created as a companion to the Enjin Platform.

    Best Software Wallet Award

    Enjin Wallet is our Gold Award winner in the Free / Software wallet category. We were impressed by the wallet’s security features such as custom memory sweeps and double encryption. Enjin wallet is our top recommendation for any beginner who wants to keep their cryptocurrencies safe.

    Is Enjin Wallet Safe to Use?

    Security is the biggest concern for wallets as hackers are known to attack various wallets and attempt to steal funds. Enjin wallet offers the best in class security for mobile wallets.

    • Two-layer encryption: Hardware AES and software encryption is employed on the lower and application layer respectively
    • Secure keyboard: The protected keyboard bars keyloggers and/or data sniffers from tapping into your mobile device to steal data. It can also be randomized to increase security.
    • Screenshot blocking and Random Access Memory (RAM) encryption: The wallet’s operating system level restricts screenshots and video recording. On the memory level, transactions are conducted on a secure RAM.
    • Custom libraries: Enjin Wallet features custom libraries that remove the private keys from the device memory after use – significantly reducing the attack service.
    • Protection processor flaws: special code is put in place to deal with flaws in ARM processors.
    • Security Audited: ORU security team found no issues that could be used to compromise the wallet or the cryptographic keys stored in the system (full security report here)
    • Samsung Blockchain Keystore support: Enjin supports the Samsung Blockchain Keystore for private key protection under Samsung’s military grade security Knox.

    Mobile wallets are classified as a “Hot Wallet” – meaning this wallet is connected to the internet. The Enjin team has devised special counter-measures to deal with hackers attempting to steal cryptocurrencies. All private keys are double encrypted, so even if hackers stole the file it cannot be decrypted. On top of this, the special designed Enjin keyboard deals with keyloggers – making sure that the on-device decryption process is safe. Lastly Enjin used custom libraries to wipe the private key from device memory once the transaction is sent – unlike other mobile wallets.

    We added many security features that regular wallets don’t have. Enjin Wallet cannot be Keylogged and not affected by CPU flaws like Meltdown and Specture.

    Witek Radomski CTO of Enjin

    Hot wallets are generally considered less safe due to possible device based vulnerabilities (CPU or Memory flaws) which could compromise the security of the mobile phone. That being said, Enjin wallet’s can be considered to be the best out of all mobile wallets. For large amounts of cryptocurrency storage, we recommend the use of cold wallets like the Ledger Nano X.

    We found the security of Enjin Wallet to be the best among mobile wallets, with external security audits confirming our viewpoint. We give it the highest security rating of 4/5 – the highest possible rating for “hot wallets“.

    Security: 4/5

    What Cryptocurrencies does Enjin Wallet Support?

    The Enjin wallet supports the storage of Bitcoin (BTC), Ethereum (ETH), Litecoin (LTC), Binance Coin (BNB), Binance Chain tokens (BEP2), Polkadot (DOT), Kusama (KSM) and Ethereum-based tokens. For Ethereum-based tokens, Enjin supports those created using the ERC20 and ERC1155 standards. Select ERC-721 collectible tokens are also supported, namely for God’s Unchained, CryptoKitties, Blockchain Cuties and Axe Infinity.

    Did you know that Enjin introduced the ERC1155 token standard? Learn more with our ERC1155 token explainer.

    The ERC1155 tokens fit into the Enjin ecosystem as these tokens can represent in-game assets. This fits perfectly into Enjin’s game development ecosystem for blockchain-based games.

    The wallet allows users to sort, view, and show virtual currency balances in your local currency. Enjin’s partners Bancor, Kyber, and Changelly allow you to easily swap tokens.

    Multi-currency Support: 4/5

    Enjin Wallet Exchange Interface
    Enjin Wallet Cryptocurrecy Exchange Interface

    Design and interface

    The Enjin wallet sports a clean and intuitive design. The wallet also allows you to easily switch from viewing your balances in cryptocurrency or the equivalent in your local fiat currency. This is extremely helpful in allowing you to know how much your portfolio is worth with a simple glance.

    What is also helpful is the ability to easily create additional wallets. So say if you send or receive cryptocurrencies for different purposes, you can create a wallet for each of them (kind of like having partitions in your actual physical wallet) which makes managing your finances very convenient and easy to trace.

    One slight gripe I have about the Enjin wallet is that when you look at the individual cryptocurrency balances in your wallet, there is a discrepancy in the balance shown at the top and the bottom (which is the correct balance). Though this does not affect your usage of the wallet, you just need to know and accept that the bug is there.

    Incorrect balance shown
    The balances shown are inconsistent, the one circled in red is actually correct

    Despite this, Enjin wallet makes up for it with the fact that features the cleanest interface out there and additional functions not seen in any other software wallet. Because as we will see below, the Enjin wallet is more than a really good software wallet. The wallet is only one small part of Enjin’s whole gaming ecosystem. Rather, the wallet opens up additional features such as a QR code scanner, wallet for in-game collectible items and marketplace for you to trade these collectibles.

    Software design: 5/5
    Ease of use: 5/5

    Final thoughts- my experiences with Enjin wallet

    I personally store small amounts of crypto on the Enjin Wallet so I can trade, or pay or receive crypto on the go. It has an easy to understand interface with a wide range of supported coins. So I have no hesitation to use it as my primary wallet. I had friends who were new to cryptocurrency and were completely overwhelmed when hearing other people talk about hardware wallets, exchanges and crazy hacks. I showed them my Enjin Wallet and it only took them less than 30 minutes to install and master. My guess is that without Enjin wallet’s simple and easy to understand design, they would have not bothered with cryptocurrencies at all. 6 months on, they are now trading cryptocurrencies regularly.

    Enjin Wallet Ecosystem

    Collectable Token Support

    Enjin has created its own ERC-1155 digital token standard which can be used to create both fungible (currencies) and non-fungible (NFT) (digital cards, pets and in-game skins) assets on the Ethereum Network.

    With the Enjin wallet, you can receive, send or melt these NFTs. The NFTs can be collectable items or in-game assets.

    You can use the wallet to trade NFTs with your friends and there are Telegram forums dedicated to buying and trading collectibles!

    Boxmining NFT collectable items
    Boxmining NFT collectable items

    To learn more about all the games and the Enjin Multiverse, check out their website. Though a fantastic feature, the Enjin Mintshop, where you could mint your own NFTs was unfortunately deprecated upon launching the public mainnet of the Enjin Platform in 2020.

    Boxmining collectable items are frequently given out as a way to say “Thank you!!” to our fans. Subscribe to Boxmining’s YouTube channel and click the notification bell so you don’t miss out!

    Scan for QR Airdrops (Enjin Beam)

    Enjin Beam QR giveaway
    Enjin Beam QR giveaway

    These giveaways could be found on various websites, games, and promotions on the Boxmining Channel. The Enjin Beams can take two forms: Airbeam, which sends all users the same collectible, or Lootbeam, which includes a variety of assets of varying rarities, so each user is likely to get different combinations of these loot assets. Read more about Enjin Beam here.

    Enjin Wallet Marketplace

    Digital Collectible items (ERC-1155 tokens) can be directly sold on the Enjin marketplace using the built in features of the Enjin Wallet. This first of a kind feature allows gamers to trade items safely without any risk by using ethereum smart contracts. Items can be listed on the marketplace by using the “sell” feature in the Collectibles tab. The procedure is a 1 step process where seller directly inputs a selling price and confirms by executing the contract on Ethereum (paying gas in the process). The item will be directly listed on the Enjin Marketplace for public purchase.

    Exchange Function

    Enjin’s partners Changelly, Bancor, and Kyber allow users to easily swap between different cryptocurrencies. All you need to do is type in the amount and type of cryptocurrency you want to convert and the cryptocurrency you want to convert it to. The amount you will receive and the details of the transaction will be automatically calculated and displayed you. If more than 1 exchange offers the type of conversion you want, the information will be displayed for you to compare and choose the one that’s best for you. Then all you need to do is press “convert” and it’s done!

    Marketplace

    The Enjin wallet also allows you to directly access their Marketplace, where you can browse and buy various NFTs. Payment can be made directly from your Enjin wallet.

    Dapp Browser

    Enjin Dapp Browser Support
    Enjin Dapp Browser Support

    Enjin wallet includes one of the best Decentralized App Browser we’ve ever seen. The clean user interface displaces the various Exchanges, Financial, Games and Social Media Services.

    Remember to check out our Enjin Guide to learn more about Enjin’s ecosystem and what’s next for Enjin.

    Enjin Wallet Tutorial: How to Set Up Enjin Wallet

    Downloading and setting up your Enjin wallet is super easy and most importantly, its FREE.

    First you will need to download the Enjin wallet app from the Apple App Store or Google Play Store.

    Open up the app, select “crypto wallet” and then “create wallet“.

    Select the password you want for your wallet. When setting up your passwords and later backing up your wallet, make sure you are in a secure environment where you are not being recorded. Thieves will be able to access your wallet if they obtain this information.

    Then, select which cryptocurrencies you would want to hold in your wallet. You can always add or remove more types of cryptocurrencies later. Then press “create wallet“.

    The app will then ask if you want to backup your wallet. This is so that you can reinstate your wallet at a later date, for example when you change your phone and need to reinstall everything. So it’s highly recommended to do this step, even though it may seem tedious.

    The backup is a 12 word recovery phrase that you will need to correctly re-enter to reinstate your wallet. So keep these 12 words recorded and stored in a safe place. See here for some ideas and tips on how to keep your recovery phrase safe.

    You will then be asked to verify your passphrase by entering 2 of your 12 word recovery phrase at random. You will then be taken to the select coins menu where you have another chance to select the coins you want to hold in your wallet. Again, you can choose to add other coins later. If you are happy with the list of coins selected, click “create wallet“. The setup is then completed and you will then be taken to the main page of your wallet.

    How to Send and Receive Cryptocurrency Using Enjin Wallet

    Sending Cryptocurrency

    On the main page of your wallet, select the cryptocurrency you wish to send.

    For this demo I will be sending Bitcoin, so I selected “BTC”.

    Then on the following page (second picture below), select “send“. On this page you can also see your transaction history for this cryptocurrency. Note: the balance shown on the top left hand side of the second picture below is sometimes inaccurate. This is a bug in the app which hasn’t been fixed yet. However this is only a display issue and does not affect your actual wallet balance which is displayed in the larger font.

    On the send page (third picture below), I usually select “Advanced mode” which allows you to type in the number of satoshis per byte you wish to send your cryptocurrency with. The more satoshis per byte, the faster the send and of course the higher the transaction fee.

    On the send page you have 3 options for inputting the receiver’s address, either: (a) type in the address; (b) paste the address; or (c) scan the recipient’s QR code address.

    For the demo I will scan the recipient’s QR code address, so I selected the QR code icon on the top right hand corner, which opens up my phone’s camera, as shown in the second picture below. There I can either choose a QR code from my photo gallery, or in this case, I scanned the QR code of the recipient.

    Once you’ve scanned the recipient’s QR code you will be brought back to the send page (first picture below) with the recipient’s address filled in. In the second entry you can enter in the amount you wish to send or simply click “ALL” to send the entire balance in your wallet. And in the third entry the number of Satoshis per byte, which as mentioned will determine how fast your transaction will be sent.

    To see how many satoshis per byte I would want to send my cryptocurrency with I go on the website whatthefee. This website gives an estimate of how fast my transaction will go through at any given time (second picture below). On the table, the figures in black represent the percentage likelihood a transaction will take a given length of time. The figures in the middle represent the number of satoshis per byte. So for example, the green shaded entry on the top right hand corner means that with 20.1 satoshis per byte, there would be a 95% chance your transaction will go through in 0.5 hours. The higher the satoshis per byte, the faster my transaction and consequently the higher the transaction fee.

    Once you’ve entered in the recipient’s address, send amount and satoshis per byte, click “next step“. This will bring you to the confirm transaction page (third picture above). Here you can double check that the details are correct, if it is, click “send now“. Now you are all done!

    Receiving Cryptocurrency

    On the main page of your wallet, select the cryptocurrency you wish to receive. If the cryptocurrency you want to receive is not shown, click the “+” button on the top right hand corner, select the coin you want to receive and then click “update coin list”.

    For this demo I will be receiving Bitcoin, so I selected “BTC”. Then on the following page, select “receive“. Your Bitcoin address will then be displayed in the form of a string of letters and numbers, or a QR code representing your address. You can then either (a) copy the address and give it to whoever will be sending your cryptocurrencies; or (b) have them scan your QR code address.

    Note: the balance shown on the top left of the second picture below is sometimes inaccurate. This is a bug in the app which hasn’t been fixed yet. However this is only a display issue and does not affect your actual wallet balance which is displayed in the larger font.

    When the cryptocurrency is successfully sent to your wallet, the balance on your main page will be updated. Tip: You can select the small circular arrows next to “value” to display the balance in your local currency or the cryptocurrency itself.

    Congratulations! You are all set!

    Successfully set up your Enjin wallet? Learned how to send and receive crypto? Now it’s time to get started with trading Bitcoin and other cryptocurrencies! Check out my course created in collaboration with Jeff Kirdeikis of Uptrennd- Bitcademy: Learn, Invest & Trade Bitcoin – In Under an Hour

    Enjin Wallet 2.0

    Enjin is also currently enrolling users in testing its Enjin Wallet 2.0 Beta, although it’s only available for Android users. This new wallet will be a completely re-written Enjin Wallet from the ground up, including all of the code to ensure better performance, stability and reliability, as well as a completely new UX and design.

    If you want to participate in testing the Enjin Wallet 2.0 Beta, you can sign up here!

    FAQs

    How to download the Enjin Wallet?

    The wallet is available for use on mobile devices powered by iOS or Android operating systems. Download the Enjin wallet on the Apple App Store or Google Play Store.

    Can I import cryptocurrencies from other wallets to the Enjin wallet?

    The Enjin wallet allows coins to be imported from other cryptocurrency wallets. Examples of cryptocurrency wallets are: Bread, Eidoo, Exodus, Coinomi, MetaMask, Trezor Model T, Ledger Nano S, Ledger Nano X and Jaxx.

    The wallet uses an extremely interactive and secure user interface. This eliminates the confusion of copying and pasting addresses.

    How does Enjin bring NFTs to Video Games?

    One of the key features unique to the Enjin Wallet is the ability to bind the wallet to various video games. So together with the ability to send and receive, scan QR codes and their Marketplace, players can obtain NFT tokens representing various in-game items and import them into different video games. This allows players to truly own digital assets – the items are not stored centrally on databases but on the Ethereum blockchain instead. (https://www.hanakaimaui.com/)